


Control execution time
of particle dynamics
There are several ways to control when particle dynamics operate:
Change the start frame for a particle object
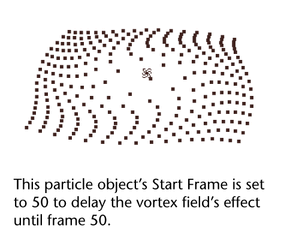
Each particle object has a Start Frame attribute that sets the time at which effects begin. For example, you can delay the effect of a vortex on a particle object until the frame of your choice.
As another example, suppose you create a character that walks through dust particles lying on a floor. The dust is connected to gravity, a floor collision object, and an air (wake) field on the character’s feet. You want the air field on the feet to stir up the dust starting at frame 100.
You can set the dust’s Start Frame to 100 to delay dynamic calculations for the dust until there’s a need for the calculations. This speeds up scene play and prevents the particles from bouncing slightly from the gravity and collision effect.
You could also prevent the dynamic calculations for dust by keying Is Dynamic off for the first 100 frames. However, by setting the Start Frame to 100, you also avoid having to wait for run-up calculations for the first 100 frames when you click a frame or scrub the Time Slider.
Note that when you create a particle object or an emitter emits a particle object, Start Frame is set to 1.0, by default. The value is the duration of a single frame in the current setting for time units.
To set the Start Frame of a particle object, select the particle object and enter a value for Start Frame in the Time Attributes section of the Attribute Editor.
An emitted particle object accepts emitted particles only at frames greater than or equal to its Start Frame. For example, to emit particles at frame number -5, set the Start Frame of the emitted particle object to -5 or less.
Control the timing of particle dynamics
With dynamic animation, you specify the actions you want an object to take, then let the software figure out how to animate the object. Historically, it has been challenging to synchronize this animation method with other actions. For example, it has been hard to increase the velocity of emitted particles in synch with a musical score coming to a crescendo.
Maya has a feature that overcomes such difficulties. Each particle object has a Current Time attribute that you can animate to slow or hasten a particle effect. This attribute contains the value of an independent clock time. In essence, you slow or speed the particle object’s clock to slow or speed the dynamics that affect it. See Understand the Current Time attribute for more details.
An emitter shoots particles up in a 150-frame animation. The following steps show how to control the velocity of the particles by keying Current Time.
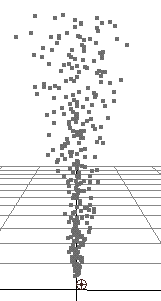
At the beginning of the animation (frame 0), the Current Time of the emitted particles is synchronized with the scene time. Both have the value 0.
At frame 50, the Current Time is keyed to 100, twice the value of the scene time. For frames 0 through 50, this adds twice as much time to the action of the emitted particles as the scene time. The emitted particles therefore move at twice the speed that would occur without the manipulation of the Current Time.
At frame 100, Current Time is keyed to 110. From frames 50 to 100, this slows the progression of time for the emitted particles relative to the scene time. The emitted particles move at a slower speed than would exist without the manipulation of the Current Time.
At frame 150, Current Time is keyed to 200, once again speeding the progression of time for the emitted particles. The particles move faster again.
Understand the Current Time attribute
Each animated particle object runs according to its own clock. You can make this clock independent of the scene clock that advances with the ticks in the Time Slider.
Each particle object has a Current Time attribute that contains its clock value. Unlike the scene clock’s time variable, you can set the value of the Current Time attribute with keys, expressions, or other animation techniques. While the scene clock is a timekeeper with fixed length increments, a particle object’s clock has variable increments that you set through the Current Time attribute. You can vary the increments to slow or speed dynamic effects on the particles.
For animation to occur in the particle object, its Current Time requires an input connection that changes as the scene plays. By default, the scene’s predefined time variable provides input to Current Time.
If you use a nonparticle shape expression to assign a value to Current Time, the value is interpreted as the type of Time units specified in the Settings category in the Window > Settings/Preferences > Preferences window. If an fps rate is selected, for instance, Film (24 fps), the Current Time value is interpreted as frames.
For example, suppose you’ve set Working Units Time value to Film (24 fps). This means your animation uses the frame number as the time value. Suppose further you use the following expression statement:
currentTime = 50;
The 50 is considered frame 50, rather than, say, 50 milliseconds.
Note that you can animate a decreasing Current Time to achieve effects such as an emitter sucking previously emitted particles back into itself. To see the results of this effect, you must turn on Cache Data for the emitted particles and play the animation.
Execute expressions after particle dynamics
Runtime expressions execute before or after dynamics in each frame, depending on what you selected when you created the runtime expression.
In pervious version of Maya, you had to choose whether a particle shape runtime expression executed before or after its dynamics were computed. In Maya, you can specify when you create the runtime expression whether it is to be executed before or after dynamics calculation.
For example, suppose you use a gravity field to drop particle blobs on a character, then you write a runtime expression for the blob object’s position to prevent its particles from penetrating the character’s surface. If you created that expression as a runtime before dynamics, you might see some surface penetration because the gravity field executes after your position-constraining expression. You can create or copy this expression to Runtime after dynamics so the residual effect of the dynamics doesn’t interfere with your expression.