Use constraints to style hair curves. For example, a constraint could act as a clasp holding hair back or in a ponytail. There are various types of constraints you can create: Rubber Band, Stick, Transform, Hair to Hair, Hair Bunch, Collide Sphere and Collide Cube. For descriptions of the constraint types, see Hair constraint types. The last two constraint types are implicit collision constraints and work differently than the other constraint types; see Work with collision hair constraints.
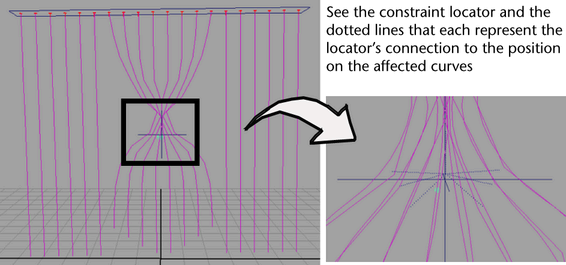
When you create a constraint, the constraint is set to affect the selected hair curves. The identification of these hair curves is stored in the curveIndices attribute in the hairConstraint node. The ID represents the index of the hair (UV grid location) on the hair system.
At the start frame the simulation determines the nearest points on the constrained curves to the constraint node position. If the current frame is less than or equal to this start frame you can move the constraint node and the connection to the nearest points updates. As the simulation runs the constraint works only on this initial set of points, not the entire curve. The constraint type determines how the simulation deals with this set of points.
This ensures the constraints don’t apply any force to the hairs at the start of the simulation, but instead constrain the simulation as it progresses. In general you should apply constraints after modeling and determining the hair start positions and shapes. If the model’s position at the simulation start frame is to be edited or to be set up for different scenes, you might want to group the constraints under a hair follicle node or under the object transform so that the relative position to the hair at the start frame doesn’t change (since the constraint is always defined relative to the Start Position, with the exception of the Hair Bunch constraint).
The constraint acts by applying forces to the set of points. The amount of force applied is scaled by the constraint’s Stiffness attribute. There is also a Glue Strength attribute that determines a threshold beyond which the attachment of the constraint to a point is broken. The point is glued to the constraint at the start frame. The moment the force being applied by the constraint exceeds the glue strength the constraint breaks and the point becomes unconstrained for the rest of the simulation. A glue strength of 1 is infinitely strong and will never break. The strength required for a constraint to snap in the middle of a simulation is touchy and may require some experimentation with different glue values (between 0 and 1) for the break to occur at a desired point (if desired, you could animate the glue strength from 1 to 0).
Since a constraint only affects one point on each of the selected curves, you may want to apply several constraints located at different positions to the same set of curves in order to constrain multiple points on those curves.
These are descriptions of the constraint types.
This is like attaching rubber bands from the constraint to the point set. The length of each rubber band is the distance from the constraint to the point at the start frame. If the distance between a point and the constraint becomes greater than the rubber band length a force is applied pulling it toward the constraint.
This is like attaching sticks from the constraint to the point set, where the sticks may rotate freely about the constraint center. This is similar to the Rubber Band constraint, except that when the distance between the constraint and points is less than the start distance a repulse force is also applied (in addition to the attractive force when the distance is greater). This tends to keep all the constrained points at a fixed distance (the distance at the start frame) from the constraint center.
This is like constraining the points to a block of jelly at the start frame. Unlike the Stick constraint, when the constraint node is rotated or scaled it will pull along the constrained points. The transform on the constraint node is effectively the transform for this block of jelly. This is useful when constraining hair to fall along a contact point, like a shoulder. Also this can be used to simulate hair being grabbed and twisted by a hand. If you animate the constraint's scale the hair can be pulled together or pushed apart.
This allows you to bind hairs together (like with a ribbon) where the hair group is free to move with respect to the constraint position. This is like a Stick constraint where the actual constraint is free to move with the hair. The constraint position is only referenced at the start frame, after which the internally used constraint is dynamically updated.
This can help create body to the hair as it animates in a fashion similar to self collision but with much less computation. The initial set of points nearest the constraint will repel each other where they overlap (according to the clump widths). There is also a slight static cling where the points stick together slightly when they touch. If the hair clumps overlap at the start frame they may suddenly push apart (unlike the other methods, which have no force at the start of a simulation). You could run the simulation until it stabilizes then set the Start Position to handle this problem.
Inserts a sphere or cube that behaves as an implicit collision object. Transform the sphere or cube as needed. For more information, see Work with collision hair constraints.
Work with collision hair constraints
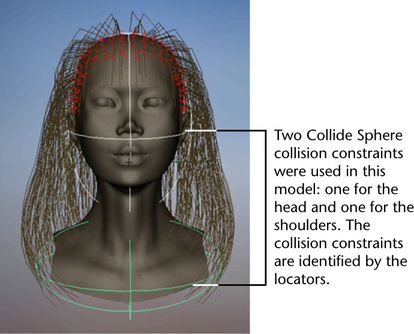
Unlike the other hair constraints, Collide Sphere and Collide Cube work on the entire hairs, not just a particular hair CV. These objects have several advantages over collision with geometry.
Typically you would use several of these constraints grouped under the transforming geometry, approximating the shape of the geometry in colliding regions like the head and shoulders. For organic objects you might want to use several spheres, scaling some into ellipsoids. The Collide Cubes are best for walls and flat surfaces, although in some cases the sharp edges can lead to stability problems that don't occur with spheres. However, low Stiffness values for Collide Cube constraints tend to smooth out the cube edges.
On the other hand, highly non-proportionally scaled spheres can have problems with points sliding towards the edges (most curved regions). This is not a problem with the non-proportionally scaled cubes.


