Render the scene using
caustics
To render using caustics you need to turn on specific settings or attributes. There are two sets of caustic-related attributes that you must initially set.
You initially render the scene using these attributes at their default settings to see how they affect the rendered image and then compare it to the previous raytrace rendering. As you gain more experience rendering with Caustics you will better understand what settings to initially use.
To turn on the caustics preset settings

This turns on the presets that control the quality of the caustics.
Mental ray for Maya uses photons to simulate the caustic effects in a scene. Photons are small packets of energy emitted from a light source into the scene. The photons travel throughout the scene, refracting through transparent objects or reflecting off reflective surfaces. The renderer keeps track of the illumination that results from this photon emission in a file called a photon map. The overall caustic simulation is determined from the photon calculations that result.
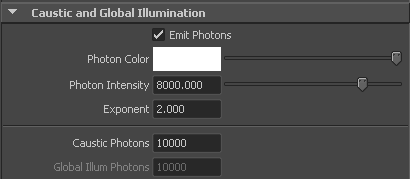
In addition to having the spotlight emit light into the scene you set the light to also emit caustic photons. The overall caustic effect is determined from the photon calculations that result.
To turn on the caustics lighting settings
Rendering the scene with caustics
Now that the lights are set to emit caustic photons and the caustics preset is turned on, you’re ready to render an image using caustics.
To render the scene using caustics

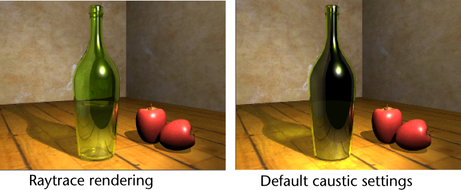
This image differs from the previous one in the following ways:
Adjusting the refraction levels
When the refraction levels are set too low, light rays do not refract through all of the surfaces enough to provide a realistic indication of a translucent surface when raytraced. This results in the object appearing opaque when it should appear translucent.
Increasing the Refractions setting allows the renderer to calculate what is seen through the surfaces of the glass by allowing the light rays to refract the correct number of times.
In the next step, you change the Refraction settings so that the bottle will appear translucent when rendered.
To increase the refraction levels
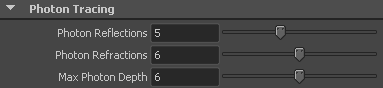
The Refractions setting sets the number of times a light ray can be refracted. When the setting is too low the ray does not penetrate through all of the surfaces. The Max Trace Depth setting limits the total Refraction and Reflection settings. By setting it to 8, you ensure that two reflection and six refraction calculations can occur.
Photons refract in a manner similar to light rays when rendering. Increasing the Refractions setting for the Caustic Photons ensures that the renderer can correctly calculate the caustics that should occur with the bottle. In this case, matching the Caustic Photon refraction settings with the Raytracing refractions is a good practice.
To increase the photon refraction settings
The Max Photon Depth setting limits the Refraction and Reflection calculations for the Caustic Photons to the limit set. The Photon Refractions setting is similar to the Refractions setting for raytracing but sets the refractions for the Caustic photons. Close the Render Settings window.
Increasing the brightness of caustics
Increasing the Photon Intensity setting increases the brightness of the refracted caustic that appears in the shadow of the bottle.
To increase the Photon Intensity
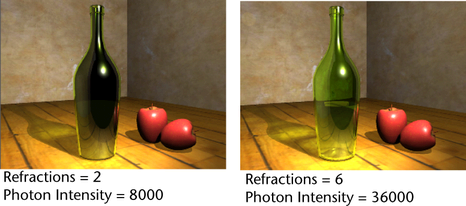
The translucency of the glass now appears more realistic. The caustic effect is more evident in the shadow of the bottle. However, the spotted effect, that appeared on the surface in front of the bottle, is more pronounced. These spots are the result of a low caustics quality setting.
Adjusting the quality of caustics
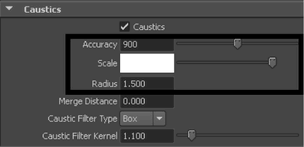
The quality of the caustic effects in a scene is primarily affected by the number of photons, the accuracy of sampling, and the radius surrounding the sampled area of illumination. (If you have previously completed the Global Illumination tutorial, you may notice similarities in this area.)
In the next steps, you return to the Render Settings window and the Attribute editor to increase the quality attributes that affect the caustics effect.
To increase the caustics quality settings
The Accuracy determines how many photons will be evaluated to determine the Caustic intensity at a given sampling point. Radius determines the size of the region surrounding the particular sampling point. The more photons that get sampled, the more realistic the caustic effect appears in the final image.
Increasing the number of caustic photons that get emitted into the scene also increases the quality of the caustic effect. When you increase the number of caustic photons you increase the density of the resulting photon map that gets produced at the beginning of the render process. The more photons, the smoother the resulting caustics effect.
To increase the number of caustic photons
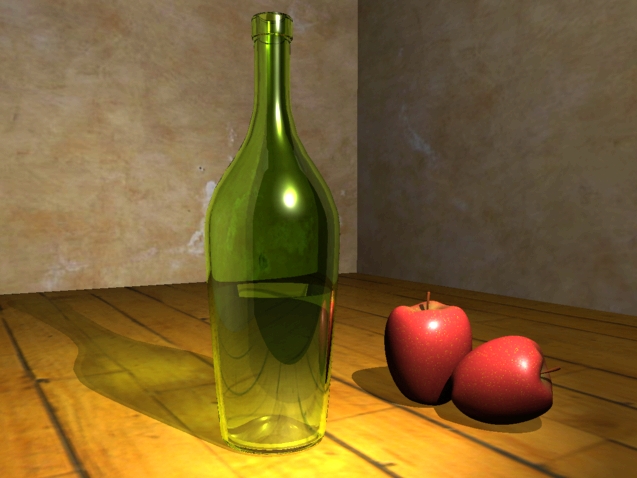
In this image the bright spots in front of the bottle should be reduced when compared to the previous images. The caustic in the bottle’s shadow should also appear more pronounced and more evenly illuminated.