Create double-sided shaded surfaces


For more information about double-sided surfaces, see Double-sided shaded surfaces.

To create a double-sided shaded surface

  1. In the Hypershade, create one of each of the following:
  2. Assign the Phong material to the surface.
  3. In the Hypershade, middle-drag the Checker texture onto the Condition utility to open the Connection Editor.
  4. In the Connection Editor, connect the Checker’s Out Color attribute to the condition utility’s Color If True attribute (click the Out Color attribute in the Checker column, then click Color If True in the Condition column).

  5. In the Hypershade, middle-drag the Crater texture onto the Condition swatch, and in the Connection Editor, connect the Crater’s Out Color to the Condition’s Color if False attribute.
  6. Middle-drag the SamplerInfo swatch over the Condition swatch to open the Connection Editor.
  7. In the Connection Editor, click the Flipped Normal attribute then click the Condition’s First Term or Second Term attribute.

  8. In the Hypershade, middle-drag the Condition swatch onto the Phong material swatch and select color to connect it to the Phong’s Color attribute.
  9. Perform a test render.

    Maya shades each side of the surface with a different texture.

Swapping the textures on the surfaces

For more information about double-sided surfaces, see Double-sided shaded surfaces.

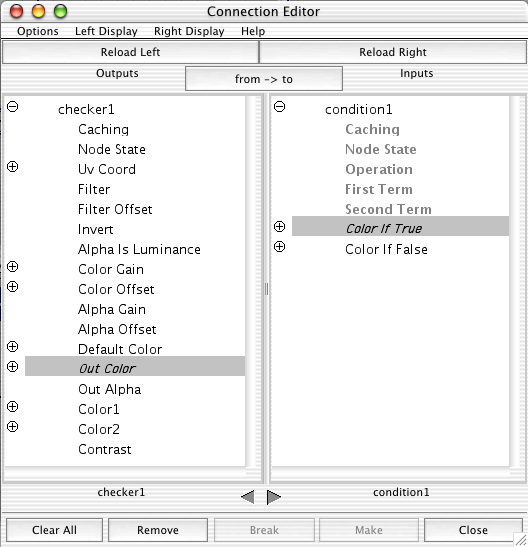
You can use the Condition utility to specify which texture is applied to the front and back sides of the surface. For more information about the condition utility, see Condition.

To swap texture mapping for double-sided shading

  1. Double-click the Condition swatch in Hypershade to open its Attribute Editor.
  2. In the Condition Attributes section, change the Operation attribute to Not Equal (or if it is set to Not Equal, change it to Equal).
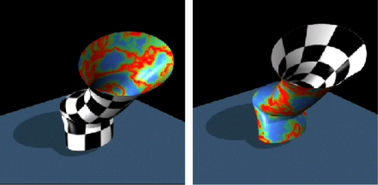
  3. Perform a test render. The following shows the result.

    NoteYou can apply more than one material to polygonal models at the face level.