


Learning Resources > Tutorials > Getting Started with Maya Unlimited > nParticles > Creating a smoke simulation with nParticles >
Lesson 1: Creating an nParticle system
In the first step you create an nParticle object and its emitter object. An emitter controls the position, direction, quantity and initial velocity of the emitted nParticles when they are born (emitted into the scene).
To ensure the lesson works as described, do these steps before beginning:
This file can be found in the GettingStarted directory that you set as your Maya project:
GettingStarted/nParticles/Smoke_Simulation_1.mb
This scene includes textured models that have been created for you. The desk, ashtray, and cigarette provided are all polygon meshes.

Creating an nParticle and emitter object
To create an nParticle and emitter objects
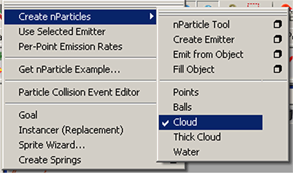
Selecting Cloud presets some nParticleShape attributes that are suitable for simulation such as smoke, dust, or fog.
 .
.
The Emitter Options (Create) window appears.

Naming your emitter object makes it easier to identify in the Outliner when you want to select it and make attribute adjustments.
Selecting a solver determines which Maya Nucleus system your nParticles belong to.
Volume emitters are well suited when you are trying to evenly emit particles from a specific area, such from the tip the cigarette, as opposed to a single point in space.
This sets the number of particles that are emitted into the scene. This directly impacts the particle density in the scene. The higher the emission rate the thicker the smoke appears in your scene.
Direction sets the emission direction relative to the emitter’s position and orientation. When DirectionY is set to 1, the nParticle are emitted along the Y axis to emulate the smoke rising in the air.
This creates some directional noise in the emitted nParticles and causes them to form a cone-shape particle cloud.
This setting adds speed in the direction specified by the Direction XYZ attributes of all volume emitters.
An Emitter_Smoke1, nParticleShape1, and a nucleus1 node appear in the Attribute Editor.
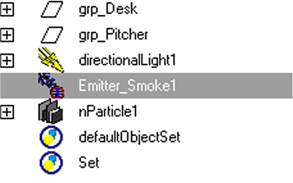
When you create a new nParticle object, a new Nucleus system is created. As part of a Nucleus system, the nParticles can interact with other Nucleus objects that are assigned to the Nucleus solver. If you created an emitter for your nParticles, an emitter node is also created. The following sections describe the new nodes in your new Nucleus system.
nParticleShape1 is the node that carries all the nParticle object attributes that define the appearance, size, and overall behavior of each particle in the nParticle system.
Emitter_Smoker1 is the nParticle emitter node, which carries all the particle emission attributes such as particle emission rate and emitter type. This node also carries the transformation attributes (translation, rotation, scale) for the emitter object. The emitter node used by nParticles is the same emitter node used by Maya classic particles.
nucleus1 is the Maya Nucleus solver node, which carries all the attributes affecting the solver system, including internal forces. For more information, see Maya Nucleus solver properties.
In this lesson you were introduced to the basic concepts of nParticles and the Nucleus dynamics system. In addition, you learned how to:
When you create an nParticle object and emitter, a Nucleus node is also created.
For more information and related techniques about nParticles, refer to the Maya Help.