


Learning Resources > Tutorials > Getting Started with Maya Unlimited > nParticles > Creating a smoke simulation with nParticles >
Lesson 3: Adding Nucleus wind to the simulation
Like Maya classic particles, you can use fields to animate the motion of nParticles and create the effect of nParticles flowing around obstacles, as well as other effects, such as explosions, tornadoes, and rocket exhaust. See the Dynamics tutorials in the Getting Started with Maya for particle tutorials that use fields. Although some nParticle attributes are different than Maya classic particle, you can still obtain similar results using nParticles to complete the particles, emitters, and fields section of the Dynamics tutorials.
With nParticles, you can also use the dynamic wind that is generated by the Maya Nucleus solver to affect the motion of your particle. Gravity and Wind forces that are generated by the Nucleus system are different from the Maya dynamic forces that you create when using Maya field. Nucleus forces are internal, in that they only affect Nucleus objects. Nucleus object that are assigned to the same Nucleus solver are affect by the same intensity of the solver’s wind and gravity.
To ensure the lesson works as described, do these steps before beginning:
This file can be found in the GettingStarted directory that you set as your Maya project:
GettingStarted/nParticles/Smoke_Simulation_3.mb
This scene includes textured models that have been created for you. The desk, ashtray, and cigarette provided are all polygon meshes.
In this lesson, you use the Nucleus solver wind to influence the smoke so that it drifts as it rises. Any other Nucleus objects (nCloth objects or other nParticle objects) that are assigned to the same Nucleus solver would also be affected by the force of the wind.
To set Nucleus wind in your simulation.
Wind Speed determines the force and intensity of the wind. A higher value means a fast wind speed, which has a more pronounced effect on the smoke.
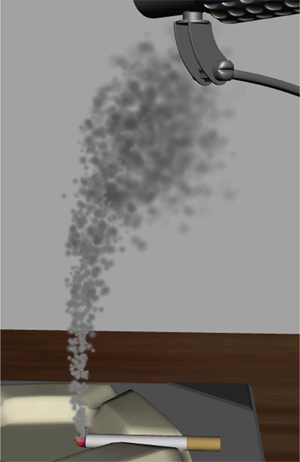
The smoke is now dispersing over a larger area and it is drifting toward the desk light.
You can continue to adjust your smoke simulation settings, such as increasing the nParticle emission rate to 150 or adjusting the curves on the Radius Scale, Color, and Opacity Scale ramps.
In this lesson, you learned how to add Nucleus wind to your nParticle effect. You can experiment with the Nucleus solver’s Wind Speed, Wind Density, and Wind Direction attributes to change the direction of the rising smoke. You can also add Maya fields, such as Volume Axis, Turbulence, or Radius, fields to effect the behavior of the smoke.
For more information and related techniques about nParticles, refer to the Maya Help.