User Guide > Rendering and Render Setup > Shading > Shading Nodes > Material nodes - Maya software > Surface materials >
Ramp Shader
You can find this material in the Create bar.
The Ramp Shader is a material (shader) that you can use for extra control over the way color changes with light and the view angle. You can simulate a variety of exotic materials and tweak traditional shading in subtle ways.
All the color-related attributes in the Ramp Shader are controlled by ramps (gradients). Graphs let you avoid complex shading networks by making certain looks, like toon shading, easier to achieve.
You can set the many attributes of the Ramp Shader to control the appearance of objects.
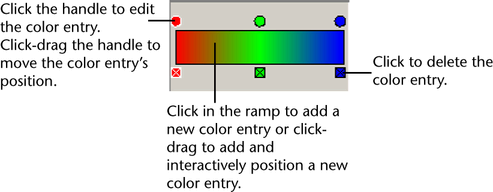
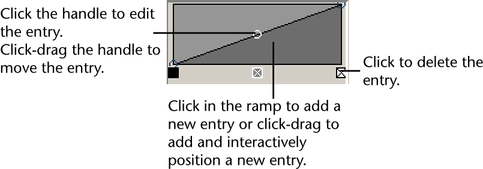
Each color entry in a ramp has a circular color handle above the ramp, and a square color icon below the ramp. The active color has a white border around its color handle and icon.
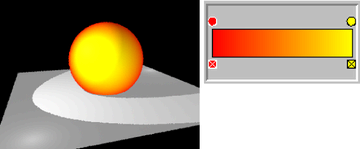
Color: two entries, black at 0.5 and surface color at 1.0
With Interpolation > Linear, this should be the same as a normal lambertian falloff. Using Interpolation > Smooth makes the linear shading artifacts disappear.
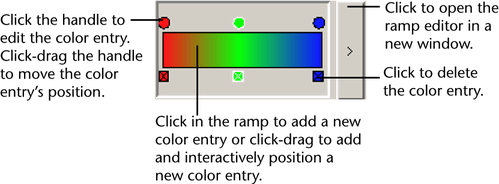
Working with the Ramp Editor in a separate large window
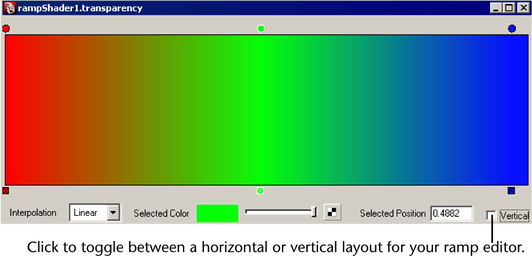
Click the arrow on the right side of the ramp to open the Ramp Editor in a larger window. In this window, you can edit the interpolation method, the selected color, and the color entries. In addition, you can check and uncheck the Vertical box to toggle between a vertical or horizontal layout for your Ramp Editor.
Checking the vertical box alters the size of your Ramp Editor. Once you check the vertical box, the Ramp Editor automatically adjusts to a suitable size.
When you save your scene, Maya also saves the layout that you have chosen for your Ramp Editor and the corresponding window size.
In addition to color entries, you can also add texture entries to the ramp. You can map a texture to both the position or the color of a ramp.
Mapping the color of a ramp index to a texture
Click the handle above the ramp and then click

beside the Selected Color attribute in the Attribute Editor (or Ramp Editor) to map a texture. You can map textures to your ramp in both the Ramp Editor and within the Attribute Editor. However, you only see the effect of the texture in the material sample swatch and in the shader icon (in the hypershade), not in the Ramp Editor.
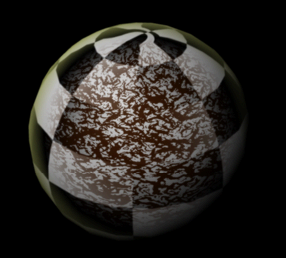
Consider the following example. Three entries have been entered into the ramp, the first a color entry, the second a check texture, and the third, a mountain texture.
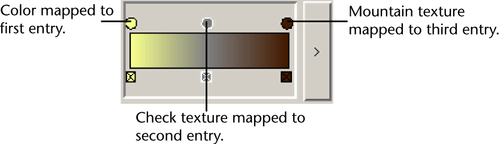
The rendered result illustrates the surface color transitioning (ramping) from a yellow color to a checkered texture to a mountain texture.
Mapping the position of a ramp index to a texture
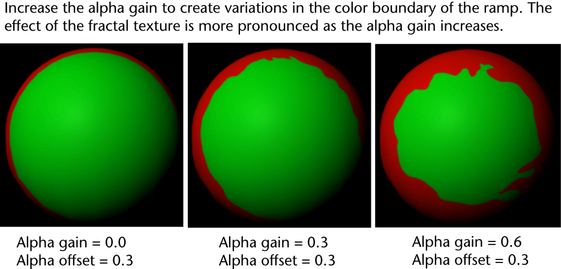
You can map the position of a ramp index to a texture to achieve interesting effects. Using this technique, you can create variations within the color boundaries of a ramp. For example, you can make the boundary between two colors a blurry, noise-like pattern using the noise texture. Alternatively, you can experiment with the settings to create complex effects such as natural looking watercolors, or making the gradient more blurry in some areas and sharper in others.
Click the handle above the ramp to select it. Right-click the Selected Position attribute in the Attribute Editor (or Ramp Editor) and choose Create New Texture to map a texture.
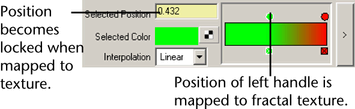
After you have mapped a texture to the position of a handle, the position field becomes locked (the text box appears yellow). The position is now fully defined by the texture that you have chosen.
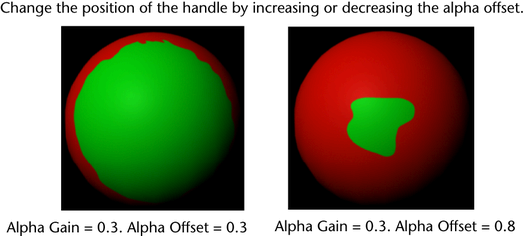
To alter the position of the handle, expand the Color Balance section of the texture in the Attribute Editor. Increase or decrease the Alpha Offset value.
To alter the effect of the texture, increase or decrease the Alpha Gain value.
For more interesting effects, you can also alter the Interpolation method of the ramp in the Attribute Editor. See Interpolation for more information.
You can map textures to your ramp in both the Ramp Editor and within the Attribute Editor. However, you only see the effect of the texture in the material sample swatch and in the shader icon (in the hypershade), not in the Ramp Editor.
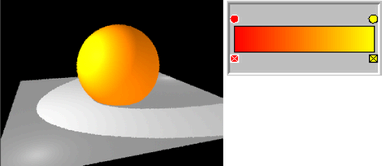
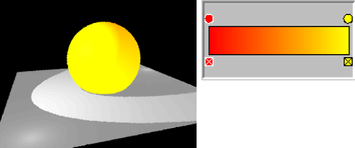
Consider the following example. Two color entries have been entered into the ramp, the first of which has its position mapped to a fractal texture.

The basic color of the surface.
Interpolation
Controls the way colors blend in the ramp. Select an option from the drop-down list: None, Linear, Smooth, Spline. The default is Linear.
Color Input
Determines how the color is spread over the surface. Select an option from the drop-down list: Light Angle, Facing Angle, Brightness, Normalized Brightness. The default is Light Angle.
The position along the ramp is determined by the angle of the light with the surface normal. The right side of the ramp is the color where the normal points directly towards the light. The center of the ramp represents the point at which the surface normal is perpendicular to the light. The left side is the color where the normal faces directly away from the light. The color values to the left of the ramp center is not be visible unless the shader has some translucency. This takes into account all lights in the scene.
The total light brightness is used to index the ramp. This can be used to create cartoon style shading by using a ramp with stepped values. The right side of the ramp is the output color where the brightness of the diffuse and translucent lighting is 1.0 or greater. The left side is the output color where the brightness is zero.
The Normalized Brightness option is similar to the standard Brightness option, but the total light is normalized. Changing the overall light intensity does not affect shading. This option is useful for Toon shading where you may want the color band spacing to be relatively fixed, even when the lighting setup may be complex.
Controls how transparent or opaque the material is, as well as the transparency color. Black, the default, is completely opaque and white is completely transparent. You can set it to any level in between. If there is more than one index in the ramp then the transparency value varies with the facing angle.
For descriptions of the attributes, which are the same as the Color attributes, see Color.
Makes a material appear as if it were emitting light, such as lava or a phosphorescent moss. The default color is black, which has no effect on the surface. If there is more than one index in the ramp the incandescence value varies with the facing angle.
For descriptions of the first few attributes, which are the same as the Color attributes, see Color.
See Ambient Color.
See Bump Mapping.
See Diffuse.
Controls how much of the light is diffusely scattered along the light direction. At a value of 0 the light is scattered uniformly in a lambertian fashion, which is good for most surfaces. Some materials, such as skin, scatter the light more along the forward direction so values larger than zero may help in simulating these materials.
See Translucence.
See Translucence Focus.
See Translucence Depth.
Controls how big the specular highlights, or hot spots, are. For more information, see Specular Shading attributes (Blinn).
Is the color of the specular reflections, also called hot spots, on the material. The final color of a specular reflection is a combination of the Specular Color and the color of the light. By making the Specular Color brighter or dimmer, you can control the brightness of the specular reflections on an object. If there is more than one ramp index, the specular color varies based on the brightness of the highlight.
For descriptions of the attributes, which are the same as the Color attributes, see Color.
This modulates or scales the intensity of the specular highlight. The facing ratio is the input to the graph. Making the graph slope down to the right simulates the fresnel effect, where objects with a low refractive index are more reflective towards the edge (where the normal is perpendicular to the view). Water and wax both have a relatively low refractive index, thus this can help simulate the look of a waxed car finish, an ocean surface or a wet object. The horizontal dimension of the graph represents the brightness of specular reflections and the vertical represents the facing angle with the view.
Specular Roll Off does not affect the reflections produced when you render using raytracing.
This functions in the same manner as specular roll off, but modulates the environment and reflected color instead of specularity. It also affects raytrace reflections. Reflectivity is used to make an object reflect light and its environment like a mirror. Set to 0 for no reflection. Increase the value to make brighter reflections. Note that brighter reflections hide more of the base surface color. This attribute is only meaningful if there is a reflection map, or if you are raytracing the render.
For descriptions of the Selected Position, Selected Value, and Interpolation attributes, see Specular Roll Off.
Defines a simple sky to ground environmental reflection using a ramp. The left of the ramp is the top of the sky and the right is the bottom.
For descriptions of the Selected Position, Selected Color, and Interpolation attributes, see Color.
Affects the color of light reflected from the material. You can map an image, texture, or environment map to this attribute in order to make fake reflections, which are less expensive than raytracing. This is called reflection mapping. Reflection mapping and raytracing may be used together, in which the reflection map is used as background, and raytraced reflections appear in the foreground.