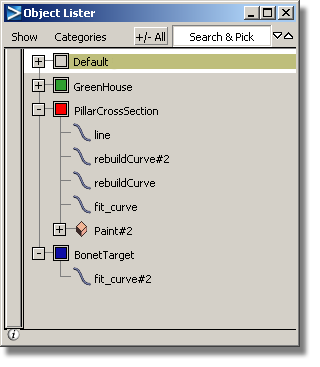
Opens the Object Lister. The Object Lister provides a structured view of the components of the scene.
The object lister organizes your scene based on either modeling layers (By Layer), or in the following order: Canvases, Construction Entities, Group Nodes, followed by all other geometry (By Object). Choose which view you want from the Show menu.
When you first open the
Object Lister, the hierarchy structure is closed. To open a section, click
the plus (+) icon. To expand all groups in a layer or object,  -click a plus icon. To expand
all layers or groups, click the +/- All button.
Click it again to collapse all.
-click a plus icon. To expand
all layers or groups, click the +/- All button.
Click it again to collapse all.
Hold to pick several adjacent
objects, or  (Windows) or
  (Mac) to pick several non-adjacent
objects.
(Mac) to pick several non-adjacent
objects.
Any objects picked in the scene can be easily located by clicking on the small up and down arrows.

If there are several items picked, each one will be scrolled to in turn in the direction you have picked. When the end of the list is reached, the display scrolls to the start.
 . When ordering By
Layer, clicking on a layer also makes it the construction
layer.
. When ordering By
Layer, clicking on a layer also makes it the construction
layer.
 to display a pull-down menu
of layer operations (such as Visible, Symmetry, Assign, and so on).
to display a pull-down menu
of layer operations (such as Visible, Symmetry, Assign, and so on).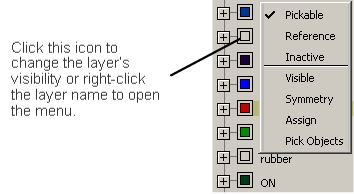
on the layer icon or click
with the on a layer color swatch
to open the layer color palette.
Click an object (curve,
surface, and so on) with the to display a pull-down menu
containing the following choices:
If sorting By Object, the following choices also appear:
All layers in the scene are shown in the object lister.
Only modeling layers that have been set to Reference are displayed in the Object Lister and scene.
Only modeling layers
that have been picked are displayed in the Object Lister and scene.
To pick layers, click their names. To pick a number of layers, -click to pick layers that
are contiguous, or -click (Windows) or -click (Mac) to pick layers
that are separated from each other.
The Search
& Pick field at the top right of the Object Lister
window helps you dynamically sort and arrange objects. For example,
if you have a large model, and want to group all the Rail surfaces,
type “Rail” in this field, then press  (Windows) or
  (Mac). All objects whose
names start with “Rail” (case insensitive) are picked in the Object Lister,
as well as the modeling window. You can scroll up and down in the
Object Lister to check the picked objects and can cross-check in
the modeling window.
(Mac). All objects whose
names start with “Rail” (case insensitive) are picked in the Object Lister,
as well as the modeling window. You can scroll up and down in the
Object Lister to check the picked objects and can cross-check in
the modeling window.

Hold the (Windows) or (Mac) key and click to unpick
any rail object that is not required for the group. Then create
a new group node or put the rail objects in an existing group node.
If a collapsed group node has a picked Rail object, the group node expands, to make it easier to find the picked geometry.
You can also use the “*” character as a wildcard. For example, *shell* will find all objects whose names contain the string “shell”, and *30 will find all objects whose names end with “30”.