To complete the design, you will use a Plane surface to create the front of the casing, and a Surface Fillet to trim and fillet it to the chamfered surfaces.
You will use Layer Symmetry and Mirror to create all the surfaces for the front casing.
Finally, you will duplicate the front casing to create the rear casing, and organize all the geometry onto layers.
Opening the tutorial file (optional)
If you successfully completed Part 2, proceed to the next step: Creating the Front Surface, below.

If you were not successful in part 2, open the file called MP3Player_Part3.wire, located in the wire directory of the CourseWare project. This file contains the completed model from Part 2.

Watch Part 3 of the tutorial.
First you will create the front face of the casing, and position it at the correct height for the MP3 Player dimensions.

 . You are prompted to enter
the new plane position. Use the
. You are prompted to enter
the new plane position. Use the  (Windows) or
  (Mac) key and grid snap
the plane to the origin.
(Mac) key and grid snap
the plane to the origin. 
The Plane surface is created 1mm square in size. It is already selected, so you will now scale and move the plane to form the front face of the casing.

Now you will set the pivot point for the Plane to the lower right-hand corner.
 + (Windows) or
  + (Mac)) to snap the pivot
accurately to the bottom right corner of the plane.
+ (Mac)) to snap the pivot
accurately to the bottom right corner of the plane.
(Windows) or (Mac) key) to position the
plane exactly at the origin.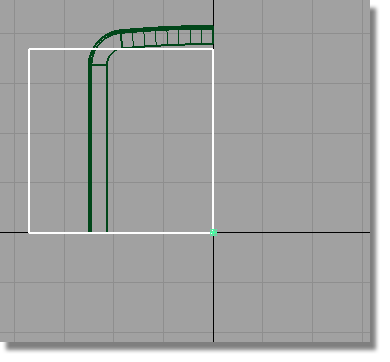
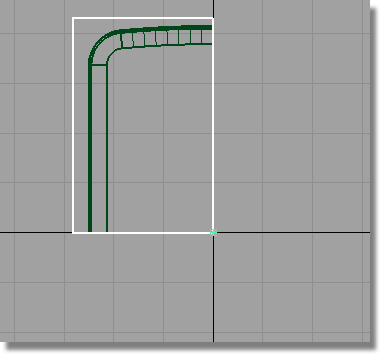
Next, you will move the plane up in the z-axis.


Now you will use the Surface Fillet tool to trim the front face and create an edge with a radius in one operation.

 and double-click the icon
to open the option window.
and double-click the icon
to open the option window.


Arrows appear on both surfaces indicating on which side the fillet will be built. In this case, we want the pink arrow to point down, and the yellow arrow to point inwards.

The edge with the specified radius is created and all the surfaces are trimmed.

 to complete the fillet.
Using Round for the Remaining Edges
Next you will create a radius on the remaining edges using the Round tool.
You could use either the Round or the Surface Fillet to create the softened edge. As the surfaces already meet at a sharp edge, the Round tool will be quicker to use.
 . You are prompted to select
a pair of edges. Click one of the edges between the chamfer and
the side surfaces.
. You are prompted to select
a pair of edges. Click one of the edges between the chamfer and
the side surfaces.
A radius indicator appears and is highlighted in white.


to complete the round.
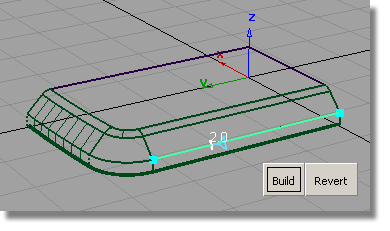
The MP3 Player casing is made from two similar components, the front and the back casing. You will complete the front and rear casings using the mirror tool and Layer symmetry.
First you will create the lower quarter of the front casing.
 and drag a selection box
over all the surfaces to select them.
and drag a selection box
over all the surfaces to select them.
 ❒ to open the mirror option window.

to deselect the surfaces.
You used mirror to create the lower surfaces, so that the top surfaces can be modified, by adding a screen, and the lower surfaces can be modified by adding buttons.
For the left and right sides of the design however, you want the geometry to be the same on both sides. So for the left and right sides, you will use Layer Symmetry to view a mirror image of the geometry, which will update as you continue to build surfaces.
 to create a layer for the
front casing.
to create a layer for the
front casing. 

and drag a pick box over
all the surfaces to select them.

The symmetry on layers is typically used in one of the three axis directions. Now you will set the Symmetry Plane so that your geometry is mirrored left to right.
The new layer is selected and shown in yellow. (If the layer isn’t selected, you need to click the layer tab to select it).
 .
.
The current symmetry plane is highlighted in yellow. You need to change this so that the geometry will be mirrored left and right.


The large yellow plane changes to the right axis for your model.
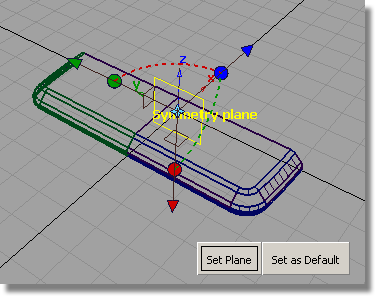


The geometry on the layer is mirrored and shown as dotted lines to indicate that it is only a visualization of the mirrored geometry, not real geometry.

Now is a good time to copy the surfaces for the rear casing, before you start to detail the front.
First you will create a layer for the rear.
and rename the layer Rear
Casing.
and drag a pick box over
all the geometry to select it.
❒ to open the option window.
Choose the XY plane and click Go.

The surfaces are mirrored.


