To use grid snapping to place a primitive cube
You may have noticed that some tools have a small yellow arrow in the top right corner.

This arrow indicates that more, similar tools are available in a hidden subpalette. To access the extra tools, click and hold the mouse to open the subpalette.
 icon.
icon.
The Surfaces > Primitives subpalette appears.
 on the different tools in
the subpalette to see their names.
on the different tools in
the subpalette to see their names.
The subpalette disappears. The Cube tool is selected and now occupies the space in the main palette where the Sphere tool was.
This time place the new primitive using grid snapping.


 button to turn on grid snapping.

The cube snaps to the grid intersections as you drag.
snap button again to turn
grid snapping off.
button, you can grid snap
by pressing and holding the  (Windows) or
  (Mac) key while you place
a primitive.
(Mac) key while you place
a primitive.
To use the palette menu to choose the Cone tool
This time use an alternative method for choosing tools from palettes.
The palette collapses to just the tab, and the other palettes move up to fill the space.
This feature is very useful for saving space in the palette window and in shelves. You can still choose tools from the palette using the palette’s menu.
 on the Surfaces palette’s
title tab to open the palette’s menu.
on the Surfaces palette’s
title tab to open the palette’s menu.
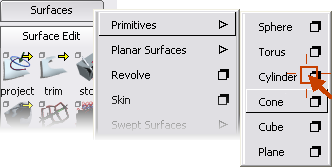
Just like the menus at the top of the screen, arrows indicate that an item in the palette menu has subitems.

You have now seen two different ways to choose a tool from a palette. From now on, when instructed to choose tools by name, for example:
“On the Surfaces palette, choose Primitives > Cone.”
you can either click the tool icon, or choose the tool from the palette menu.

To use tool options to add a half-cylinder
, click the title tab of
the Surfaces palette to open the
palette menu, then open the Primitives submenu.
Notice that some items have shadowed boxes next to the name of the item.

 (Windows) or
  (Mac) to set the sweep to
180 degrees.
(Mac) to set the sweep to
180 degrees.


This button applies the settings in the window and activates the tool.

As you specified in the option window, the cylinder has a 180-degree perimeter and is created from four sections (spans).
Like the symbol in the menu, this indicates the tool has options.
The Cylinder Options window appears.


