To show and hide the shelf window
The Shelves window appears.
Alias, however, provides another, even more convenient location for shelves. In these tutorials, you will use the shelf area in the control panel.
To help demonstrate how to make new shelves, clear the default shelves and make new shelves specific to these tutorials.
Before you clear the default shelves, save them, so you can retrieve them later.
 on the Shelf menu
button at the top of the control panel’s shelf area to open the
options menu.
on the Shelf menu
button at the top of the control panel’s shelf area to open the
options menu.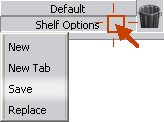
A file requester appears.
In the next procedure, you will start a new shelf of tools commonly used in curve fitting in preparation for the lesson on fitting curves to scan data.
To clear the existing shelf set and create a new one
on the menu button at the
top of the shelf area to open the options menu. Notice how the menu
button is now called Default, after the name of the
current shelf.
A requester appears asking for the name of the new shelf.

 key to clear the text, and
type CurveFit. Click OK to name
the new shelf.
key to clear the text, and
type CurveFit. Click OK to name
the new shelf.![]()
The old Shelf set is deleted and a new, empty shelf appears in the shelf area.
Now you can begin adding tools to the new shelf.
 , drag the Fit
Curve tool onto the CurveFit shelf
in the control panel.
, drag the Fit
Curve tool onto the CurveFit shelf
in the control panel.
The tool appears in the shelf.
You could move the entire Curve Edit palette onto the shelf by dragging its title tab, but you only want a selection of tools from the full palette.
Next, add curve drawing tools to the palette.
Since you will often need to create curves of different degree in technical surfacing, it would be useful to have customized versions of tools with different settings.
The shelf allows you to do this. When you drag a tool onto a shelf, the new copy of the tool keeps the settings it had when it was dropped on the shelf, independent of the original tool in the palette.
Using this technique,
create several versions of the two original curve creation tools,
New curve (edit pts  ) and New curve (cvs)
  .
.
For each version, assign different settings for the Degree option.
To add versions of the New curve tools to the shelf with different options
and open the tool’s option
window.
(Remember that you can also choose New Edit Point Curve from the palette menu).
The New Edit Point Curve option window appears.

The options let you set the knot spacing (parameterization) and degree of the new curve.


This icon represents the tool as configured with these settings.
on the tool icon at the
top of the option box and drag it to the CurveFit shelf.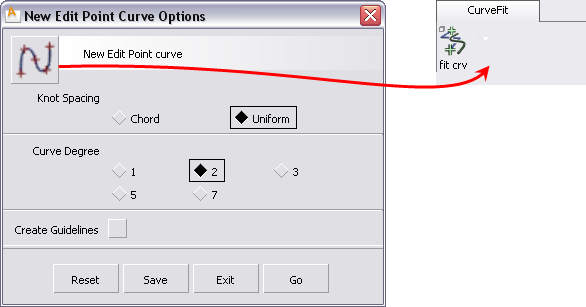
Now when you choose this icon in the shelf, the New Curve (edit pts) tool creates degree 2 curves.

to drag the tool icon at
the top of the option window to the shelf.
Another copy of the tool is added to the shelf. When you choose this copy of the tool, the New Curve (edit pts) tool will create degree 3 curves.
 to show the shelf’s menu.
Note that the two versions of the tool have the exact same name and icon.
To be able to distinguish between the tools, rename them.
If you cannot remember which is which, double-click the two icons to see their option windows. You want the version with the Degree option set to 2.
 (Windows) or
  (Mac) key and double-click
the tool icon.
(Mac) key and double-click
the tool icon.
A name requester appears.

(Windows) or (Mac) key and double-click
the second copy of the New Curve by Edit Points tool.
on the title tab of the
shelf to open the shelf menu.
The two copies of the tool are now distinguishable in the menu, but still have identical icons.
We recommend you keep the shelves collapsed and use the shelf menus to choose tools. This saves space in the shelf.
To remove a tool from the shelf
Let’s now assume that this was a mistake and you want to remove the tool.
over the tool’s icon in
the shelf.
The name of the tool appears.
held down, drag the label
to the upper-right corner of the window and position the cursor
over the trash can icon.
You can also delete groups of tools by dragging a tab with the middle mouse button to the trash can.
You may have noticed that icons are a bit crowded on the shelf. The large icons are good when you are learning which icon is which, but now you can switch to the small icon size to save space in the shelf.
To change to the small icon size


If you want, you can also turn on the icon labels option to display name labels for all the icons.

Alias loads smaller versions of all the tool icons.
You have seen how to create shelves with customized tools. In later lessons, you will load pre-made shelves containing all the tools you need to complete the tutorials.


