A Block controller is a global List controller that allows you to combine several tracks from multiple objects over a range of time, and group them as "Blocks." These Blocks are then used to re-create the animation anywhere in time. Blocks can be added, removed, scaled, moved graphically in Track View, and saved. Blocks can represent either absolute or relative animation.
For example to animate a hand forming a guitar chord, all the rotations of the fingers and hand can be saved as a block. This block can then be used to recreate the hand and finger position, rotation, and animation whenever the chord is played in an animation.
Essentially, block controllers allow you to build up libraries of animations and apply them to objects as you choose.
Master Block Parameters Dialog
After assigning a Master Block, right-click the MasterBlock track to display the Master Block Parameters dialog. This is the first step in creating a block.
With this dialog, you can save blocks and then load them later. Blocks are saved as BLK files.
The Track View Pick dialog is displayed when track selection is necessary; for example, when you click Add in the Master Block Parameters dialog. Select tracks in the dialog to include in a block. Valid tracks are shown as darker.
After you create a block by clicking Add in the Master Block Parameters dialog and then selecting tracks in the Track View Pick dialog, clicking OK in the Track View Pick dialog displays the Block Parameters dialog.
Attach Controls Dialog (Loading Blocks)
The Attach Controls dialog is displayed when you click Load in the Master Block Parameters dialog. Tracks in blocks saved previously can be mapped to tracks in the current scene.
Slave Parameters Dialog (Slave Controller)
Every time a block is created, all tracks within the block are assigned a slave controller, which allows the MasterBlock to transfer key data. The slave controller tracks appear with the original tracks you used to create the block. See Slave Parameters dialog.
Below the main MasterBlock track are subtracks. The first of these is always Blend. The remaining subtracks are initially copies of the tracks used to create the block.
 Assign, select Master Block in the dialog, and then click OK.
Choose a name that will remind you of the animation in this block.
The Block will contain animation between frame 0 and frame 10.
The block has been created, and you can now use it.
Example continued: To use a block:
The animation repeats at frame 20.
You can create a number of blocks for different periods of an object's animation, and use them at different locations in the MasterBlock track.
To scale (resize) an inserted block:
This creates a new instance of the block, which you can place at a different time.
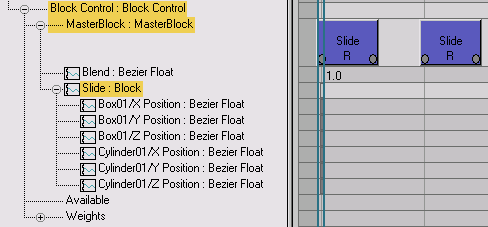
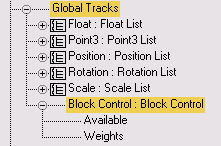
Inserted blocks appear in the Key window to the right of the MasterBlock controller in the hierarchy under Global Tracks.
Displays in Track View after you assign a Master Block controller to an available track.
You can right-click the track in the Key window. This displays a pop-up menu that shows the name of blocks that have been created. Choosing a block inserts the block into the MasterBlock track. The dialog also has an entry, Properties, that displays the Master Block Parameters dialog.
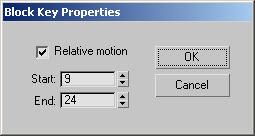
In the MasterBlock track, inserted blocks display as colored rectangles. The name of the block appears at the center. In the lower left and right corners are keys that indicate the beginning and end of the block's animation. Below the name of the block is the letter “R” for relative, or “A” for absolute. Click and drag the center of a block to move it in time. Select a key in the corner of a Block to move one edge of the block (scale time).
Right-click an inserted lock to display the Block Key Properties dialog (described below).
3ds Max opens this dialog when you click Load in the Master Block Parameters dialog. Tracks in blocks previously saved can be mapped to tracks in the current scene.
After clicking Add in the Master Block Parameter dialog and selecting tracks in the Track View Pick dialog to create a Block, clicking OK in the Track View Pick dialog opens the Block Parameters dialog.
After assigning a Master Block, right-click the Master Block track to open the Master Block Parameters dialog. This is the first step in creating a block.
Every time you create a block, all tracks within the block are assigned a Slave controller, which allows the Master Block to transfer key data.
3ds Max opens this dialog when track selection is necessary; for example, when you click Add in the Master Block Parameters dialog. Select tracks in the dialog that you want to include in a Block. Valid tracks are darker.


 (Curve Editor (Open))