Command entry:
Rendering menu

Effects
Environment and Effects dialog
Effects panel
Add
Add Effect dialog
Blur
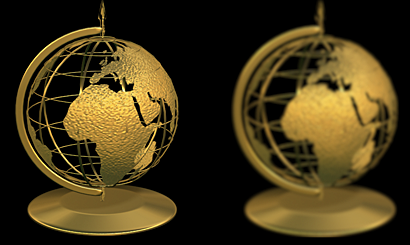
The Blur effect allows you to blur your image in three different methods: Uniform, Directional, and Radial. Blur works on
individual pixels according to selections made in the Pixel Selections panel. You can blur an entire image, non-background
scene elements, by luminance value, or by using a map mask. Blur can give your animation added realism by rendering the illusion
of object or camera movement.
Interface
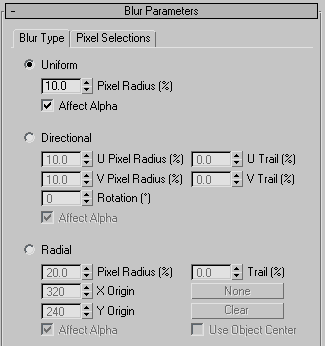
Blur Parameters rollout, Blur Type panel
- Uniform
-
Applies the Blur effect evenly across the entire rendered image.
- Pixel Radius
-
Determines the intensity of the Blur effect. Increasing the value increases the number of surrounding pixels that each pixel
will use to compute its blur. The more pixels used means a greater blur for the image.
- Affect Alpha
-
Applies the Uniform Blur effect to the alpha channel when turned on.
- Directional
-
Applies the Blur effect in any direction according to the Directional parameters. The U Pixel Radius and Trail blur the pixels
horizontally while the V Pixel Radius and Trail blur the pixels vertically. Rotation is used to rotate the axis of the horizontal
and vertical blurring.
- U Pixel Radius
-
Determines the horizontal intensity of the Blur effect. Increasing the value increases the number of surrounding pixels that
each pixel will use to compute its blur. The more pixels used means a greater horizontal blur for the image.
- U Trail
-
Adds “direction” to your blur by weighting more blur to either side of the U axis. This adds a streaking effect and creates
the illusion that your objects or your camera are rapidly moving in a particular direction.
- V Pixel Radius
-
Determines the vertical intensity of the Blur effect. Increasing the value increases the number of surrounding pixels that
each pixel will use to compute its blur, and creates a greater vertical blur for the image.
- V Trail
-
Adds “direction” to your blur by weighting more blur to either side of the V axis. This adds a streaking effect and creates
the illusion that your objects or your camera are rapidly moving in a particular direction.
- Rotation
-
Rotates the axis of the U and V pixels that will be blurred by the U and V Pixel Radius spinners. By using Rotation with the
U and V Pixel Radius spinners you can have the Blur effect applied to any direction in your rendered image. When rotation
is 0, U corresponds to the image’s X axis and V corresponds to the image’s Y axis.
- Affect Alpha
-
Applies the Directional Blur effect to the Alpha channel when turned on.
- Radial
-
Applies the Blur effect radially. Using the Radial parameters you can define a point within your rendered image to use as
the center of the Radial Blur. You can use an object as the center or an arbitrary location set by the X and Y Origin spinners.
The Blur effect will apply the least amount of blur to the center origin of the effect and gradually increase the blur to
the pixels further away from the center. This can be used to simulate motion blur caused by camera zoom.
- Pixel Radius
-
Determines the intensity of the Radius Blur effect. Increasing the value increases the number of surrounding pixels that each
pixel will use to compute its blur. The more pixels used means a greater blur for the image.
- Trail
-
Adds “direction” to your blur by weighting more or less blur toward the center of the Blur effect. This adds a streaking effect
and creates the illusion that your objects or your camera are rapidly moving in a particular direction.
- X/Y Origin
-
Specifies the center of the blur, in pixels, with respect to the dimensions of the rendered output.
- None
-
Lets you specify an object whose center serves as the center of the blur effect. Click this, select an object, and then turn
on Use Object Center. The object name appears on the button.
- Clear
-
Removes the object name from the button above.
- Use Object Center
-
When on, the object specified by the None button (tooltip: Pick an object to center on.) serves as the center of the blur
effect. If no object is specified and Use Object Center is on, no blur is added to the rendered image.
- Affect Alpha
-
Applies the Radial Blur effect to the Alpha channel when turned on.
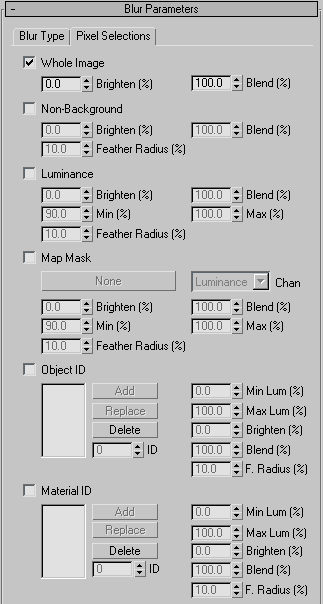
Blur Parameters rollout, Pixel Selections panel
- Whole Image
-
Affects the entire rendered image when chosen. This is useful when the Blur effect dims your rendered image. By using Brighten
and Blend you can maintain the original colors of the scene.
- Brighten
-
Brightens the entire image.
- Blend
-
Blends the Blur effect and the Whole Image parameters with the original rendered image. This can be used to create a soft-focus
effect.
- Non-Background
-
Affects everything but the background image or animation when chosen. This is useful when the Blur effect has dimmed your
scene objects but not the background. By Using Brighten, Blend, and Feather Radius, you can maintain the original colors of
the scene.
- Brighten
-
Brightens the rendered image except for the background image or animation.
- Blend
-
Blends the Blur effect and the Non-Background parameters with the original rendered image.
- Feather Radius
-
Feathers the Blur effect applied to the Non-Background elements of your scene. When using Non-Background as a Pixel Selection
you will notice that the scene objects have a hard edge to their blur since the objects are being blurred but the background
is not. Use the spinner to feather the blur and eliminate the hard edge of the effect.
- Luminance
-
Affects any pixels that have luminance values that fall between it’s Min and Max spinners.
- Brighten
-
Brightens pixels that fall between the Minimum and Maximum luminance values.
- Blend
-
Blends the Blur effect and the Luminance parameters with the original rendered image.
- Min
-
Sets the minimum luminance value necessary for each pixel in order for the Blur effect to be applied to the pixel.
- Max
-
Sets the maximum luminance value a pixel can have in order for the Blur effect to be applied to the pixel.
- Feather Radius
-
Feathers the Blur effect applied to pixels that fall between the Minimum and Maximum luminance values. When using Luminance
as a Pixel Selection the Blur effect can create a hard edge on the effect. Use the spinner to feather the blur and eliminate
the hard edge of the effect.
- Map Mask
-
Applies the Blur effect according to the channel selected and mask applied through the Material/Map Browser. After selecting
a mask you must select a channel from the Channel list. Blur then examines the mask and channel according to the values set
in the Minimum and Maximum spinners. Any pixels in the mask that are of the selected channel and between the Min and Max values
will have the Blur effect applied. This is useful for blurring selected portions of a scene such as a winter morning as seen
through a frost covered window.
- Channel
-
Selects a channel that the Blur effect will be applied to. After selecting a particular channel, use the minimum and maximum
spinners to determine the value a mask pixel must have in order to have the effect applied to it.
- Brighten
-
Brightens the portions of the image that the Blur effect is applied to.
- Blend
-
Blends the Map Mask Blur effect with the original rendered image.
- Min
-
The minimum value (RGB, Alpha, or Luminance) a pixel must have in order to have the Blur effect applied to it.
- Max
-
The maximum value (RGB, Alpha, or Luminance) a pixel can have for the Blur effect to be applied to it.
- Feather Radius
-
Feathers the Blur effect applied to pixels that fall between the Minimum and Maximum channel values. When using map mask as
a Pixel Selection, the Blur effect can create a hard edge on the effect. Use the spinner to feather the blur and eliminate
the hard edge of the effect.
- Object ID
-
Applies the Blur effect to an object or part of an object with a specific Object ID (in the G-Buffer), if the object matches the Filter settings. To add or replace an Object ID, use the spinners or enter a value in the ID
text box and then click the appropriate button.
- Min Lum
-
The minimum luminance value a pixel must have in order to have the Blur effect applied to it.
- Max Lum
-
The maximum luminance value a pixel can have for the Blur effect to be applied to it.
- Brighten
-
Brightens the portion of the image that the Blur effect is applied to.
- Blend
-
Blends the Object ID Blur effect with the original rendered image.
- F. Radius
-
Feathers the Blur effect applied to pixels that fall between the Minimum and Maximum luminance values. When using Luminance
as a Pixel Selection, the Blur effect can create a hard edge on the effect. Use the spinner to feather the blur and eliminate
the hard edge of the effect.
- Material ID
-
Applies the Blur effect to a material or part of a material with a specific Material ID Channel, if the material matches the Filter settings. To add or replace a Material ID channel, use the spinners or enter a value
in the ID text box and then click the appropriate button.
- Min Lum
-
The minimum luminance value a pixel must have in order to have the Blur effect applied to it.
- Max Lum
-
The maximum luminance value a pixel can have for the Blur effect to be applied to it.
- Brighten
-
Brightens the portion of the image that the Blur effect is applied to.
- Blend
-
Blends the Material Blur effect with the original rendered image.
- F. Radius
-
Feathers the Blur effect applied to pixels that fall between the Minimum and Maximum luminance values. When using Luminance
as a Pixel Selection, the Blur effect can create a hard edge on the effect. Use the spinner to feather the blur and eliminate
the hard edge of the effect.
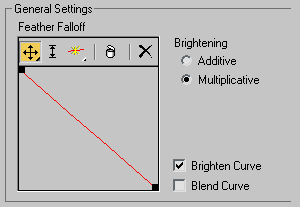
Feather Falloff control curve
The Feather falloff curve allows you to determine the feather falloff off the Blur effect based on a graph. You can add points
to the graph to create a falloff curve, and adjust the interpolation in those points.
- Move
-
Lets you move the points on the graph. This button is a flyout, providing free movement (the default), horizontal, and vertical
movement.
- Scale Point
-
Lets you scale the points on the graph. This moves each selected point vertically, in proportion to its previous value. Click
a point to scale, or draw a selection rectangle around several contiguous points to select them, and then drag any point in
the selection to scale them all.
- Add Point
-
Lets you create additional points on the falloff curve. This button is a flyout, providing linear points (the default) and
Bezier points with handle.
- Delete Point
-
Removes points from the graph.
- Brightening
-
These radio buttons let you select additive or multiplicative brightening. Additive brightening is brighter and more distinct
than multiplicative brightening. Additive brightening is useful when you use blur in combination with a Glow effect. Multiplicative brightening provides a soft highlight to the Blur effect.
- Brighten Curve
-
Lets you edit the brightening curve in the Feather Falloff curve graph.
- Blend Curve
-
Lets you edit the blend curve in the Feather Falloff curve graph.