In the real world, the intensity of light diminishes over distance. Objects far from the light source appear darker than objects near the source. This effect is known as attenuation.
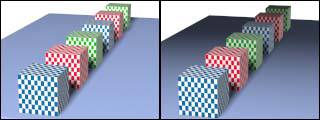
Image on right rendered with attenuation
In nature, light attenuates at an inverse square rate; that is, its intensity diminishes in proportion to the square of the distance from the light source. It is common for attenuation to be even greater when light is occluded by small particles in the atmosphere, especially when there are clouds or fog present.
Attenuation and Photometric Lights
Photometric lights always attenuate at the inverse square rate. This is one of the reasons it is important for scenes with a radiosity solution to use real-world dimensions and units.
Attenuation and Standard Lights
By default, standard lights don't attenuate. Consequently, an object's distance from the light doesn't matter, and only the angle of light to the surface has any effect on illumination unless you turn on attenuation. You can manually control the rate of attenuation for standard lights. You can also use attenuation with the Raytrace map. If your scene uses standard lights, you should consider adding attenuation whenever possible, for two reasons:
For standard lights, you can explicitly set where attenuation begins and ends. This is partly so you don't have to worry about setting up strictly realistic distances between light objects and the objects they illuminate. More importantly, this feature lets you fine-tune the effect of attenuation. In outdoor scenes, attenuation can enhance the effect of distance. In an indoor setting, attenuation is useful for low-intensity light sources such as candles.
For standard lights, you set attenuation parameters on the light's Intensity/Color/Attenuation rollout. For the Raytrace map, you set the parameters on the map's Attenuation rollout.


