Command entry:
Select an object


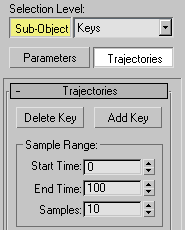
Motion panel
Trajectories
The Trajectories feature displays the path an object travels over time. This is useful for seeing at a glance how the object
moves with respect to other objects in the scene during an animation without actually having to play the animation. Trajectories
also lets you adjust the path directly and convert it to and from other formats.
NoteBy default, an object's trajectory is visible in the viewports only when the object is selected and Trajectories mode is active.
To make the object's trajectory visible at all times, turn on the Trajectory check box under Display in the
Object Properties dialog or on the Display panel
Display Properties rollout.
Using trajectories, you can do the following:
- Display the 3D path for selected object’s position tracks.
- Insert and delete keys from the path.
- Move, rotate, and scale keys on the path.
- Convert the path to a spline object.
- Derive a new path from a spline object.
- Collapse any transform controller into editable keys.
Values under Sample Range are used in the Spline Conversion and Collapse Transform functions.
NoteYou can assign the four principal Trajectories functions to keyboard shortcuts and other custom UI items. The following actions
are available via
Customize User Interface:
- : Enters and exits Add Key mode.
- : Activates the Delete Key function on a one-time basis.
- : Enters and exits the Keys sub-object level for direct editing of animation keys via transformation of the trajectory keys.
- : If one or more objects are selected, this enters and exits Trajectories mode on the Motion panel.
Procedures
To display an object’s trajectory:
-
 Select an animated object that moves over time.
- Right-click the object and choose Properties.
Trajectory is not available.
- In the Display Properties group, click By Layer to change this button to By Object. Skip this step if By Object is already
displayed.
Trajectory becomes available.
- Turn on Trajectory, then click OK.
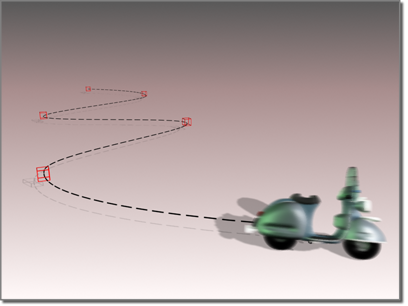
The Trajectory is displayed as a red line with white squares and dots. The white squares are keys, the white dots are in-betweens.
To add a key to a trajectory:
- Select an object.
- Display the trajectory by following the previous steps.
- On the Motion panel, click Trajectories.
- Click Sub-Object to activate Keys and enable editing.
- Click Add Key.
The button highlights.
- Click the trajectory.
Wherever you click the trajectory a key will be added.
- Right-click the key and select Key Info from the right-click menu.
In the Key Info dialog, you can change the In and Out values for the in-betweens on either side of the key. This allows you
to use the trajectory key to create the illusion of hesitation or acceleration.
You can click repeatedly to add many keys in this mode.
To delete a key from a trajectory:
- Select a key on a trajectory. You can click it, or use window selection.
- On the Motion panel Trajectories rollout, be sure Add Key is turned off.
- On the Motion panel Trajectories rollout, click Delete Key.
3ds Max deletes the key.
To transform keys on a trajectory:
- Select one or more objects.
- On the Motion panel, click Trajectories.
- Click Sub-Object to activate Keys and enable editing.
- Select one or more keys and use the transform tools on the Main toolbar to
 move,
move,  rotate, or
  scale the selected keys.
To set an object to use a spline as its animation path:
- Create or open a scene that contains any object and a spline to use as an animation path.
- Select the object and activate Trajectories mode.
- Click Convert From and then select the spline.
The trajectory is created from the spline and the object moves to its start point. If you play or scrub the animation at this
point, the object moves along the path.
NoteAny existing animation keys for the object will be incorporated at their current locations into the new path. So, for best
results, use a non-animated object.
Interface
- Sub-Object
-
Enables key editing. Use the Move, Rotate, and Scale transforms to change the location of a key(s) displayed on a trajectory.
Trajectories rollout
- Delete Key
-
Deletes the selected key(s) from the trajectory.
- Add Key
-
Adds key(s) to the trajectory. This is a modeless tool. When you click this button once, you can then add any number of keys
by clicking the trajectory line in the viewport one or more times in succession. To exit Add Key mode, click the button again.
Sample Range group
- Start Time/End Time
-
Specifies the interval for the conversion. If you're converting from position keyframes to a spline object, this is the time
interval for which the trajectory will be sampled. If you're converting from a spline object to position keys, this is the
interval over which the new keys will be placed.
- Samples
-
Sets the number of samples for the conversion. When converting in either direction, the source is sampled at regular intervals,
and keys or control points are created on the target object.
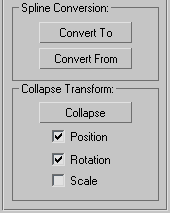
Spline Conversion group
- Convert To/Convert From
-
Converts keyframe position tracks to and from spline objects. This enables you to create a spline trajectory for an object
and then convert that spline to keyframes for that object's position track in order to do various keyframe-specific functions
(such as applying constant velocity to the keys and normalizing the time). Or, you can convert an object's position keyframes
into a spline object.
TipConvert To and Convert From can be used to move an object along a path without using a path constraint.
Collapse Transform group
Generates keys based on the current transformation of the selected object. You can apply this for any type of transform controller
assigned to an object, but the main purpose of this function is to "collapse" a parametric transform effect, such as one generated
by a Path constraint, into standard, editable keys.
- Collapse
-
Collapses the transform of the selected object.
- Position, Rotation, Scale
-
Specifies which transforms you want to collapse.
You must choose at least one check box to activate the Collapse button.