Command entry:
Create panel


(Space Warps)
Forces
Object Type rollout
Path Follow
Command entry:Create menu
Space Warps
Forces
Path Follow
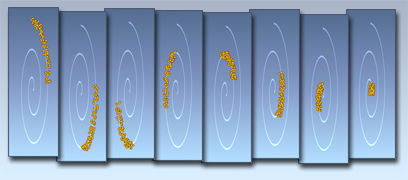
The Path Follow space warp forces particles to follow a spline path.
Procedures
To create a Path Follow space warp:
- On the Create panel, click (Space Warps). Choose Forces from the list, then on the Object Type rollout, click Path Follow.
- Click and drag in a viewport to define the size.
The Path Follow warp appears as a box-shaped icon containing curved lines that indicate hypothetical paths.
To set up and use Path Follow:
- Create a shape consisting of a single spline. (You can use shapes with multiple splines, but 3ds Max uses only one spline for the path.)
- Create a particle system and set its parameters to emit particles over a range of frames.
- On the Create panel, click Path Follow, and drag in a viewport to create the Path Follow icon (a cube with wavy lines). The
display and position of this icon don't affect the particles.
- On the Basic Parameters rollout, click Pick Shape Object and select the spline you created earlier.
-
 Bind the Path Follow icon to the particle system.
- Adjust the Path Follow parameters to create the particle movement you want.
NoteYou can further animate the particle effect by animating the spline vertices.
TipTo adjust the position of the path or particle system while maintaining access to the Path Follow parameters, select the Path
Follow space warp and then turn on

(Pin Stack), below the modifier stack.
If the particles don't follow the emitter after it's moved, then change any PathFollow parameter, and the motion will be corrected.
Interface
Current Path group
Lets you choose the path for the particles, and specify the range of influence of the Space Warp.
- Object
-
Displays the name of the currently assigned path.
- Pick Shape Object
-
Click this, and then click a shape in the scene to select it as a path. You can use any shape object as a path; if you select
a multiple-spline shape, only one the lowest-number spline is used. You can also use NURBS curves as paths.
- Unlimited Range
-
When off, the range of influence of the space warp is limited to the value set in the Distance spinner. When on, the space
warp influences all bound particles in the scene, regardless of their distance from the path object.
- Range
-
Specifies the range of influence when Unlimited Range is off. This is the distance between the path object and the particle
system. The position of the Path Follow space warp's icon is ignored.
Motion Timing group
These controls affect how long particles are influenced by Path Follow.
- Start Frame
-
The frame at which Path Follow begins to influence the particles.
- Travel Time
-
The time each particle takes to traverse the path.
- Variation
-
The amount by which each particle's travel time can vary.
- Last Frame
-
The frame at which Path Follow releases the particles and no longer influences them.
Particle Motion group
The controls in this area determine the motion of particles.
- Along Offset Splines
-
The distance between the particle system and the path alter the effect of the particle motion. If the first vertex of the
spline is at the birthplace of the particle, the particle follows the spline path. If you move the path away from the particle
system, the particles are affected by the offset.
- Along Parallel Splines
-
Particles follow a copy of the selected path, parallel to the particle system. In this mode, the position of the path relative
to the particle system does not matter. The orientation of the path, however, affects the particle stream.
- Constant Speed
-
When on, all particles travel at the same speed.
- Stream Taper
-
Causes particles to converge or diverge toward the path over time, or to simultaneously converge and diverge. You specify
the effect by choosing Converge, Diverge, or Both (see following). This provides a tapering effect over the length of the
path.
- Variation
-
The amount by which Stream Taper can vary for each particle.
- Converge
-
When Stream Taper is greater than 0, the particles move in toward the path as they follow the path. The effect is that the
stream tapers from larger to smaller over time.
- Diverge
-
Provides the opposite effect of Converge. The particles diverge from the path over time.
- Both
-
Splits the particle stream, causing some particles to converge and others to diverge.
- Stream Swirl
-
Specifies the number of turns by which particles spiral about the path. In conjunction with Stream Taper, alters the diameter
of the spiral.
Stream Swirl is generally more effective when you choose Along Offset Splines.
- Variation
-
The amount by which each particle can vary from the Spiral value.
- Clockwise
-
Particles spiral in a clockwise direction.
- Counterclockwise
-
Particles spiral in a counterclockwise direction.
- Bidirectional
-
The stream is split so that particles spiral in both directions.
Uniqueness group
Provides a seed number for unique generation of the particle pattern.
- Seed
-
Specifies the seed number for the current Path Follow.
Display Icon group
Affects the display of the Path Follow icon.
- Icon Size
-
Specifies the size of the Path Follow icon. Does not alter the Path Follow effect.