 Command entry:Select an object.
 Modify panel Modifier List VertexPaint Paintbox dialog (Click Edit in the Parameters rollout if it isn't displayed.)
The VertexPaint modifier's Paintbox is a floating toolbox with various vertex painting tools. The Paintbox is launched automatically after the VertexPaint modifier has been applied to one or more objects. You can close the Paintbox by clicking the X button in the upper-right corner of its window. To open it again, click the Edit button in the Parameters rollout of the VertexPaint Modifier


Control the display of the vertex paint in the viewport by using the four icons at the top of the floating panel. You can easily switch between shaded and unshaded vertex color modes, or turn off the display of vertex color and or texture maps.
 Vertex color display – unshaded
 Displays the currently selected object in vertex color display mode. This mode is identical to the one offered by the Object
Properties menu (right click on object, select Properties Turn On Vertex Color in the Display Properties group, making sure that Shaded is off.)
This has no effect on wireframe, but works on lit wireframe and all other shaded display modes.
 Vertex color display – shaded
 Displays the currently selected object in vertex color display mode, with viewport lighting (shading). his mode is identical
to the one offered by the Object Properties menu (right click on object, select Properties Turn On Vertex Color in the Display Properties group, making sure that Shaded is on.
 Disable vertex color display
 Toggle texture display
 Viewport Channel Display selector

This menu allows you to select which one of the map channels to paint on:
 Vertex colorsChoosing this lets you display the vertex color channel in the viewport.
 Vertex alphaChoosing this lets you display and paint the vertex transparency channel in the viewport.
 Vertex IllumChoosing this lets you display and paint the vertex lighting channel in the viewport.
 Map ChannelChoosing this lets you define a numbered map channel to paint on. Define the channel ID number with the Map Channel Display
spinner.
Map ChannelChoosing this lets you define a numbered map channel to paint on. Define the channel ID number with the Map Channel Display
spinner.

Map channel display in viewport flyout
What you see is what you paint, so whatever you select will both be displayed and activated for painting.
This control lets you to numerically select a channel other than the 3 conventional ones listed above, for display only. If the channel you select is currently used for mapping coordinates, you'll see red/yellow/green colors corresponding to the UVW values.
You might choose map channels above the standard channel 1, 2, 3 that do typically get used for texture mapping. But you will need to keep track of your own conventions, and/or use the Channel Info utility to track what has been allocated for each object.
The Map Channel Display Spinner is only available when the Map Channel display button. If you assign a new vertex paint modifier or create a new layer and choose a particular numeric map channel, then select Map Channel display, the spinner will become available.
 Lock button
The Lock button makes the Display Channel setting unavailable, and automatically sets Display Channel to whatever channel
you choose on the Modify panel Channel rollout. Keep this turned on, to ensure that you're always displaying what you're painting.
If you want to glance at another channel without stopping your current paint session, turn off the lock and then switch the display channel. When you are finished, switch back and turn the lock back on.
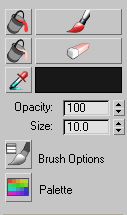
Vertex paint controls
Here are the controls that let you access the paintbrush and the paint. You can choose color to paint with, from a color selector or from the scene. Choose to adjust the brush size or envelope, or launch advanced paintbrush options such as pressure sensitivity.
Performs a traditional paint fill operation on the current object or sub-object selection. In the case of sub-object selections (vertices, faces, elements) the fill will honor those selections. In the case of soft-selections Paint all will do a “faded” fill, slowly tapering off the opacity based on the soft selection settings.
As with the Paint button, this will either paint on the current layer, if one is open in the Modify panel, or else it will create a new vertex paint layer instanced across the selected objects.
 Paint
PaintStarts the painting process. Once it is turned on, you can start painting on the current selection, by moving the cursor into the viewport and over the object.
If there is a Vertex Paint modifier highlighted in the Modify panel, you will be painting into that layer. But if the selected objects do not currently have a vertex paint layer highlighted in the modify panel, then a dialog appears letting you create a new modifier. This will be instanced across all the selected objects.
You will not see the results of your brush strokes, unless the proper display mode is set (above) Be sure your display mode and your paint target match. For example – if you are painting on the alpha channel, be sure you are displaying the alpha channel. If you are painting on the color channel, display the color channel. Brush strokes will use the color specified in the color swatch directly below the Paint button.
See Painter Options Dialog for more painting options.
 Erase all
Erases all painting applied to the currently selected objects via the current VertexPaint modifier. This allows you to see through the underlying color of the object’s vertices. This underlying color might come from the object’s original vertex color, or from another vertex paint layer directly below it in the modifier stack. This supports soft selection as well.
 Erase
EraseTurns the brush into an eraser that will remove paint from the currently selected objects. Erase mode will actually erase any painting applied to the currently selected objects for the current layer of paint (allowing the true color of the original objects vertices to be seen, or the vertex paint layer immediately below the current one).
 Pick color from object
Allows you to choose a color from the currently selected objects. The color is taken from a single vertex; region selection is not supported. The choice must occur near a vertex, or no color will be chosen. You can drag across a vertex of interest to pick up its color. Because this button enters a mode, it must be clicked to leave the mode, or you can choose another mode to turn it off.
 Color swatch
The color swatch indicates the current color that will be used when painting begins. Clicking the swatch launches the standard color selector. Here you can change the color that will be used on the next brush stroke. It provides standard Hue, Saturation, and Brightness selection, along with Red, Green, and Blue selection and numerical entry.
Controls the opacity of paint being applied to the currently selected objects in a single paint stroke (actually, any time before mouse up). This value represents the percentage of new paint that will blend into the color already applied to the selected objects. Successive paint strokes will continue to add this color until it overpowers the underlying color completely. The maximum value is 100% and 0% is the minimum value. A value of 50 percent will blend equally with the underlying vertex color in a single stroke (before mouse up).
The brush opacity serves to clamp the effect of each brush stroke, taken as a whole. If you pick a low opacity amount, then a single brush stroke will have only a small effect, no matter how much you scrub. This allows improved control over the density of a glaze of color, with an even glazing across all the painted vertices.
 Brush Options
 Opens the Painter Options dialog, where you can access advanced paintbrush controls. These are the standard set of Painter Interface options. The same options can be seen, for example in the Skin modifier, for painting weights.
Here you will find a rich selection of brush configuration tools that change the way your brush strokes apply color to the selection. Includes tools for mirror painting mode and using pressure sensitivity.
 Palette
Click to display the Color Palette, which lets you create, edit, and manage custom palettes for use with VertexPaint.

Tools in this group let you choose sub-object selection levels. You can select vertices, faces or elements. Includes the option to ignore backfacing so you can limit your selection to sub-objects that face toward you, and also provides access to standard soft selection options.
This creates a mask that will lets you determine what is being affected by your paint strokes, and any other operations you might apply, such as blurring or color adjustment. Erase functionality will also honor this mode selection.
 Select vertex
 Select face
  Select element
 The same soft-selection options found in Editable Mesh and Editable Poly are available by clicking this button.

Tools in this group allow you to perform overall color adjustment or image blurring without using the paint brush in the viewport.
 Adjust Color
Displays the Adjust Color dialog, where you can find sliders for adjusting HLS or RGB values, preview the adjustment effect, and apply it.
 Blur
Blur Blurs currently selected channel values (for example, vertex color, alpha) for the currently selected objects. Also supports sub-object selection of vertices, faces, and elements. With soft selections, the final blurred value is computed, and then combined with the original color according the selection; a 50 percent soft selection means that a vertex will become a fifty-fifty combination of its original color and the blurred color. Successive clicks of the Blur button will succesively blur the previous results, eventually washing out painting effects entirely.
Blur is useful for softening vertex color lighting information that is automatically generated by the Assign Vertex Color utility or rollout. Assign Vertex Color computes intensities per vertex. This is especially useful for low-resolution geometry and high-frequency lighting changes.
 Blur Brush
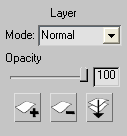
The layer mode drop-down list allows you to select a specific operator for this paint layer. The operator selected affects base color, alpha, illumination, and other information coming up from layers below it, or from the base object itself. The chosen operator controls how the incoming color is combined with any newly painted colors for the current level.
This mode is changeable at any time, without destroying previously painted information in layers above, below, or in the current paint layer. The following modes are supported per paint layer:
It's useful when you want to make an object appear a different color but in the same lighting conditions. A fully bright or dark channel is never affected however, so if Red=100% and Green=0% in the base color, then neither the red nor green channels can be affected by the layer color.
For each RGB channel, if the layer is at full value in that channel, the output channel will be at full value. Even if the layer value is less then full value, the output is still strongly brightened in that channel. For example, a medium-red layer color will add a significant red brightness to the output.
The next four Light modes essentially offer compromises between the destructive effect of Normal Mode and the toning effect of Overlay mode. Try using medium-value desaturated layer colors, since the light modes can be too destructive with bright, vivid layer colors. A neutral grey layer color is transparent in any of the light modes.
The next four modes are used to control the HSV channel values of the image instead of using RGB channel value.
Allows you to set the opacity of the current vertex paint layer, from 0 to 100 percent. 100 percent Opacity means that the current layer is entirely opaque: you cannot see through it to the layer directly under it or to the base vertex colors of the objects being painted.
The opacity of a layer is animatable. Simply turn on Auto Key, move the time slider and adjust the spinner value. This will set a keyframe.
Be aware that the paint opacity is different from the vertex alpha channel. Values less than 100 percent incrementally reveal any vertex color, alpha information, and so on, coming from vertex paint layers beneath it, or the base object's original information. Opacity values can be changed for the current layer at any time. Since vertex paint layers are preserved in the modifier stack you can return to a particular layer at any time and adjust its opacity to tune an object’s final appearance.
Another way to think about the opacity slider is that it is identical to the amount spinner. The difference between them is that opacity is for the entire layer, where as amount is for the current brush stroke (between a mouse down and mouse up period when painting). Changing the amount spinner after painting does not affect what is already displayed on the screen; where changing the opacity layer does. In the end, the current vertex paint layer being applied generates a final color that is the combine result of amount and opacity. The whole concept should be quite natural to any Adobe Photoshop user. However, Photoshop is able to display a light grey and dark grey quilt as a background to give a visual cue about layer opacity, whereas 3ds Max does not support this same display cue. So in 3ds Max, more attention is required of the artist to understand the opacity of each vertex on each layer.
 New Layer
 Delete Layer
 Condense to single layer
Click to condense all vertex coloring into a single layer in the current VertexPaint modifier. Use this to modify existing vertex coloring within the current modifier.
Condensing layers is a two-part operation: First 3ds Max adds a new VertexPaint modifier to the stack, combining vertex coloring applied directly with Editable Mesh/Polygon and from previous VertexPaint layers according to the settings described above. Second, it deletes any prior VertexPaint modifiers.
If Preserve Layer has been turned on for a particular VertexPaint layer, then its colors are “baked” into the new VertexPaint modifier, but the preserved layer isn't deleted from the stack.


 Utilities panel