The Queue Monitor application (monitor.exe) lets you manage, view, and receive status updates about all jobs currently submitted to the network rendering queue. This executable file is copied to the Backburner root directory during setup, and is available from the Start menu.
Queue Monitor helps you adapt to changing needs and priorities. Jobs can be activated, deactivated, reordered, and removed, and servers can be unassigned to free up resources on workstations, or brought back online as they become available again.
You can run Queue Monitor from any computer connected to the rendering network. Once started, you can connect to any available network Manager. You can launch as many Queue Monitors as you want from anywhere on your network and connect to a Manager machine. All except the first Queue Monitor connecting to the Manager appear in "read only" mode. If there is already a Queue Monitor connected to the Manager, subsequent connections alert you that you are in read-only mode, and "Read Only" appears in the title bar. In read-only mode, you can view network render activity, but cannot change anything in the queue unless you obtain queue control.
To view all current jobs in the rendering queue, you first connect to the Manager that all of the servers are "talking to." To do this, you can either connect automatically to the Manager by searching with a subnet mask, or connect to a specific Manager by supplying the IP address or machine name of the machine where you started the Manager.
To view all current jobs in the rendering queue:
 (Connect).
If this is the first time you're connecting, or you're connecting to a different Manager, and you're using Automatic Search, just click OK. If you're not using Automatic Search, you need to specify the Manager to connect to. In the text field, enter the name or IP address of a network Manager. This is the same information you specified in the Server General Properties dialog.
The Queue Monitor connects to the network Manager and activates its various display windows.
As requirements change, you can temporarily deactivate an active or pending job in the rendering queue, or reverse the process and restart jobs that are inactive.
When you suspend a job, the Servers assigned to the job either drop the frame they are rendering or finish writing the frame, depending on where they are in the rendering process. The next pending job becomes active and begins to render.
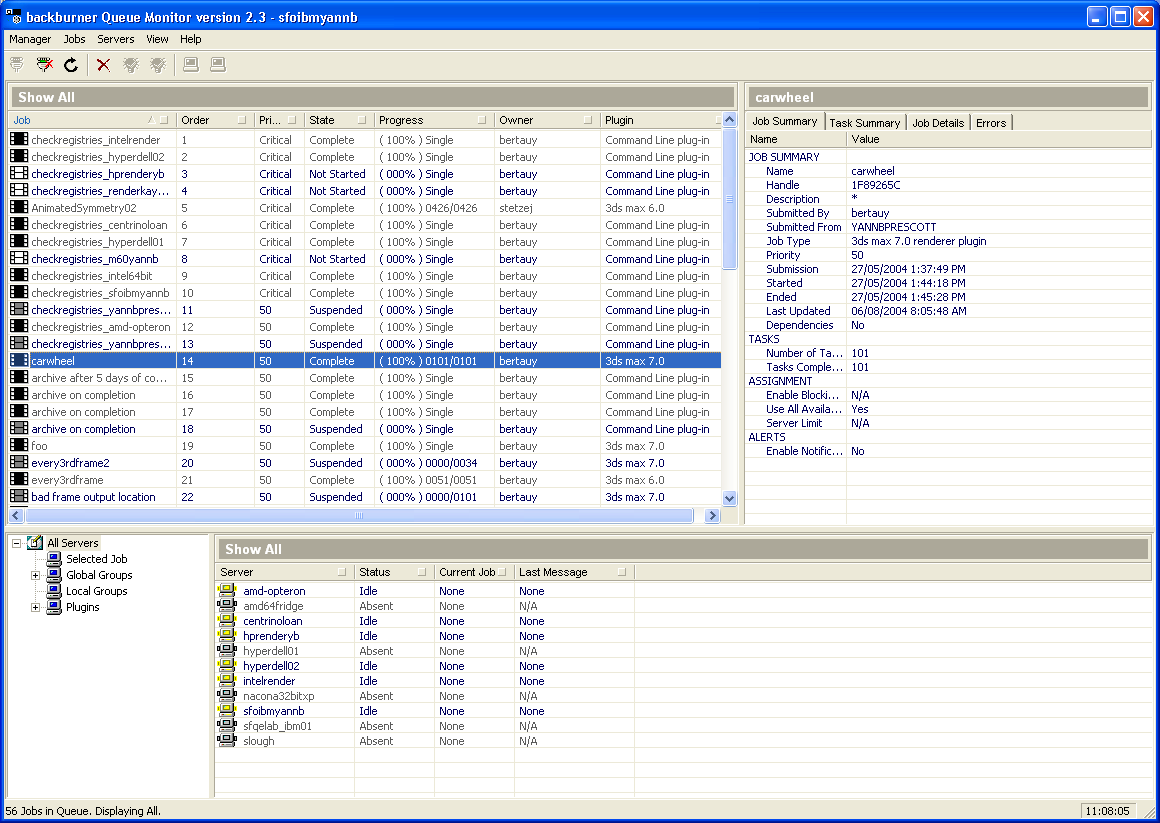
The Queue Monitor user interface comprises a menu bar, a toolbar, a status display, and four windows: job list, job information, server tree view (or hierarchical list), and server list.
Use to control aspects of the Queue Monitor and the network Manager.
Connects to a Manager using the Connect To Manager dialog. In the dialog, turn on Auto Search to search for a Manager using the specified subnet mask, or turn off Auto Search to search for a Manager using a specific Manager name or IP address. Click OK to perform the search, or Cancel to exit without connecting.
If the Manager is found, current Servers and jobs appear in their respective lists in the Queue Monitor. If the Manager cannot be found, an alert appears.
Lets you gain control over the rendering queue. Available only when Queue Monitor is running on two or more machines in the network, and your copy was not the first one run.
When you request queue control, a dialog appears on the controlling machine informing that user of the request. The dialog counts down 10 seconds, and if no response is made during that time, or the OK button is clicked, control transfers to the requesting Queue Monitor, which then informs the requestor of the transfer. If the request is denied, the requesting user is informed of that fact.
When on, Queue Monitor automatically updates the information in its windows every 20 seconds, or whenever information changes if information changes less frequently. When off, to update the windows you must click the toolbar Refresh button. Default=on.
Unless you are the only person managing the queue, we recommend leaving Auto-Refresh on. The danger of turning it off is the possibility of getting out of sync with the state of the queue. For instance, if another person deletes a job and you decide to edit that job, when you finish editing that job, the Manager will send you an error message saying the job no longer exists.
Choosing this command opens the Module Info Report dialog. For troubleshooting purposes, this command lets you generate a delimited file that shows you the version and location of Backburner plug-ins and the Backburner application itself for each network rendering system.
Use to obtain information about rendering jobs. Most Jobs menu functions are available only when at least one job is highlighted in the Job list, and many require that only one job be highlighted.
These commands are also available by right-clicking a job in the job list.
Opens the Job Settings dialog, with settings for job-related functions such as frame range and output size.
Opens the Job Dependencies dialog, which you can use to specify existing jobs that must finish before the current job can start.
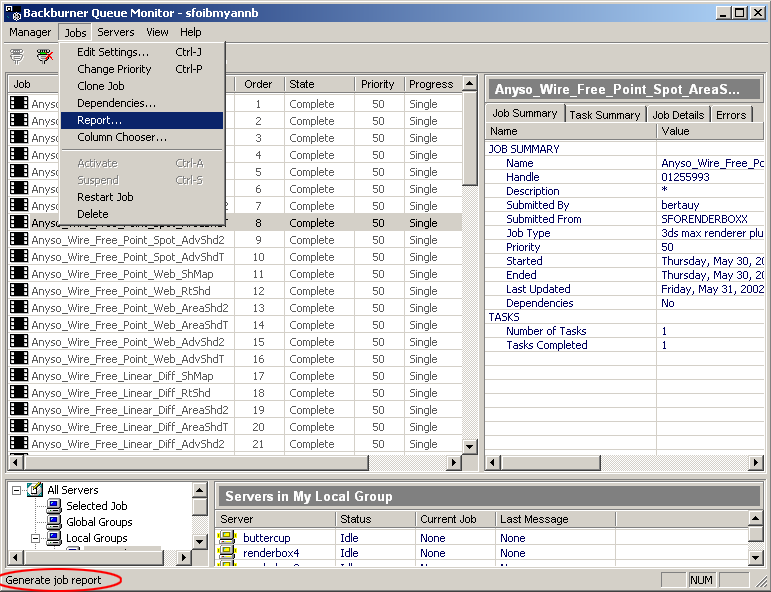
Opens the Job Report dialog for generating text files containing job reports.
Opens the Job Columns dialog, with additional columns you can drag into the Job list title row. As you drag a column over the title row, arrows appear indicating where the column will be inserted.
To remove a column, right-click its title and then choose Remove This Column. You cannot remove the Job or Order column.
Accesses the Job Archives where jobs are stored after clicking the Archive Jobs command or if they're assigned to automatically archive upon completion. Choosing this command opens the Job Archive dialog where you can choose to Delete, Activate or Refresh jobs.
Use to control and obtain information about job servers.
These commands are also available by right-clicking a server in the server list.
Opens the Server Columns dialog, with additional columns you can drag into the Server list title row. As you drag a column over the title row, arrows appear indicating where the column will be inserted.
To remove a column, right-click its title and then choose Remove This Column. You cannot remove the Job or the Order column.
Opens the Week Schedule dialog for the highlighted server, for defining when the server is available to render jobs.
Toggles display of the Queue Monitor status bar. When on, the status bar appears at the bottom of the Queue Monitor window and displays status prompts.

Contains buttons for performing various common Queue Monitor functions.
ConnectSee Connect.
 Disconnect
See Disconnect.
 Refresh
 Delete
 Activate
 Suspend
 Assign Server
 Remove Server
The Job List window lists all current jobs, along with progress and status. Additionally, a status icon before each job's name provides a graphical indication of its status. See Viewing Jobs and Servers with the Queue Monitor.
Right-click a job name to access the Jobs menu.
Click a column title to sort the list by the column contents (alternating clicks sort in ascending and descending order). Right-click a column title to access a menu that lets you sort the column, specify its alignment, remove the column (if it's optional), access the Column Chooser for adding optional columns, and display only the default columns.
The Job Information window contains tabs for viewing information about different aspects of a single highlighted job in the Job List window. If no job is highlighted or multiple jobs are highlighted, this window is blank.
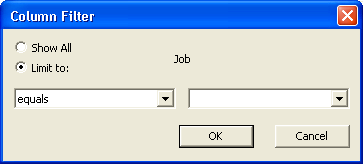
You can sort and filter columns in the Job Information Window. Click  in the column you wish to filter and select the Column Filter options.
This window presents a hierarchical list of all Server groups, lets you create, delete, and rename global and local Server groups, and see which Servers can render your job.
Server groups are logical combinations of Servers that you can use to easily assign specific Servers to render a job. Global groups are available to all machines in the rendering network, while local groups are available only on the computer on which they are created. To create a global or local Server group, right-click any item in the Server Tree view, and choose Create Global Group or Create Local Group. After you choose either command, the new group appears in its respective category with the name New Global/Local Group; at this point, you can rename it by typing a new name.
After you define a group, its name shows up as a tab in the Server list in the Network Job Assignment dialog. Only global groups appear on machines other than the one on which they're created.
To remove a Server group, right-click its name in the Server Tree view and choose Delete Group. To rename a Server group, right-click its name in the Server Tree view, choose Rename Group, and then enter a new name.
Following is a list of default list entries in the view. Click the item for the described result.
The Server List window shows all Servers in the current group (selected in the Server Tree view). For each listed server, the windows displays, by default, its status, the job it's currently rendering (if any), and the last message it sent to the Manager. Additional, optional details can be shown using the Column Chooser command.
Click a column title to sort the list by the column contents (alternating clicks sort in ascending and descending order). Right-click a column title to access a menu that lets you sort the column, specify its alignment, remove the column (if it's optional), access the Column Chooser for adding optional columns, and display only the default columns.
You can sort and filter columns in the Server List Window. Click in the column you wish to filter and select the Column Filter options.
A status icon before each server's name provides a graphical indication of its status. See Viewing Jobs and Servers with the Queue Monitor.
Right-click a server name to access the Servers menu.
You can generate delimited ASCII reports containing detailed statistics about the version and location of Backburner plug-ins and the Backburner application itself for each network rendering system.
Use the Job Settings dialog to change job-related settings such as frame range, output size, and output directory, without having to use the Render Setup dialog and resubmit the job.
All rendering jobs submitted to the network rendering queue are shown in the Job list window, located on the upper-left side of the Queue Monitor dialog, immediately below the toolbar. Below it is the Server list window, which shows all servers attached to the manager and their status.
You can generate ASCII reports containing detailed statistics about a particular job selected in the Job Queue list.
Use the Job Archives dialog to delete, activate and refresh jobs that have been archived. Jobs are placed here when you select a job from the Job list on the Queue Monitor and click the Archive Job command. This brings up the Backburner Job Archives dialog Jobs are also placed in the Job Archives if you set them to automatically archive when the rendering is completed.
As requirements change, you can deactivate an active or pending job in the rendering queue, or reverse the process and restart jobs that are inactive.
When prioritizing jobs and dividing up the network render load, you might need to pull individual servers off one job and place them on another.
Reordering lets you change the job order in the queue to meet changing deadlines or priorities. You can delete jobs from the queue at any time.
By default, all servers are available at all times. Using the Queue Monitor's Week Schedule feature, you can arrange the hours during which each server is available for network rendering.