Command entry:
Create panel


(Lights)
Standard
mr Area Spot button
Area Light Parameters rollout
When you render a scene using the mental ray renderer, an area spotlight emits light from a rectangular or disc-shaped area, rather than from a point source. With the default
scanline renderer, the area spotlight behaves like any other standard spotlight.
NoteIn
3ds Max, area spotlights are created and supported by a MAXScript script. Only the mental ray renderer uses the parameters in the
Area Light Parameters rollout. See
Enhancements to Standard Features for more details.
TipArea lights take longer to render than point lights. To create a quick test (or draft) rendering, you can use the Area/Linear
Lights as Point Lights toggle on the
Common Parameters rollout of the Render Setup dialog to speed up your rendering.
Procedures
To create an area spotlight:
- Go to the Create panel and click (Lights).
- Choose Standard from the drop-down list.
- On the Object Type rollout, click mr Area Spot.
- Drag in a viewport. The initial point of the drag is the location of the light, and the point where you release the mouse
is the location of the target.
The mental ray renderer will ignore the spotlight cone, but the location of the spotlight target determines the orientation
of the plane of the area light, and the direction in which it’s projected.
- Set the shape and size of the area light in the Area Light Parameters rollout.
While you use the spinners to adjust the size of the area light, a gizmo (yellow by default) appears in viewports to show
the adjusted size. This gizmo disappears once you finish adjusting the value.
To convert a standard 3ds Max light to an area light:
 Select one or more lights.
- Go to the
 Utilities panel.
- On the Utilities rollout, click MAXScript.
The MAXScript rollout is displayed.
- On the MAXScript rollout, choose Convert To Area Lights from the Utilities drop-down list.
The Convert To Area Lights rollout is displayed.
- On the Convert To Area Lights rollout, click Convert Selected Lights. A MAXScript alert is displayed, that says "Delete Converted
Lights?" Click Yes to delete the original light and replace it with the area light. Click No to leave the original light in
place. If you click No there are now two lights in the scene: the original light, and the area light based on it.
- Click Close to dismiss the Convert To Area Lights and MAXScript rollouts.
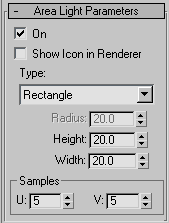
Interface
- On
-
Turns the area light on and off. When On is on, the mental ray renderer uses the light to illuminate the scene. When On is
off, the mental ray renderer doesn’t use the light. Default=on.
- Show Icon in Renderer
-
When on, the mental ray renderer renders a dark shape where the area light is. When off, the area light is invisible. Default=off.
- Type
-
Changes the shape of the area light. Can be either Rectangle, for a rectangular area, or Disc, for a circular area. Default=Rectangle.
- Radius
-
Available only when Disc is the active type of area light. Sets the radius of the circular light area, in 3ds Max units. Default=20.0.
- Height and Width
-
Available only when Rectangle is the active type of area light. Set the height and width of the rectangular light area, in
3ds Max units. Default=20.0 for both Height and Width.
While you use these spinners to adjust the size of the area light, a gizmo (yellow by default) appears in viewports to show
the adjusted size. This gizmo disappears once you finish adjusting the value.
Samples group
- U and V
-
Adjust the quality of shadows cast by the area light. These values specify how many samples to take within the light’s area.
Higher values can improve rendering quality at a cost of rendering time. For a rectangular light, U specifies the number of
sampled subdivisions in one local dimension, and V the number of subdivisions in the other local dimension. For a circular
(disc) light, U specifies the number of subdivisions along the radius, and V specifies the number of angular subdivisions.
Default=5 for both U and V.