The Limit controller lets you specify upper and lower limits to available controller values, thus restricting the potential value range of the controlled track. For example, in a character rig you could use this to restrict rotation on finger joints so the fingers can't bend backward. Basically, once a track is limited, and the limit is active, you can't set a value for the track beyond the limit.
You can apply a Limit controller to any other type of controller; the limited controller (that is, the original controller) then appears as a child of the Limit controller in the Track View hierarchy.
The Limit controller lets you specify upper and lower limits to available controller values, thus restricting the potential value range of the controlled track. For example, in a mechanical assembly you could use this to restrict rotation on a part so that it doesn't rotate beyond its standard range of motion. Basically, once a track is limited, and the limit is active, you can't set a value for the track beyond the limit. You can apply a Limit controller to any other type of controller; the limited controller (that is, the original controller) then appears as a child of the Limit controller in the Track View hierarchy.
Because the Limit controller doesn't change the original controller, you can easily switch back and forth between the original and the limited animation by toggling the limits. But if you collapse the Limit controller, the result is the limited animation, and the original animation is no longer available.
Use of the Limit controller makes it faster to set up and create animation. It eliminates the need for expressions or scripts to do the same thing, this improving the ease with which you can set up automation in hierarchies and rigs, creating effects such as avoiding collision, FK joint limits, etc.
For example, a Technical Director might want to assign limits to float values that animators will adjust to make posing easier, enforce standards, or prevent inconsistencies and mistakes. A TD could use limits for:
Character riggers can use limits to create complex relationships or shortcuts in rigs. Examples include:
Following is a brief list of examples of specific uses for the Limit controller:
 Set Upper/Lower Limit commands to limit the fingers' motion.
Limitations of the Limit Controller
It's important to be aware of the following limitations of Limit controllers:
Example: To use the Limit controller:
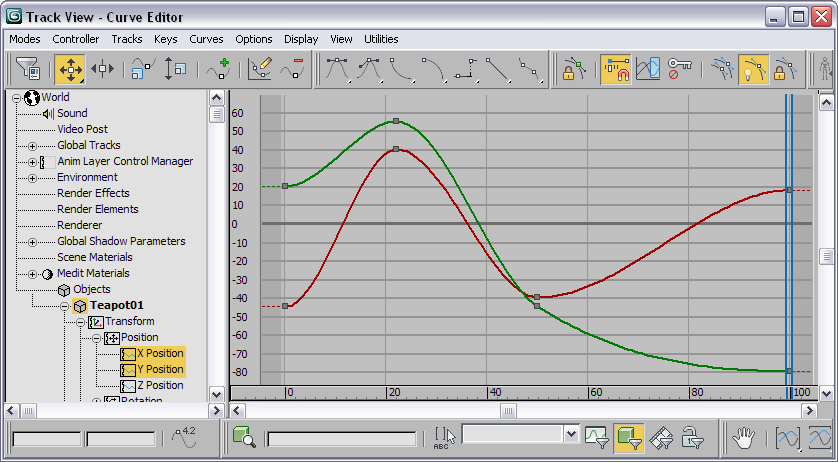
In this example, the teapot position was animated on the X axis between extents of about –45 to 40, and on the Y axis between extents of about –80 and 54.
This opens the Float Limit Controller dialog, where you can set limits and other values, but you might find it easier to do this interactively, so for now just accept the defaults by closing the dialog.
The track retains its original name (X Position, in this example), but the icon has changed to indicate that it's now a Limit controller, and is expandable (see illustration in following step).
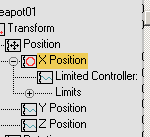
The hierarchy contains a child track, named Limited Controller, and a new, expandable child branch named Limits.
Because the original X-axis movement falls within the default limits, the two tracks are identical.
 Set Lower Limit.
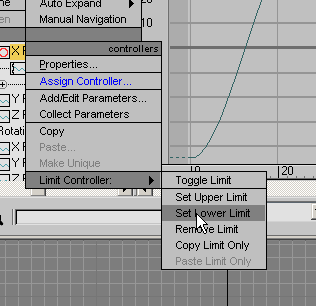
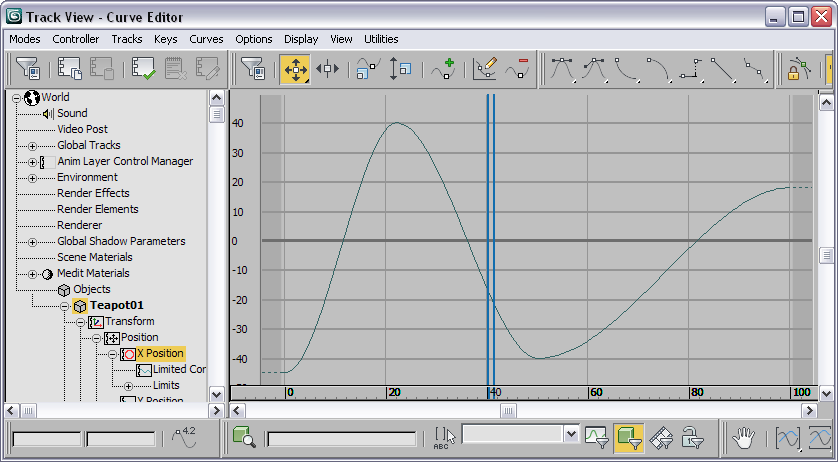
The graph curve is now clipped below the lower limit. When you scrub the animation, the object doesn't move beyond that position.
 Set Upper Limit.
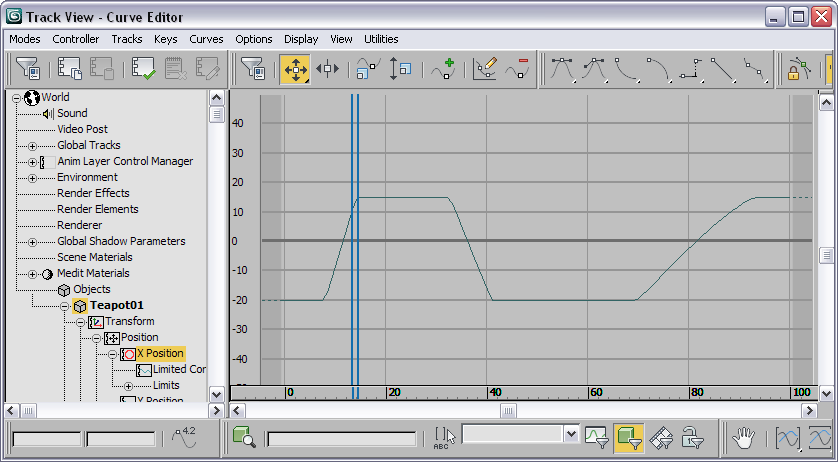
In this example, we've set it at about 13. The graph curve is now clipped above the upper limit and below the lower limit. The resulting motion is likewise constrained.
The motion on the X axis is limited at both extremes; wherever the object originally moved beyond the limits, it now behaves as though it's hitting a wall.
The Limit Controller (X Position) track clearly shows the upper and lower clipping, while the Limited Controller track shows the original motion.
The original motion still exists as the Limited Controller track; you can restore it temporarily by toggling the Limit controller.
Toggle Limit.
Now, when you scrub the animation, the object moves as before.
Toggle Limit again to restore the limits
You can copy the Limit controller in two ways: the limits only, or the limits and motion combined. First, you'll copy the limits only.
Copy Limit Only.
Paste Limit Only. When the Paste dialog opens, click OK to confirm the paste as a copy.
Now the Y Position track is also limited, using the same extents as the X Position track, but retaining its original underlying motion. To verify this, compare the Y Position track with its child Limited Controller track.
Next, you'll copy the entire limited X Position track to the Z Position track, including motion and limits. The Z Position track currently is not animated.
Compare the X and Z Position tracks and both their child Limited Controller tracks. Each corresponding pair of curves is identical. The motion appears as though the object is hitting the inside edge of a box.
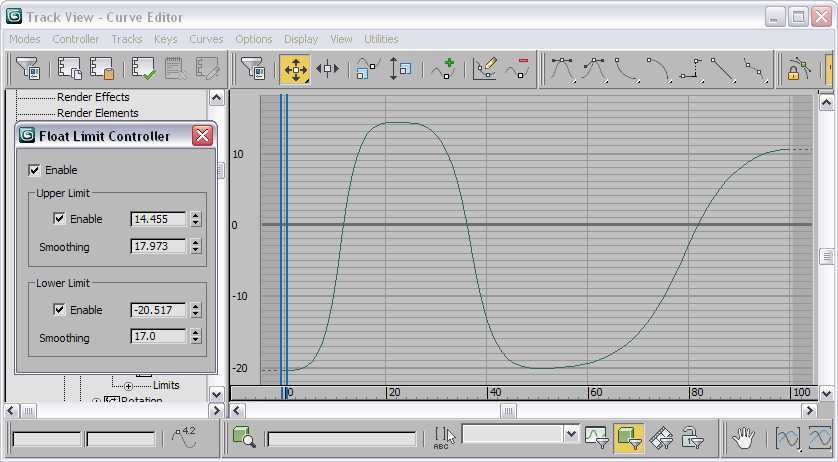
Finally, we'll cover the Smoothing Buffer settings. By default, sharp corners are created wherever a curve is limited, causing abrupt changes in motion. You can smooth off these corners with the Smoothing Buffer parameters, resulting in more natural-looking motion.
Smoothing Buffer spinner to increase the Smoothing Buffer value as far as it can go.
As you increase the value, the corners of the upper limit on the graph become smoother.
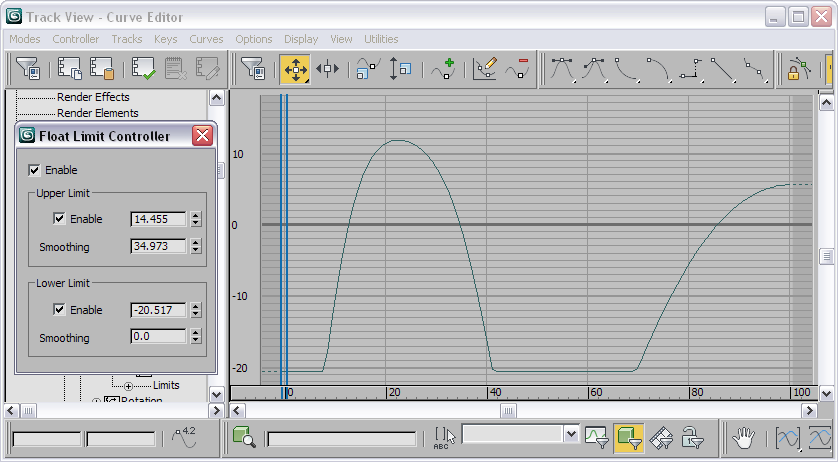
Note that there's an upper limit to this value; in this case, it's 34.973. This limit is determined by the values of the other three settings on the dialog.
Smoothing Buffer. It's not possible with the upper smoothing value at its maximum.
The Limit Controller interface comprises the Float Limit Controller dialog and several-right-click menu items.
The Float Limit Controller dialog opens when you first assign the Limit controller, or when you right-click a highlighted Limit-controller track and choose Properties.
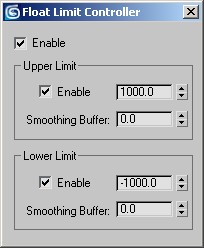
The highest value permitted by the Limit controller. Any values above this value in the original controller are clipped; that is, they're set to this value, unless smoothing is in effect. Default=1000.0.
You can animate this value via keyframing and other standard methods, and manipulate this animation in Track View via the Upper Limit track in the controller's Limits branch.
Specifies a smoothing value, so that clipped values at the beginning and end of a clipped range gradually increase and decrease instead of leveling off abruptly.
The maximum total smoothing is determined by the Upper and Lower Limit values. (Upper Limit Smoothing Buffer value) + (Lower Limit Smoothing Buffer value) cannot exceed this total. For the smoothest possible results at the upper and lower extents of the
clipping, set either Smoothing Buffer value to the maximum amount, and then back it off to half that value and set the other
Smoothing Buffer to the same amount.
You can animate the Smoothing Buffer value via keyframing and other standard methods, and manipulate this animation in Track View via the Upper Smoothing track in the controller's Limits branch.
The lowest value permitted by the Limit controller. Any values below this value in the original controller are clipped; that is, they're set to this value, unless smoothing is in effect. Default=-1000.0.
You can animate this value via keyframing and other standard methods, and manipulate this animation in Track View via the Lower Limit track in the controller's Limits branch.
Specifies a smoothing value, so that clipped values at the beginning and end of a clipped range gradually decrease and increase instead of leveling off abruptly.
The maximum total smoothing is determined by the Upper and Lower Limit values. (Upper Limit Smoothing Buffer value) + (Lower Limit Smoothing Buffer value) cannot exceed this total. For the smoothest possible results at the upper and lower extents of the
clipping, set either Smoothing Buffer value to the maximum amount, and then back it off to half that value and set the other
Smoothing Buffer to the same amount.
You can animate the Smoothing Buffer value via keyframing and other standard methods, and manipulate this animation in Track View via the Lower Smoothing track in the controller's Limits branch.
Limit Controller right-click menu
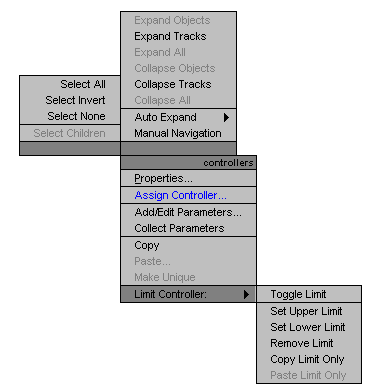
To access the Limit Controller right-click menu, highlight a Limit Controller track in the Track View hierarchy, and then
right-click the track and move the cursor to the Controllers quadrant Limit Controller menu item.
Turns the Limit controller on and off. This is the same as the Enable check box on the Float Limit Controller dialog.
Applies only the copied Limit values, or adds a Limit controller with the copied values if one doesn't exist, while retaining the values of the original limited track.
As with pasting copied controller tracks, you can paste the Limit values as a copy or an instance of the copied Limit controller, with the option to replace all instances of the paste target.


 (Curve Editor (Open))