Command entry:Main toolbar
 (Curve Editor (Open)) Select a rotation track in the Track View hierarchy. Track View menu bar Controller menu Assign Euler XYZ
The Euler XYZ Rotation controller is a compound controller that combines separate, single-value float controllers to specify an angle of rotation about each of the X, Y, and Z axes. Euler XYZ is not as smooth as quaternion rotation (used by the TCB Rotation controller), but it is the only rotation type that you can use to edit rotation function curves.
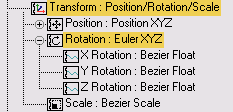
The Euler XYZ Rotation controller assigns individual tracks to the X, Y, and Z components of position, rotation, and scale
transforms. However, the controller assigns three keys (one for each axis), by default. To avoid this, you can use Customize User Interface actions to create explicit axis keys. These are available in the Main UI group Set Key Tools category.
The Gimbal reference coordinate system is intended for use with this controller. With other coordinate systems, rotating about one axis always changes at least two tracks. With Gimbal rotation, rotating about one axis changes only one track, making it easier to edit function curves.
Euler rotation offers several advantages over the TCB Rotation controller, which was the default rotation controller prior to 3ds Max 5. Euler rotation provides function curves, while TCB does not. Euler rotation allows for three separate curves that can be manipulated in the Curve Editor. TCB rotations can be controlled only with tension, continuity, and bias settings, making it difficult to keyframe and manipulate X, Y, and Z rotation independently.
On the other hand, TCB rotation allows for rotation greater than 180 degrees on a given keyframe. If you turn on the Rotation Windup option, you can get rotation values greater than 360 degrees.
Euler Rotation and the Waveform Float Controller
Because the Euler Rotation controller uses radians, unit adjustments should be made when other controllers are applied to Euler axes. For example, the Waveform Float controller has a default amplitude of 100 in the Characteristic Graph. When the Waveform Float controller is applied to an Euler axis, the default amplitude is 100 radians. This sets the Amplitude setting to 5729.598 (the number of degrees in 100 radians).
Euler Rotation and the Noise Float Controller
When a Noise Float controller is applied to an Euler axis, the default Strength setting is 286.479 or 50 percent of 10 radians in degrees (maximum deflection).
Euler Rotation and the MIDI Motion Capture Controller
When a MIDI Motion Capture controller is applied, the Parameter Scaling is taken in radians so that the Max. default setting of 1.0 results in an upper boundary of 57.2958 degrees.
Example: To use Euler XYZ Rotation:
 Motion panel and make sure the assigned rotation controller is Euler XYZ. If not, highlight the Rotation track in the Assign
Controller rollout list, click
Motion panel and make sure the assigned rotation controller is Euler XYZ. If not, highlight the Rotation track in the Assign
Controller rollout list, click  (Assign Controller), and then choose Euler XYZ in the Assign Controller dialog list. Click OK.
 (Auto Key).
 Play the animation. The box rotates 500 degrees around the X axis and 90 degrees around the Z axis. In this case the X-axis
rotation takes place first, and then Z-axis rotation.
Play the animation. The box rotates 500 degrees around the X axis and 90 degrees around the Z axis. In this case the X-axis
rotation takes place first, and then Z-axis rotation.
To use Euler XYZ with List controllers for local rotation control:
You can mimic the local Euler rotation controller (available in earlier versions of 3ds Max) by combining a list controller with an Euler XYZ rotation controller.
Motion Panel.
assign a LookAt controller to teapot, with the dummy assigned as the LookAt Target.
You now have an object with rotation controlled through the dummy.
(Assign Controller) and pick Rotation List.
Now there is a list controller, with the LookAt Constraint applied as the first rotation controller in the list.
You now have a list controller with a LookAt Rotation as the first controller and an Euler XYZ as the second controller.
Now you can animate the rotation independent of the LookAt rotation control. It should now behave the same as the Local Euler controller that was available in versions 4 and earlier.
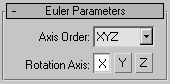
Euler parameters are displayed in the Motion panel.
The Euler parameters rollout is displayed when Rotation is selected in the PRS Parameters rollout.