A multicurve trimmed surface is an existing surface trimmed by multiple curves that form a loop.

Creating a multicurve trimmed surface
When you create a multicurve trimmed surface, you create only one trimmed hole. If you want to create multiple holes, first create holes in the surface using other techniques, and as the final step create the multicurve trim.
You can't trim across the edge between two surfaces, or across a "seam" where a surface touches itself, as at the back of a spherical surface created by converting a Sphere primitive.
The NURBS object must contain a surface with curves on it that create a closed loop.
The curves must form a single closed loop, or completely traverse the surface.
 (Create A Multicurve Trimmed Surface).
The Trim list shows the names of the curves you select. Flip Trim inverts the direction of trimming. Flip Normals lets you flip the surface normals at creation time. (After you have created the surface, you can flip normals using controls on the Surface Common rollout.)
While a multicurve trimmed sub-object is selected, a rollout with the multicurve trim parameters appears. This rollout appears only when one multicurve trimmed sub-object is selected. It isn’t possible to edit more than one multicurve trimmed object at a time, so unlike some other NURBS sub-objects, the rollout doesn’t appear when multiple multicurve trimmed sub-objects are selected.
Multicurve Trimmed Surface rollout (modification time)
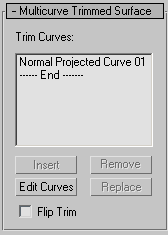
Lets you edit the currently selected curve without switching to another sub-object level. Click to turn on Edit Curve. The points or CVs of the curve are displayed, as well as the control lattice if the curve is a CV curve. You can now transform or otherwise change the points or CVs as if you were at the Point or Curve CV sub-object level. To finish editing the curve, click to turn off Edit Curves.
Don't edit the curve so you break the loop. If you do, the surface goes into an error condition.
Reverses the direction of the trim.
Along with Edit Curves, the Insert, Remove, and Replace buttons let you alter the curves that trim the surface. While you are making changes, the surface will go into an error condition (orange display by default) until the curves you are working on once again form a closed loop.


 Modify panel