Command entry:Unwrap UVW modifier
Edit UVs rollout
Open UV Editor button
Edit UVWs dialog
Tools menu
Render UVW Template
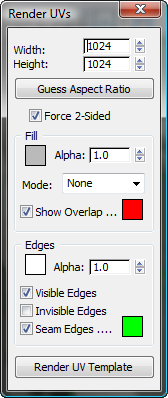
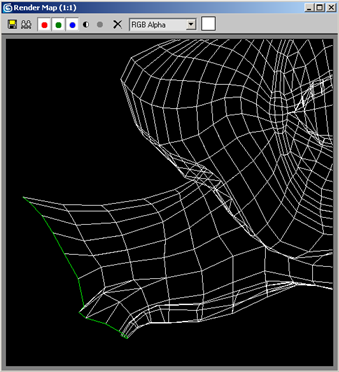
The Render UVs dialog, part of the Unwrap UVW editor, lets you export a model's texture mapping data as a template; a bitmapped image file. you can then import this template
into a 2D paint program, apply color as needed, and then bring it back into 3ds Max as a texture map to apply to the model. The exported file looks like a screen shot of the editor window, but without any
background texture, and has the added options of setting color and alpha options for both the edges and the area they cover.
For a procedure that covers usage of this dialog, see To export texture coordinates to a paint program:.
Interface
- Width/Height
-
The horizontal and vertical dimensions of the output (rendered) template image in pixels.
- Guess Aspect Ratio
-
Adjusts the Height value to produce an output aspect ratio based on the Width value and the dimensions of the UV grid.
For instance, if a rectangular UV grid measures 20 x 100 units and you click Guess Aspect Ratio, it would try to keep the
bitmap at the 1:5 aspect ratio. This makes painting on the bitmap easier because the bitmap is at the correct aspect ratio
for the mesh.
WarningUsing this function can result in Height value that is not a power of 2. If your mesh is destined for a real-time renderer,
adjust the resulting Height value to the nearest power of 2 after using Guess Aspect Ratio. For example, if it sets Height
to 650, change it to 512 before rendering the template.
- Force 2-Sided
-
When on, all UV edges are rendered into the template. When off, only UV edges of faces facing the viewer are included; edges
of back-facing faces are not rendered.
Fill group
Fill is the coloring applied to the rendered bitmap in the face areas between edges. By default, there's no fill; the bitmap
color is black, and the alpha channel is fully transparent. You can change this to a solid color or to shading derived from
the mesh and lighting in the scene, or from the normal directions.
NoteThe overlap color overrides the fill color. For example, if Show Overlap is on and all visible faces overlap other faces,
all faces will show the overlap color, ignoring the fill color.
- [color swatch]
-
Shows the fill color used for faces when Mode is set to Solid. To change the color, click the swatch.
- Alpha
-
Sets the alpha-channel value for the fill areas when Mode=Solid, Normal, or Shaded. When Mode=None, the fill alpha is always
0.0 (transparent). Range=0.0 (transparent) to 1.0 (opaque). Default=1.0.
The alpha channel is included with the rendered image only when you save in a format that supports transparency, such as TIF
or Targa.
- Mode
-
Specifies the method used for filling faces in the rendered template.
- None: No fill is rendered. This setting ignores the Alpha value, and sets fill alpha to 0.0; that is, fully transparent.
- Solid: Renders faces using the fill color specified by the swatch at the top of the Fill group.
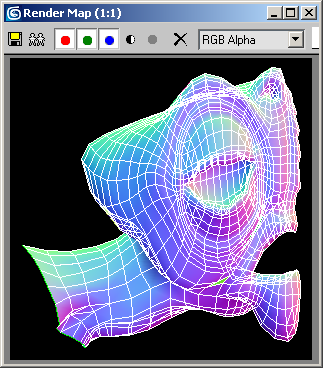
- Normal: Renders each vertex’s normals into the bitmap. The result looks similar to a normal map.
- Shaded: Uses a simple lighting setup to render shading across the UV surface.
- Show Overlap
-
When on, fills faces that overlap other faces with the overlap color, shown in the color swatch to the right. Default=on.
To change the overlap color, click the color swatch.
Edges group
- [color swatch]
-
Shows the color used for rendered edges. To change the color, click the swatch.
- Alpha
-
Sets the alpha-channel value for edges. Range=0.0 (transparent) to 1.0 (opaque). Default=1.0.
The alpha channel is included with the rendered image only when you save in a format that supports transparency, such as TIF
or Targa.
- Visible Edges
-
When on, edges are rendered using the specified edge color. Default=on.
- Invisible Edges
-
When on, hidden edges are rendered using the specified edge color. Default=off.
Hidden edges are most often found dividing mesh polygons into triangles. They aren't present in polygon objects.
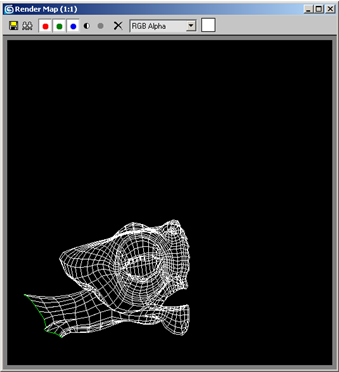
- Seam Edges
-
When on, seam (outside) edges are rendered using the specified seam color. Default=on.
To change the seam color, click the color swatch. The default color (green) is the same as that used for seam edges in the
Edit UVWs dialog, but the two can be changed separately.
_____
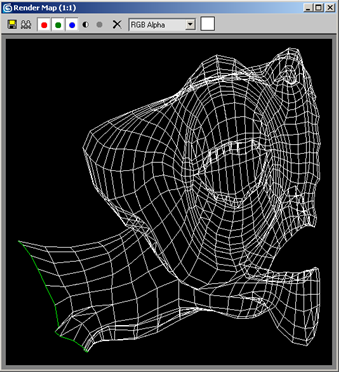
- Render UV Template
-
Renders the template bitmap in a new rendered frame window.
 To save the rendered frame, click the Save Bitmap button.
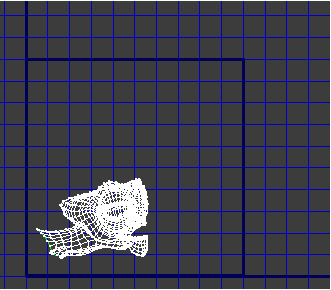
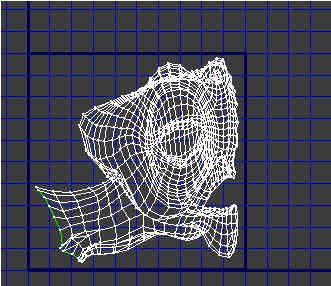
NoteThis command renders the normalized UV space, from (0,0) to (1,1), as depicted in the editor by a dark blue outline. For best
results, make sure the texture UVs fill this space but don't exceed its bounds.
Tip 
To turn off the background texture, which tends to obscure the UV space outline, click the Show Map button on the upper toolbar.