Command entry:
Select an editable mesh object.


Modify panel
Selection rollout

(Face),

(Polygon), or

(Element)
Command entry:Select an editable mesh object.
Modify panel
Modifier stack display

Expand the Editable Mesh entry.
Face, Polygon, or Element
Command entry:Select an editable mesh object.
Quad menu
Tools 1 quadrant
Face, Polygon, or Element
A face is the smallest possible mesh object: a triangle formed by three vertices. Faces provide the renderable surface of an object.
While a vertex can exist as an isolated point in space, a face cannot exist without vertices.
At the Editable Mesh (Face) level, you can select single and multiple faces and transform them using standard methods. This
is also true for the Polygon and Element sub-object levels; for the distinctions between face, polygon, and element, see Editable
Mesh Selection rollout.
Interface
Soft Selection rollout
Soft Selection controls affect the action of sub-object Move, Rotate, and Scale functions. When these are on, 3ds Max applies a spline curve deformation to unselected vertices surrounding the transformed selected sub-object. This provides
a magnet-like effect with a sphere of influence around the transformation.
For more information, see Soft Selection Rollout.
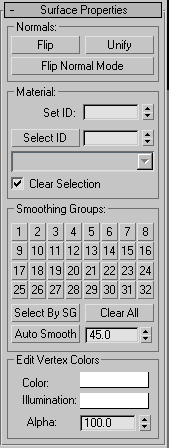
Surface Properties rollout
These controls let you work with face normals, material IDs, smoothing groups, and vertex colors.
Normals group
- Flip
-
Reverses the direction of the surface normals of the selected faces.
- Unify
-
Flips the normals of an object so that they all point in the same direction, usually outward. This is useful for restoring
an object's faces to their original orientations. Sometimes normals of objects that have come into 3ds Max as part of a DXF file are irregular, depending on the methods used to create the objects. Use this function to correct them.
- Flip Normal Mode
-
Flips the normal of any face you click. To exit, click this button again or right-click anywhere in 3ds Max interface.
TipThe best way to use Flip Normal mode is to set up your viewport to display with Smooth+Highlight and Edged Faces on. If you
use Flip Normal mode with default settings, you'll be able to flip a face away from you, but you won't be able to flip it
back. For best results, turn off Ignore Backfacing in the Selection rollout. This lets you click any face and flip the direction
of its normal, regardless of its current direction.
Material group
- Set ID
-
Lets you assign a particular material ID number to selected sub-objects for use with multi/sub-object materials and other applications. Use the spinner or enter the number from the keyboard. The total number of available IDs is 65,535.
- Select ID
-
Selects sub-objects corresponding to the Material ID specified in the adjacent ID field. Type or use the spinner to specify
an ID, then click the Select ID button.
- [Select By Name]
-
This drop-down list shows the names of sub-materials if an object has a Multi/Sub-Object material assigned to it. Click the
drop arrow and choose a sub-material from the list. The sub-objects that are assigned that material are selected. If an object
does not have a Multi/Sub-Object material assigned, the name list is unavailable. Likewise, if multiple objects are selected
that have an Edit Patch, Edit Spline, or Edit Mesh modifier applied, the name list is inactive.
NoteSub-material names are those specified in the Name column on the material's Multi/Sub-Object Basic Parameters rollout; these
are not created by default, and must be specified separately from any material names.
- Clear Selection
-
When on, choosing a new ID or material name deselects any previously selected sub-objects. When off, selections are cumulative,
so new ID or sub-material name selections add to the existing selection set of patches or elements. Default=on.
Smoothing Groups group
Use these controls to assign selected faces to different smoothing groups, and to select faces by smoothing group.
To assign faces to one or more smoothing groups, select the faces, and then click the number(s) of the smoothing group(s)
to assign them to.
- Select by SG (Smoothing Group)
-
Displays a dialog that shows the current smoothing groups. Select a group by clicking the corresponding numbered button and
clicking OK. If Clear Selection is on, any previously selected faces are first deselected. If Clear Selection is off, the
new selection is added to any previous selection set.
- Clear All
-
Removes any smoothing group assignments from selected faces.
- Auto Smooth
-
Sets the smoothing groups based on the angle between faces. Any two adjacent faces will be put in the same smoothing group
if the angle between their normals is less than the threshold angle, set by the spinner to the right of this button.
- Threshold
-
This spinner (to the right of Auto Smooth) lets you specify the maximum angle between the normals of adjacent faces that determines
whether those faces will be put in the same smoothing group.
Edit Vertex Colors group
Use these controls to assign the color, illumination color (shading), and alpha (transparency) values of vertices on the selected
face(s).
- Color
-
Click the color swatch to change the color of vertices on the selected face(s). Assigning vertex colors at the face level
prevents blending across the face(s).
- Illumination
-
Click the color swatch to change the illumination color of vertices on the selected face(s). This lets you change the illumination
without changing the vertex's color.
- Alpha
-
Lets you assign an alpha (transparency) value to vertices on the selected face(s).
The spinner value is a percentage; zero is completely transparent and 100 is completely opaque.