Materials add greater realism to a scene only if you choose their colors and other properties to appear like real-world objects. This topic presents some general guidelines for choosing standard material colors. When possible, you should also observe colors in the objects you are modeling, especially under different lighting conditions.
For objects on which you want the viewer to focus attention, an unmapped standard material doesn't often provide the level of realistic detail you probably want. However, for distant and peripherally visible objects, as well as some kinds of real-world materials, such as molded plastic, an unmapped standard material can work well. Keeping the number of maps to a minimum can help keep down the file size.
Whether a scene is indoors or outdoors affects your choice of material colors, just as it affects the way you set up lights. Full sunlight is bright and unidirectional. Most indoor lighting is less intense and more even (that is, multidirectional) than daylight. However, some special indoor lighting (and nighttime outdoor lighting), as for the stage, also features intense, directional light.
Direct sunlight has a yellow tint. Materials for objects to appear in daylight should have a specular color of a pale, unsaturated yellow (for example, RGB values of 240, 240, 188). The ambient color should be the complement of the specular: a deep, dark purple with a hint of the diffuse color.
Materials for objects to appear under normal interior lighting should have a specular color that is close to white. (Our perception compensates for the yellow or green tint that is often present in artificial light.) The ambient color can often have the same hue as the diffuse color, but with a darker value.
Materials for objects to appear under spotlights should follow the general guidelines for daylight materials. The specular color should match the spotlight's color, and the ambient color should be a very dark value of the spotlight color's complementary hue, mixed with a bit of the material's diffuse color.
If you want to render an object under changing lighting conditions, you can choose colors that are a compromise between the optimal colors for each kind of lighting, or you can animate the material so that its colors change to suit the changing light.
Representing Natural Materials

Outdoor scene with natural materials
Most natural materials have a matte surface with little or no specular color. For natural materials such as these, use the following guidelines:
Some foliage, bird feathers, fish scales, and so on, are shiny. For materials such as these, set the Glossiness to higher values. You might also want to change the specular color so it's closer to the lighting color than the surface's diffuse color.
Water is reflective, and is best modeled by a color component in combination with a reflection map or a water map.
While metal is a natural material, its special visual characteristics are most apparent when it has been polished. Standard material represents this by using a special shading type, described later in this topic.
Representing Manufactured Materials
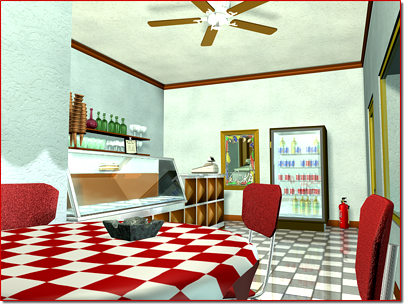
Indoor scene with manufactured materials
Manufactured materials often have a synthetic color rather than an "earth tone." Also, many manufactured materials, such as plastics and porcelain glazes, are very shiny. For manufactured materials, use the following guidelines:
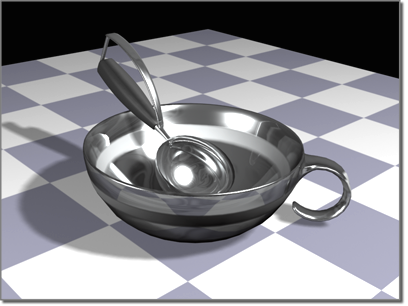
Metallic cup and ice cream scoop
Polished metal has a characteristic "glancing" highlight that appears where the light is at a high angle of incidence. To generate this effect, Metal shading uses the Cook/Torrance illumination model.
For metallic materials, you can use the Metal shading type. This disables the specular color and highlight controls. The Metal shader calculates its own specular color, which can vary between the diffuse color and the color of the light.
In the diffuse region of a metal material, the ambient component is greater than it is for other kinds of materials.
The Anisotropic, Multi-Layer, and Strauss shaders give you further options for modeling polished metal.
If the metallic object is the focus of the scene, you can improve realism by using a Blend material to combine metallic shading with a reflection map.


 When you preview metallic surfaces, it is useful to turn on a backlight. This displays the metal's glancing highlight. The
Backlight button is to the right of the sample slots.
When you preview metallic surfaces, it is useful to turn on a backlight. This displays the metal's glancing highlight. The
Backlight button is to the right of the sample slots.