Face Robot works in six stages that are straightforward to use. When you load an existing scene in Face Robot, it automatically goes to the stage where you last saved it.
The following images and steps show you the basic workflow path that you follow in Face Robot.
To get started with Face Robot, check out the Face Robot videos on the Softimage YouTube Learning Channel.
You can also load the sample Face Robot scenes that are installed in the Softimage application's Data\XSI_SAMPLES\Scenes\FaceRobot folder.
As you work, it's a good idea to save your own scene at each stage of the Face Robot process so that you don't need to start from scratch if you run into problems.
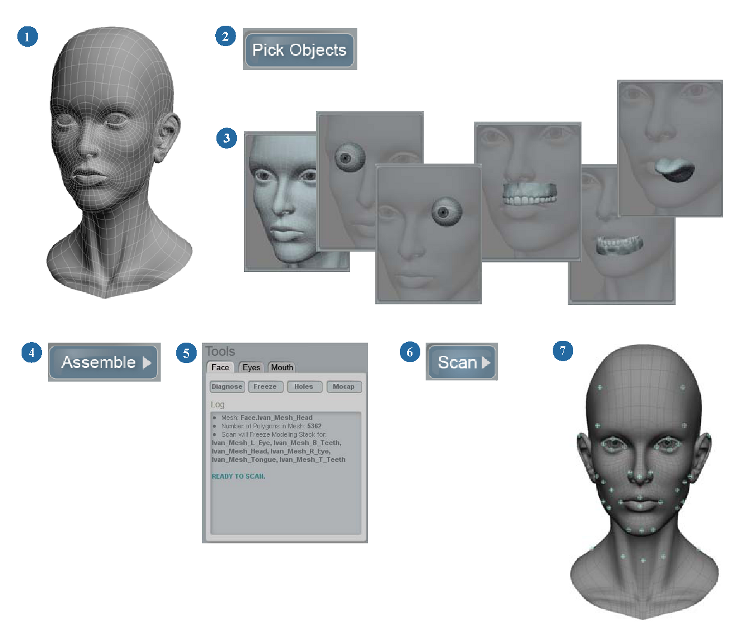
| 1 |
Make sure to follow the modeling requirements for the head before you start — see Modeling the Head and Its Parts for Face Robot. Load the model, scene, or file that contains all the face parts: a head, two eyeballs, separate upper and lower teeth, and an optional tongue — see Loading and Saving Scenes in Face Robot. When you're in Face Robot mode, you'll see the Stage 1 panel — see Assembling the Face Objects. |
| 2 |
With the head and face parts ready to go, click the Pick Objects button on the Stage 1: Assemble panel. This opens the Stage 2 panel. |
| 3 |
On the Stage 2: Objects panel, pick all the objects that need to be processed by Face Robot. |
| 4 |
When you're done, click the Assemble button. This returns you to the Stage 1 panel. |
| 5 |
Back on the Stage 1 panel, check the diagnosis and fix any problems. If you haven't already done so, make sure to set the DNA type of the face to Symmetry or Asymmetry or else you can't continue — see Selecting a DNA Type. |
| 6 |
When the Diagnosis indicates that the face is ready to scan, click the Scan button, and Face Robot scans the objects. |
| 7 |
After the scanning is done, the Stage 3: Landmark panel opens. Pick all the landmark points on the face that help Face Robot determine the size and proportions of the face. Face Robot guides you through this process. See Picking the Landmark Points on the Face. |
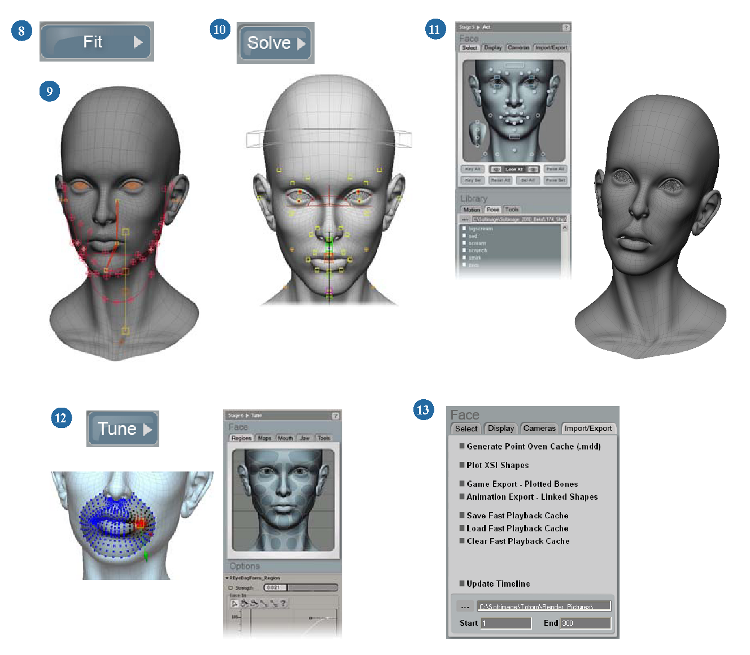
| 8 |
When you're done picking the landmarks, right-click to end the picking mode, then click the Fit button. Face Robot analyzes the face and creates a set of fitting controls based on the location of these landmarks. When the fitting process is done, the Stage 4 panel opens. |
| 9 |
On the Stage 4: Fit panel, adjust the fit of the curves on the soft tissue around the jaw, the position of the neck controls, the centering and placement of the eyes, the placement of the jaw bone, and the placement of the controls on the tongue, if you included one. See Fitting the Face. |
| 10 |
Click the Solve button when you're done. Face Robot solves the soft tissue according to the placement of the controls that you adjusted. At the end of this process, you've got a solved Face Robot head! The Stage 5 panel then opens. |
| 11 |
On the Stage 5: Act panel, you can set keys on the animation controls that are created on the face, or load in motion capture files to animate the controls on the face. See Stage 5: Act. |
| 12 |
Click the Tune button to go to the Stage 6: Tune pane. Here, you can sculpt and tune each region of the face in different ways to adjust how it deforms according to the animation. You'll probably go back and forth a lot between this panel and the Act panel. See Stage 6: Tune. |
| 13 |
When you're all done and good to go, click the Act button on the Tune panel to return to the Act panel. From there, you can export the finished animated Face Robot head in a number of different ways. See Exporting from Face Robot. |
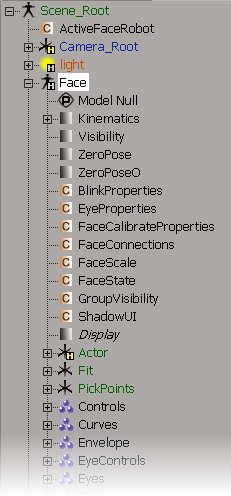
When you create a head in Face Robot, a Face model is created. This model contains all the operators, face rig objects, properties, and animation controls that are used by Face Robot to create animated facial deformations.
You can find and select the special Face Robot elements in the Face model using the explorer.
 Except where otherwise noted, this work is licensed under a Creative Commons Attribution-NonCommercial-ShareAlike 3.0 Unported License


