Dynamic property assignment is a feature of the render tree that lets you extend shaders by using the output of one shader as the input for one or several shader parameters. Since each node has an output and at least one input, you can connect a nearly endless number of nodes together. For example, you can use a 2D or 3D texture to control a material shader's reflectivity and another texture to control the its specularity.
Some render tree connections are very basic. For example, when you connect a color output into the an object's surface input, you have a pretty good idea of what the result is going to be because you're only changing the object's color. But what if you connect a fractal shader to another shader's Reflection input or a cloud texture to a material's Displacement input? The combinations are endless!
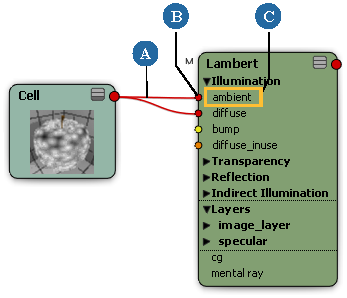
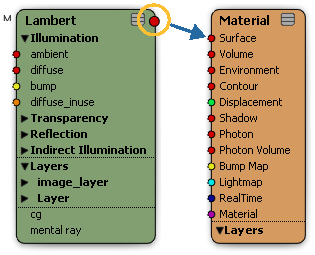
In general, you connect shader nodes by clicking and dragging an output port from the right side of one shader node onto an input port on the left side of another shader node, or the other way around (drag the input port onto an output port).
Data flows along the connection from the first node and is processed by the second node.
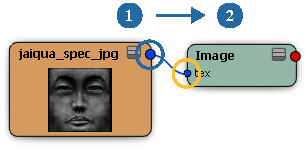
| 1 |
Data travels from this node's output port ... |
| 2 |
.. and is processed by this node via its input port. |
When a port is connected, the value of its corresponding parameter is driven by the connection, which means that you can no longer set the parameter's value in that shader's property editor. In fact, the parameter and its controls (checkboxes, sliders, etc.) are not even displayed. If you remove the connection, the controls reappear in the property editor.
The type of the data, as indicated by the port colors, determines whether you can connect two specific ports. If you cannot connect two ports, it is likely because the types are incompatible. See Ports for Parameters: The Ins and Outs for more information.
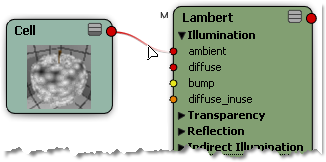
Once you have created a connection arrow from a node's output, you can drag the cursor over a port inside another node to see if a parameter will accept the connection.
If the parameter name changes color, it will accept the connection arrow.
If the input and output are not of the same type, a conversion node is created automatically.
If a shader node already exists in the render tree, you can connect one of its output ports by dragging the port icon onto another node. You can also add a new node and connect it at the same time by dragging the node from the preset manager directly onto a node's port (you can't do this for shader compounds).
You can hover the mouse pointer over a connection to highlight the connected ports. If a port is not visible because it has been collapsed or because the view is zoomed out too far, information about the port is displayed in a pop-up.
Connecting Existing Shader Nodes
Bring two or more shaders that you want to connect into the render tree.
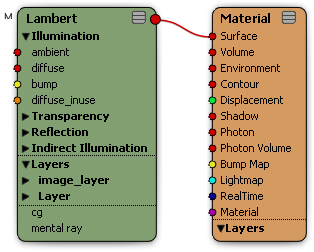
Click on an output port on the right side of a node, then drag it over to an input port on another node and release the mouse button. If the input port's name is highlighted when you drag over it, the connection is valid.
Click on an input port on the left side of a node, then drag it over to an output port on another node and release the mouse button. When the menu of ports appears, select the one to which you want to connect.
You can connect the same output to as many input ports as you want.
Adding a Node from the Preset Manager and Connect It to an Input
Drag a shader node (not a shader compound) from the preset manager directly onto the node to which you want to connect. The new node is slightly transparent and displays an arrow when it's on top of the existing node.
Drag the new node over the port name to which you want to connect so that the name is highlighted. When you release the mouse button, the new node is connected to that port.
Connecting to Collapsed Nodes, Port Groups, and Texture Layers
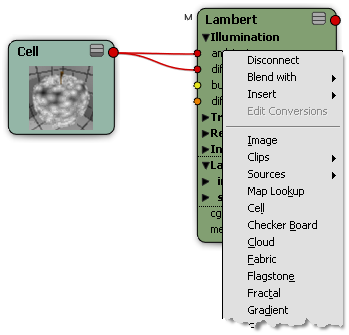
When port groups, texture layers, or entire nodes are collapsed, their ports are hidden. Rather than expanding them, you can use a pop-up menu to connect nodes to ports while they're collapsed.
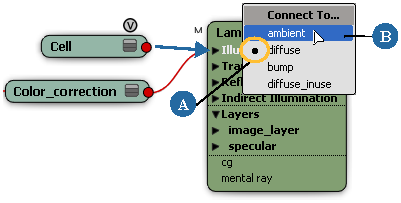
Drag a connection arrow from an output port onto a collapsed node, port group, or texture layer. Release the mouse button and a pop-up menu appears showing all input ports that are valid for that connection.
Select an item from the menu to connect to that port.
Ports that are already driven by a connection are have a bullet beside their name in the menu. Selecting a connected port replaces the old connection with the new one.
You can press Shift to keep the menu open while you select multiple ports.
Rather that getting shader nodes from the preset manager or Nodes menu and then connecting them, you can insert certain nodes directly into the render tree workspace using a contextual menu. You can insert nodes between other nodes in one of three ways:
Blended with the shader's parameters using a texture layer. For more information about working with texture layers in the render tree, see Working with Texture Layers in the Render Tree.
Inserting a node from the preset manager
Drag a shader node (not a shader compound) from the preset manager onto the connection line between two nodes. The new node is slightly transparent.
Release the mouse button when the connection line is partially highlighted and the new node's outline shows an arrow.
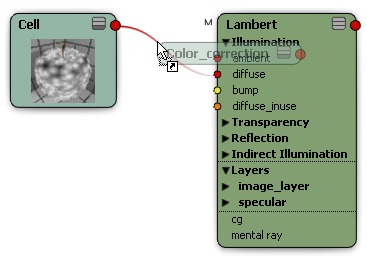
The new node's inputs and outputs are connected according to the first valid ports available. If these are not the desired ports, simply reconnect them.
Inserting a node using a pop-up menu
Expand a node and right-click any of the following:
Right-click in any of these places (A, B, C) to insert a node.
From the pop-up menu that appears, choose one of the following:
Disconnecting nodes is as simple as connecting them. Use any of the following techniques:
Move the mouse pointer over the connection line, close to the input port. The line's right end is shaded in white.
Click and drag away from the port until the cursor changes to a pair of scissors, then release the mouse button.
You can also replace a connection by connecting a new node without disconnecting the first one.
Assigning Texture Projections to Nodes
Texture shaders and certain other properties require you to select a projection. You can specify an existing projection or create a new one using the texture projection control in the upper-left of the render tree.
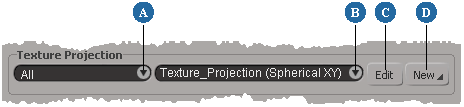
| A |
If multiple objects use the same material, you can select the one(s) to affect: All or a specific object. This box appears only if a material is shared by multiple objects. It updates automatically as you select objects in the scene, as long as the render tree is not locked. |
| B |
Select an existing projection to use. If an object already has one or more projections when you apply a texture, the texture will automatically use the first projection. However, this box will remain blank until you explicitly select a specific projection. If multiple objects with the same material use different projections, (multiple values) appears instead of a projection name. You can select a projection by name only if all objects have a projection with the same name. However if you are using a naming convention for projections on different objects, you can enter a string with a * wildcard pattern. |
| C |
Click to modify the properties of the selected projection, as well as the support if applicable. In the case of multiple texture projections, a multi-selection property editor opens. Changes that you make from the property editor affect all projections. |
| D |
Click to create a new projection. See Creating Texture Projections. |
Besides viewing and editing texture projection information, you can also get information about other maps used by selected nodes (weight maps, color at vertices maps, and so on). If you select multiple nodes that use different types of maps, the texture projection controls are deactivated.
For information on texture projections in general, see Applying and Editing Textures.


 Show Connections as Curved Lines