On the Tune panel, you can sculpt the deformers and paint weight maps to adjust how the underlying soft tissue model will deform the face when it's animated.
The Tune panel is divided up into three main sections: the Face panel on top, the Options panel below it, and the Sculpt panel at the bottom. See the following image and table to find where all of the options on the Tune panel are discussed:
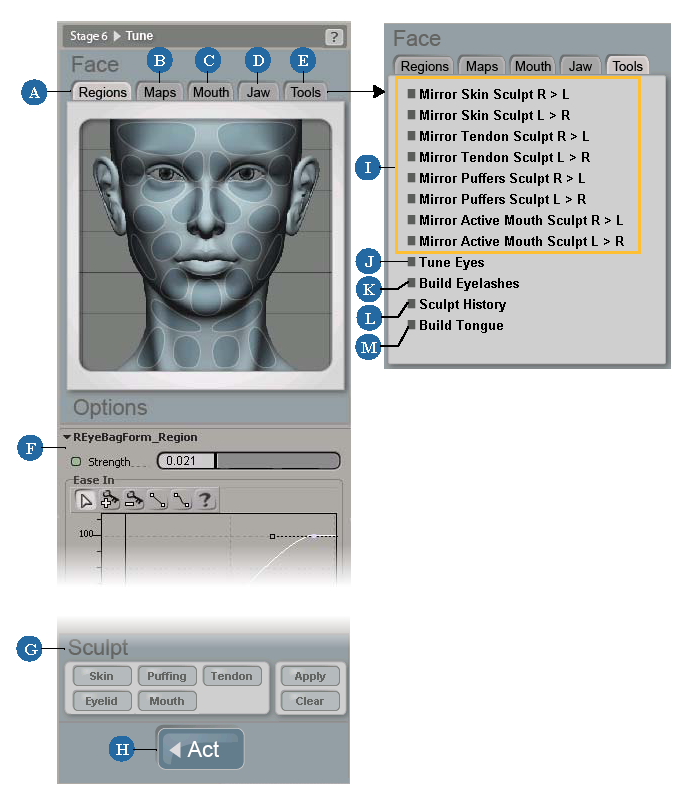
| A |
The Regions tab contains a map of the areas of the face that can be sculpted using these deformers — see Working with the Region Deform Areas. |
| B |
The Maps tab contains options for displaying different types of maps used for deforming the face — see Painting Weight Maps, Painting Envelope Weights, and Region and Stress Maps. |
| C |
The Mouth tab contains commands for fixing mouth problems and tuning the mouth and lips — see Fixing Problems and Regenerating the Mouth, Painting the Mouth Blending Area, and Tuning the Lips and Mouth. |
| D |
The Jaw tab contains commands for tuning the jaw shape — see Tuning the Jaw. |
| E |
The Tools tab contains commands for several different tuning and sculpting issues (see I, J, K, L, and M). |
| F |
The Options panel contains options for whatever command or tool you have selected in the Face panel above. For example, if you click a region on the face on the Regions tab, options for that region appear below in the Options panel. |
| G |
The Sculpt panel contains buttons for sculpting the different parts of the head — see Overview of Sculpting. |
| H |
The Act button lets you return to the Act panel. You can also press F6 to keep an Act panel synoptic view open at all times — see below. |
| I |
The Mirror options on the Tools tab let you sculpt the face in symmetry — see Sculpting the Skin (Forehead, Eyebrow, Neck, and Jaw Areas). |
| J |
The Tune Eyes command on the Tools tab lets you fine-tune the eyelid curves — see Tuning the Eyelids. |
| K |
The Build Eyelashes command on the Tools tab lets you build eyelash meshes and rigs — see Building Eyelash Meshes. |
| L |
The Sculpt History command on the Tools tab displays the history of sculpts you have created with the Sculpt command — see Working with the Sculpt History. |
| M |
The Build Tongue command on the Tools tab lets you add, fit, and solve a tongue mesh — see Adding a Tongue. |
Displaying the Act Panel Synoptic View
During the process of tuning, you will probably want to go back and forth between the Tune and Act panels as you get the deformations just right according to the animation.
You can easily go back and forth between the Act and Tune panels by clicking the appropriate buttons at the bottom of each panel.
You can also press F6 to display an Act panel synoptic view to keep it available while working in the Tune panel. This makes it easy to tune and sculpt the soft tissue and set new keys for the animation based on these adjustments.
To display the Act panel synoptic view
Position the cursor where you want the Act panel synoptic view to be and press F6: the middle of the left side of the view is positioned at the cursor's location.
Press F6 again (or activate another tool, such as by pressing the space bar) to hide the synoptic view.


