Creating a simple and functional spine is often a daunting task in any character setup because of the nature of the spine's
movement. There are different ways of solving this problem, but creating a spine with the Create  Skeleton Create Spine command is the best and easiest way. With it, you can create a quaternion-blended spine for controlling a character the way
you like.
Skeleton Create Spine command is the best and easiest way. With it, you can create a quaternion-blended spine for controlling a character the way
you like.
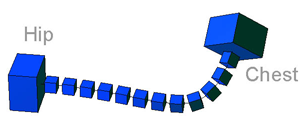
This spine is made up of cubes that act as vertebrae, with the top and bottom vertebrae attached to hip and chest control objects that you create. The simplest way of visualizing a spine is a bridge that starts at the hip and extends to meet the chest. Its orientation matches the hip where its starts and the chest where it ends. The vertebrae roll between these two orientations and bank along the path of the spine.
The spine is a mixture of path constraints (to keep it on a spline), distance constraints (to hold the spine together more like a chain than a spline), and up-vector constraints (to keep the orientation to the spine but the roll to the quaternion blend between the chest and hip).
As well, the spine uses a scripted operator to control its movement. As a result, you should not use the Remove Animation from All Parameters, Any Animation Type or any of the Remove Animation from Transforms commands from the Animation panel when deleting animation from the spine. This will remove the scripted operator on the up-vector
parameters of the path constraint from the vertebrae, causing the spine to be incorrectly oriented when you rotate the character.
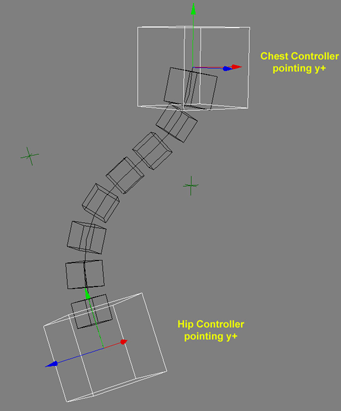
Orient the positive Y axis of the hip and chest controllers so that they will both be pointing along the axis of the spine. This is very important to do to get a straight spine, and avoid unexpected results when you animate.
Choose Create Skeleton Create Spine from the Animate toolbar.
Pick the object that is to act as a hip controller (the base of the spine), then pick the object (middle-click) that is to act as a chest controller (the top of the spine).
In the Spine Maker dialog box that appears, define the number of vertebrae in the spine. The spine is generated using this information.
If you can select Implicit Vertebrae, the cubes that represent the vertebrae are created from implicit cubes instead of polygon mesh cubes.
Parent the spine into your skeleton or rig setup the way you want.
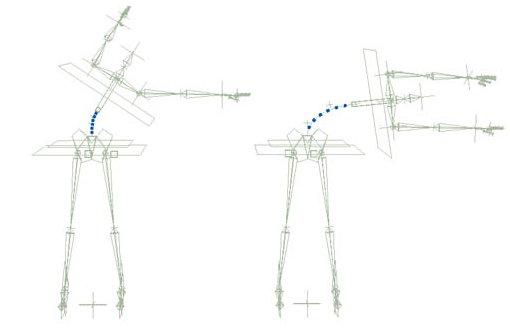
To animate the spine, set keys on the position and rotation of the hip and chest controllers. The spine maintains a fixed length and will reach towards the chest as much as it can.
Stretching and Squashing the Spine
You can "squash and stretch" the spine to fit it into a number of different character setups, or to adjust to a new animation to which you've retargeted the character (such as with Motion Deform — see Converting a Biped's Motion to Deformable Tracks).
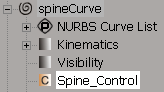
The scale of the spine doesn't change as you move the chest controller, but it can be scaled with the Scale slider that appears when you create the spine, and is located in the Spine Control custom parameter set beneath the spine curve object.
This means that every component can be scaled or animated in proportion from the bones to the spine.
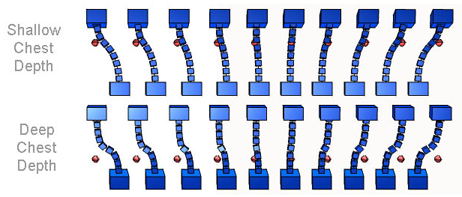
Both the chest and the hip have nulls that represent depth, called ChestDepth and HipDepth, respectively. These nulls are created as children of the chest and hip control objects. The depth affects how the spine deforms in position and rotation, such as to give the spine a more natural curve.

If you want to modify the depth on the spine, position these nulls in Constraint Compensation mode (click the CnsComp button on the Constrain panel). You can also key in them if you want to animate the depth variance. The depth of the spine is set only through parenting, so the chest and hip objects might move independently from the depth nulls if you have Child Transform Compensation mode on (the ChldComp button).
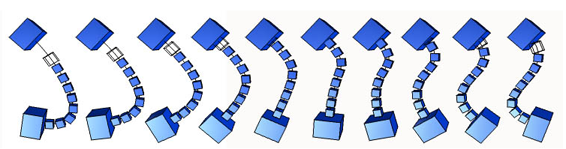
You can roll the spine between ranges of 360û to -360û (a full 720û) which makes it useful for dynamic spine motion, tentacles, dinosaur necks, and many other character setup scenarios.
In a regular quaternion blend, you will never interpolate a rotation blending path greater than 180 degrees. You can visualize this by picturing two points on a sphere. No matter where you position the two points, the shortest path will always represent an angle 180 degrees or less.
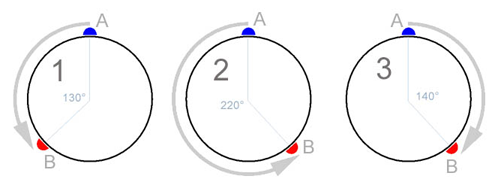
Consider Sphere 1 above where you are blending between Object A and B. As B moves away from A the distance you will be blending through increases. In diagram 1, the blend will be between 0û (A position) and 130û (B position).
Now if you consider Sphere 2, B has moved beyond 180û to a position 220û away. But at this point the best blend found by a slerp algorithm ends up being from the other side of the sphere, shown in Sphere 3. The angle being blended between will be 140û.
For this reason you will never have a blend angle greater than 180û and less than -180û.
You can use the spine as a tool for taking the animation from a simple chain and making it seem as if it was done with many more bones. For example, create a simple chain, constrain the spine to it, and then constrain a secondary chain with more bones to the spine.
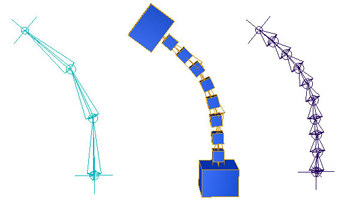
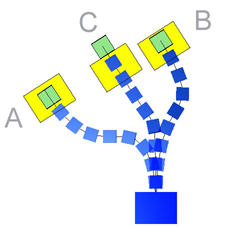
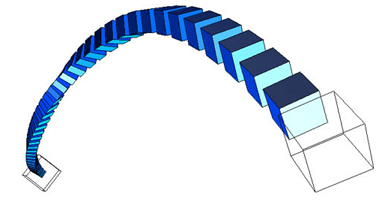
The end of the spine will push out to avoid crunching. This also is useful for keying the spine's translation with fewer keys. As shown in the illustration below, the chest controller in yellow is keyed at moves between positions A and B.
However, this motion will end up crunching the spine at position C. The spine's end vertebra (small box in green) will push out to avoid the crunch, giving a smooth animation in this case with out any extra keying to correct the movement.