Action states are a framework that offers you control of how specific deformers are animated in the ICE tree. It's basically a state system that keeps track of which action state is being used on which deformers: you provide the ICE logic for the conditions under which action states switch and how the deformers' animation blends.
You will probably use action states in conjunction with constraints on particular deformers, such as to drive the orientation of an arm to make it wave or scratch the actor's head. You can also get animation data from action sources to drive specific deformers (see below). For example, while an actor is in his running pose state, you could blend in a "twisting torso" action source that makes only the upper body deformers rotate as he's running.
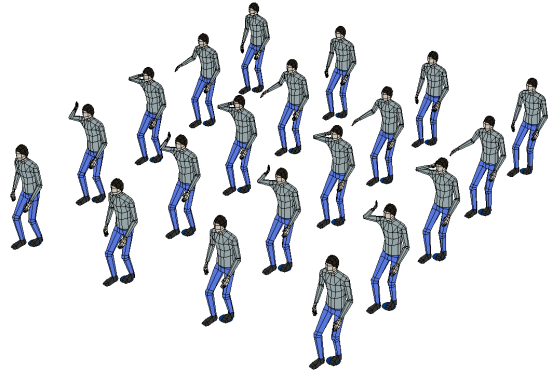
The following example shows a simple way in which you can use action states. In a nutshell, here's what happens in this crowd simulation: The actors are in a walk cycle as defined with the usual locomotion pose states. When an actor instance (particle) reaches a certain position in global Z as he's walking, his right arm is rotated up into a salute pose. When he walks a bit farther ahead in Z, his arm rotates back down into its normal position in the walk cycle.
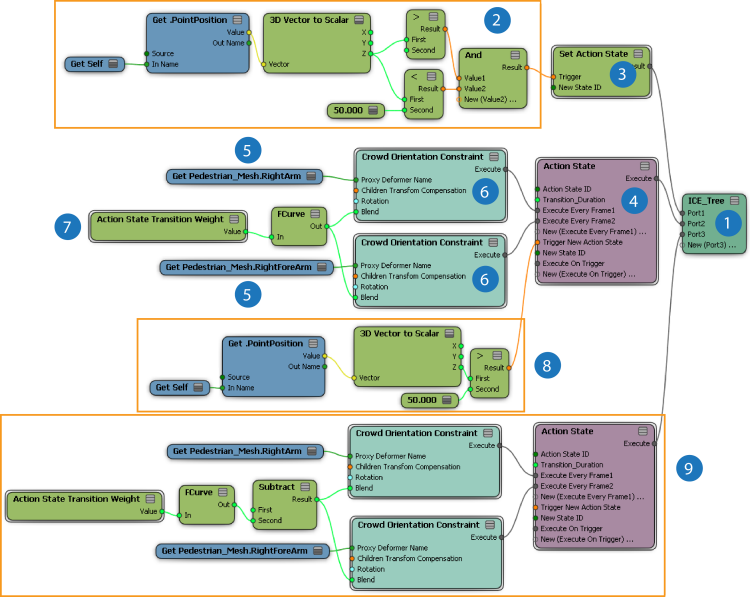
And here's what's happening with the action states in the ICE tree. Each of the numbers in this image corresponds to the steps following it:
Using this example as a base, here are the basics of what you need to do:
| 1 |
Create an ICE tree in the Simulation region of the simulation point cloud. Position it above the Skeleton Simulation ICE tree so that the actor's pose state data is calculated first. |
| 2 |
Create the logic for the condition in which to use the action states. In this example, the condition is that the particle's (actor instance) position is greater than 35 units on the global Z axis but less than 50 units. |
| 3 |
In the Set Action State compound, use that logic as the trigger for activating the first action state that you have defined as the New State ID. In this example, the New State ID is set to 1 to match the first action state defined. |
| 4 |
Get an Action State compound for the first state you want to create and set its options. In this example, the Action State ID is set to 1 and the Transition Duration is 10 frames. |
| 5 |
Get each actor rig proxy deformer that you want to constrain or animate. In this example, the RightArm and RightForearm deformers will be constrained. |
| 6 |
Add the constraints that you want to use to drive the animation of the deformers. You can also use specific animated parameters from action sources to drive the animation - see the next section below. In this example, the Crowd Orientation Constraint compound is used to rotate each deformer into a salute pose. The RightArm is being constrained to a Rotation Z value of -15, while the RightForearm is being constrained to a Rotation Z value of -150. |
| 7 |
Using the Action State Transition Weight compound, blend between the deformer's values from their original pose to the one that you're defining in this action state. In this example, the arm deformers' orientation from the walk cycle is blended with the orientation defined by the constraints. An Fcurve node provides a smoother ease-in for the transition. |
| 8 |
Define the logic that sets the Trigger New Action State from the first action state into the next one. In the first Action State node, set the New State ID to that of the action state to which you want to switch upon the trigger being activated. In this example, the logic is that the next action state (Action State ID 2) is used when the trigger of the particle's position being greater than 50 units on the global Z axis is reached. |
| 9 |
Create the next Action State that will be triggered. In this example, this action state's ID is 2. The animation used here is basically the reverse of that defined in the first state: the RightArm and RightForearm deformers are being rotated back down to their original positions as defined in the Walk pose. Note that a value of 1 is used in the Subtract node to return the blending to the original value. |
Using Action Sources to Modify the Deformer Transformations
If you're using action states, you can drive the animation of specific deformers using an action source that animates only those deformers, such as the animation of the right arm waving. You can also use an action source that affects the whole rig proxy, but then access only specific animated parameters from it to drive certain deformers. You can also choose which frames of the original action source you want to use.
You can get the original source model's action sources directly into the ICE tree, then use the Get Action Source at Frame node to get one or all animated parameters at a specific frame from an action source. Using this node means that you don't need to load the action sources and create pose states to access the data, but you do need to know the contents of the action sources well and be able to set up your own logic in ICE for using that animation data.
Here's a basic outline of what you need to do to drive the animation of the deformer with data from an action source:
Set up the action state system as described above.
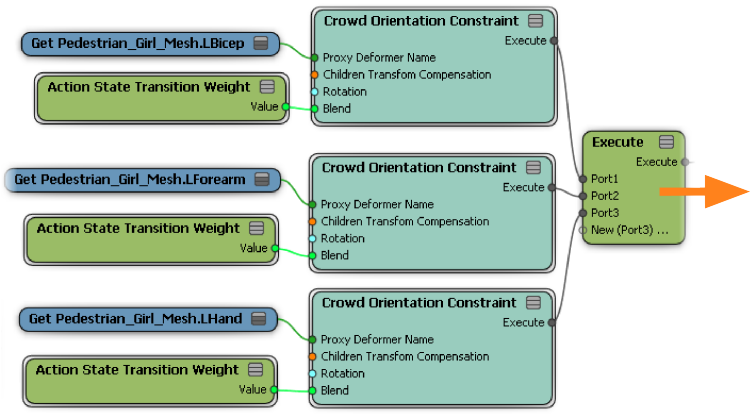
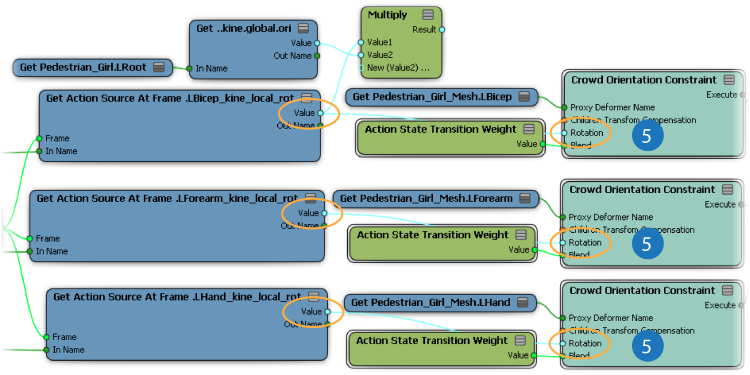
In this example, the three left arm deformers are each in Get Data nodes and set up with an orientation constraint. They are all plugged into an Execute node which is plugged into an Action State compound that's part of an action state system.
Get the original model's action source whose animation you want to use. This source can contain animation for only the deformers you want to control or for the whole rig.
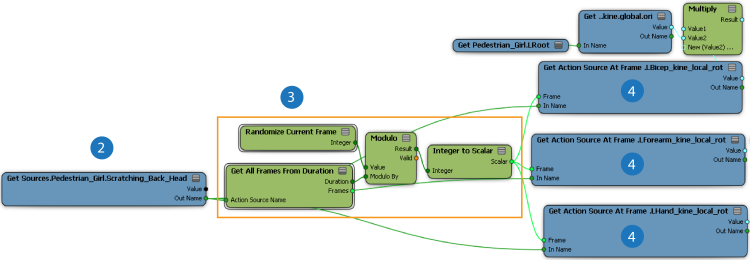
In the example image below, the action source for a "scratching the back of the head" is loaded (2). This action source contains animated arm rotation parameters that will be used to animate the actor's left arm deformers.
Get all or some of the frames of the action source. If you want to use only certain frames, create the logic to specify which ones, as shown in the example image below (3).
In the Get Action Source at Frame node, get the specific animated parameter you want to use to drive the animation of the deformer. Select it from the Explorer > Items list in this node.
In this example, each Get Action Source at Frame node (4) gets the local Rotation X animated parameter for each deformer in the actor's left arm (bicep, forearm, and hand) that is constrained.
Note that the Get All Frames from Duration compound is not a factory compound, but is available in one of the CrowdFX sample scenes.
If you select an animated rotation parameter, such as RBicep_kine_local_rotx, it gives you a scalar, but if you remove the axis (such as "x") from the string, it gives you a vector or rotation type. To get a rotation type, you must keyframe the Rotation Order in your original animation before saving the action source. If you didn't key the rotation order, you can use an Euler to Rotation node to get a rotation type.
Plug the animation data from the Get Action Source at Frame node into a constraint compound or use some other logic to drive the deformer's animation.
In this example, each Crowd Orientation Constraint compound is used to constrain its corresponding deformer with the Rotation values supplied from its Get Action Source at Frame node.