Reflectivity and highlight settings


Tip

To view the parameters for a particular material, select an object with that material and press Ctrl+M, or right-click on the material swatch in the “in scene materials” UI and choose Material Properties.

Show reflections for this material

Turns on reflections for this material.

Reflect the environment

Reflect the current environment in Hardware rendering mode, as well as other objects in the scene in Ray Trace rendering mode.

Use reflection map

Use a reflection map when you want your materials to reflect something other than the environment background. Control brightness using the Reflection brightness slider (must be adjusted for each environment).

Note

Reflection maps override all other reflections in Ray Tracing. This means that any objects with this material will reflect only the map in both Hardware and Ray Tracing modes, and any other objects will not be reflected. This can result in the material appearing less reflective in Ray Tracing mode.

A reflection map must be a panoramic image in the “vertical cross” format. The image file should have an aspect ratio of 3:4 and pixel dimensions that are a power of 2 (24 x 32, 384 x 512, etc.). The image can either be a regular image (JPG, PNG, BMP) or a High Dynamic Range image (HDR, EXR).

Reflectivity
Various materials reflect differently depending on the angle you view them from; for example, looking directly at a flat surface might show little or no reflection, but viewing the surface at an oblique angle might clearly show reflections. This effect is also called Fresnel. Use the Reflectivity menu to determine if reflectivity varies by angle viewed.
  • Is constant across the surface : The brightness of reflections is constant across the surface (the default). Adjust overall reflectivity by dragging the Overall reflectivity slider that appears. Full reflectivity is attained when you drag all the way to the right (1.000).
  • Depends on the viewing angle : Reflections are stronger on areas of the surface viewed edge-on and weaker on areas of the surface viewed directly on. Adjust this effect using the reflectivity graph that appears.

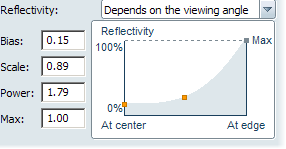
    The mathematical function that relates the angle of view to the amount of reflection is called a "Fresnel function", and it is uses three parameters: Bias, Scale, and Power. The fourth parameter, Max, stops the amount of reflectivity from ever going above a certain number.

    The formula is: reflectivity = bias + (scale * (1.0 - cos(view angle))**power)). You can try typing in these values directly, or use the reflectivity graph to change the Fresnel function. As you change the curve on the graph, the look of the material updates in the view.

    Change the reflectivity by clicking and moving the handles. The left side of the graph shows how reflective the material is when viewed directly ("at center"). The right side shows you how reflective the material is when viewed on an oblique angle ("at edge").

    See Reflectivity examples.

Highlight size

Controls the size of shiny highlights or hotspots on the surface. (This value is sometimes called eccentricity.) This value affects directional light, as configured with the Environment Light slider in the Directional Light and Shadows window.

Tip

For surfaces to be perceived as shiny, the highlight size should be small and the highlight transition value should be high. For surfaces to be perceived as dull, the specular highlight size should be large and the highlight transition value should be small.

Highlight transition

Modulates or scales the intensity of the specular highlight. (This value is also called specular rolloff.) In other words, it affects how much of the highlight spreads into darker areas. Like highlight size, this value affects directional light, as configured with the Environment Light slider in the Directional Light and Shadows window.

Reflection Type
Use this drop-down box to control reflection tint. You can tint the reflection with the material color, with a custom color, or not at all. If you choose the custom color option, controls appear so you can select a color or an image map. See Color parameters
Absorb reflection
(Not available when the custom reflection type is selected.) Dims the reflection by removing light that is coming off of the reflective surface. Use this in parallel with the Overall reflectivity slider or reflectivity graph under Reflectivity. Suitable for surfaces such as aluminum or gold. For example, gold tends to strongly reflect other colors in the scene, which might not be desirable. You can reduce this effect by increasing reflection absorbency.
Enable blurred reflections and refractions
Turns on blur and enables the accompanying Surface rougness slider. Useful for simulating materials that are reflective or transparent but do not have a perfectly smooth surface, such as sandblasted glass or metal.

Examples of use:

  • Take a highly reflective chrome surface and use blur to make it look like silver or aluminum.
  • With beige leather, and bump enabled, turn down reflectivity and use blur to make the surface look less like plastic.
  • With glass materials, add a bump map and use and use reflectivity blur to create a "frosted" look.
  • With Gold, turn up reflectivitity and use blur to give it a realistic sheen.
  • If you want a polished surface, turn down Surface roughness.
  • If you want a glossy surface, reduce or turn off blur.
  • On wood surfaces, to get a satiny finish, enable blur, add some surface roughness and a bit of reflectivity.