Work with materials used in the scene


View a list of currently used materials

  1. Press M to view the material interface.
  2. At the top of the Materials interface is a section labeled Materials in Scene.

    The list indicates which materials are currently assigned in the scene, which materials are included in alternatives, and which materials are linked to imported model files. It also shows materials previously assigned in the scene or copied into the list.

Icons used in the list


A check mark indicates the material is currently used in the scene. (To find out which surfaces use the material, choose Select objects with this material from its right-mouse button menu, then press Ctrl-F to focus in on the selected surfaces.)


An asterisked check mark indicates the material is used in an alternative that is not currently visible in the scene. (To view alternatives, press the A key.)


If there is no check mark, the material is not applied to any surface.


A chain icon indicates the material is linked to the material in the originating application. You can rename, but not delete, the material.

If you update the file from the Import Status window, the material is updated. If you edit the material, the link is broken and the chain icon disappears.

If you edit a linked material, a new material is created and applied to all the objects assigned with the old material.


A question mark indicates that at least one material texture cannot be found. A possible cause is a broken or partial path name.

Change material properties

To change the properties of a material for all objects in the scene to which it is applied to, either:

  1. Right-click on the material icon in the “Materials in this scene” category and select Properties....
  2. Right-click on the object itself, and choose Material Properties from the pop-up menu.
    Note

    Both of these methods of editing the Material Properties will affect even hidden objects or objects in alternatives. However, if the material is already added to an alternative, the material alternative will not change.

Set up color studies or palettes

You may want to copy extra materials into the list or duplicate existing materials and tweak them to set up color studies or a palette of scene materials.

To add a material from the library to the Materials in this Scene list, select the material and choose Copy to Scene Materials.

To duplicate a material in the Materials in this Scene list so you can create several variations of textures or colors, select Duplicate from its right button menu.

Filter the list

To filter the list to view particular types of materials:

  1. Go to the Materials in this Scene category heading.
  2. Click the Manage button to see the filter options.
  3. Select one of the Show menu entries.

    The filters available are:

    • Show All: lists all materials in the scene, whether imported, assigned, or unused.
    • Show Assigned: lists only materials assigned to objects in the scene. The materials will have a checkbox icon in the corner.
    • Show Unused: lists materials that are not assigned or imported. The materials will have no icon in the corner.
    • Show Imported (Locked): lists materials that were imported with the geometry and are locked. The materials will have a lock icon in the corner.
    • Show Materials used in Alternatives: lists materials that are used in material alternatives. The materials will have a checkbox icon or an asterisked checkbox icon, depending on what alternative is currently displayed.
    • Show Materials of Selected Objects: lists materials that are used in the current selection. This list will update as objects are selected or deselected.

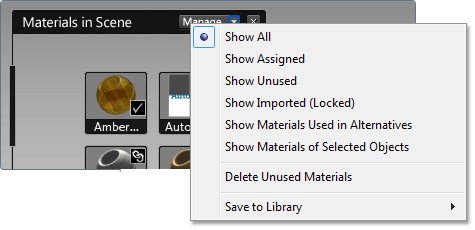
      There are also additional functions in the Manage menu for Materials in this Scene:

    • Delete Unused Materials: deletes all unused materials from the Materials In Scene area, except locked materials and those used in alternatives.
    • Save to Library: provides an easy way to save an in-scene material to a common library of specific materials.

    See the Icons used in the list section above for the visual icons seen on some materials.

Delete materials from the list

If there is no check mark icon on a material in the Materials in this Scene list, it means the material is no longer applied to any surfaces. As these extra materials start to build up, you may wish to clean up the list to focus on those materials actually being used.

To delete all unused materials from the list, go to the Materials in this Scene category heading and select Delete unused materials from its right mouse button menu.

To delete any particular unused material from the list, select Delete from its right mouse button menu.

Note

You cannot delete materials with a lock icon, because they are contained in the original model file that was imported into Autodesk Showcase. This file cannot be changed within the software.

Tip

To delete a material with a check mark, first reassign the objects it’s assigned to. Choose Select objects with this material from the right mouse button menu and then click another material to assign it to the objects.

Refresh material swatches

When a material swatch (icon) is added to the Materials in this Scene list, it takes on the lighting and environment characteristics of the scene. From that point on, however, changes you make to environment and lighting are not reflected in the material swatches unless you refresh them.

To refresh material swatches (icons):

Reuse the materials list

To get customized materials from one scene to another scene:

  1. Open a new scene.

    (To make sure the list stays the same, do not open an existing scene or import any models.)

  2. Select File > Import from Scene and select the scene file containing the list of customized materials.
  3. In the Import from Scene window, click the Materials only button and then click Import.
  4. Import the models you want to decorate with the imported materials.
See Also