Painting > 
Paint on your 3D model


To paint on a 3D object

  1. Load a model into the 3D View.
  2. In the Paint Tools tray, select the Paint Brush.
  3. Stroke on the model to paint.

    The Create New Paint Layer window appears.

    NoteYou must have at least one paint layer to paint on a model. If you have not yet created a paint layer, the Create New Paint Layer window displays automatically the first time you paint. See also Create a new paint layer.
  4. In the Create New Paint Layer window, do the following, then click OK:
    • (Optional) Enter a Name for the layer.
    • Select the Size (resolution) for the image by selecting a number that represents the number of pixels along X and Y for the image (square aspect ratio - 256, 512, 1024, 2048 (default), 4096). The larger the image, the finer and sharper the detail you can apply when painting.
    • Specify the image file format and bit depth (8, 16, 32) for the image you are going to paint using the Save As drop-down list. For a list of supported image formats, see Paint file formats and color bit depth.
    • Specify on which paint channel to apply the paint (and how it appears on the model as a result).

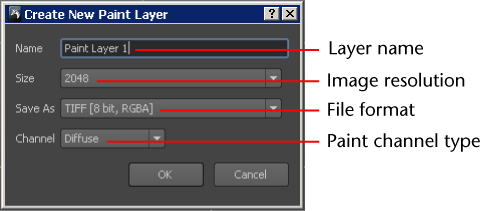
      For example, if you want the paint to appear as the diffuse base color material for the model, select Diffuse (default). For more information on the channel types, see Channel.

  5. Stroke on the mesh where you want to apply paint.

    How the paint appears depends on the Channel you set for the paint layer.

    NoteIf the following message appears: To paint this area, you must first load the UV tile. Hold the cursor over the area and press the up arrow to load or unload the tile, this indicates that multiple UV tiles exist on the model and the area you want to paint is currently unloaded. Load the tile before proceeding. See Paint across multiple UV tiles.