Save images for stencils and stamps


Mudbox supports several image formats for stencils and stamps. While you can use 8-bit images, you can achieve better results with images that are 16 or 32-bit depth.

If you plan to use vector displacement maps for stamps or stencils, you can use texture extraction in Mudbox to produce 32-bit TIFF images. See Extract a vector displacement map for more information.

Using Photoshop for stencils and stamps

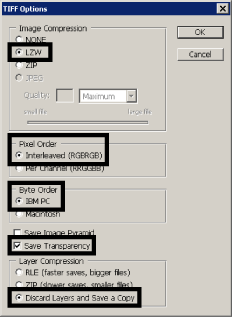
To create stamps and stencils with an alpha channel (RGBA) and have 16 bits per channel as their bit depth, you can use an editing application such as Adobe Photoshop.

  1. Launch Photoshop.
  2. Select File > New.
  3. In the New window that appears, set the following options and click OK.
    • Width: As required.
    • Height: As required.
    • Color Mode: RGB Color - 16 bit
    • Background Contents: Transparent

      (Creates an alpha channel for the image.)

    • Advanced > Color Profile: Don’t Color Manage this Document

      (Ensures the file is not tagged with an existing color profile.)

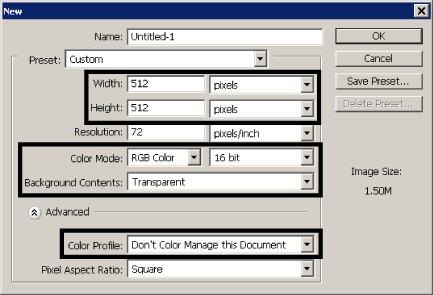
    A new blank image appears in the work area. A checkered background on the canvas indicates the presence of the alpha channel.

    Note

    The Height and Width for a stamp image can range between 256 and 512 pixels, and must be square in proportion. For a stencil, the Height and Width can be non-square in proportion.

  4. Paint your stamp or stencil.
  5. Save the image by selecting File > Save As.
  6. In the Save As window, specify a filename for the image, set the following items, then click Save.
    • Format: TIFF
    • Layers: Off
  7. In the TIFF Options window that appears, set the following, then click OK.
    • Image Compression: LZW
    • Pixel Order: Interleaved (RGBRGB)
    • Byte Order: IBM PC
    • Save Transparency: On
    • Layer Compression: Discard Layers and Save a Copy

Related topics

Save images to the Stamp or Stencil tray

Sculpt using stencils

Stencil properties