The Render Settings area lets you modify the length, speed, size, color, and format of your rendered files.
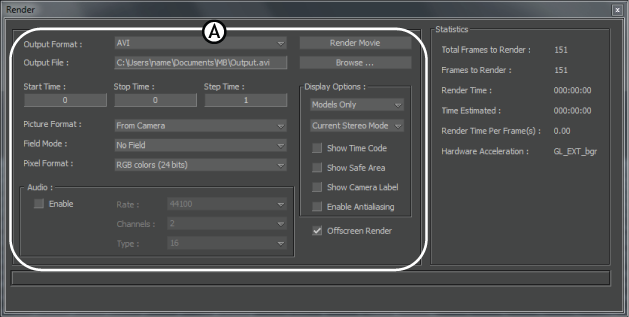
Render window A. Render Settings area
The Output Format menu lets you select from the following render file formats:
| Format | Description |
|---|---|
| AVI | Renders all specified frames to an .avi file. The AVI output format enables you to select a compressor from the list of compressors in the Video Compression dialog after you click Render Movie. See Video Compression dialog. |
| MOV | Renders all specified frames to a .mov file. The MOV output format enables you to select compression settings (based on the compression type) in the Compression Settings dialog after you click Render Movie. See Compression Settings dialog |
| JPG | Renders each specified frame to a .jpg file. The file name of the first frame is <name>0000.jpg (where <name> is specified in the Output File Name field). The next frame is saved to <name>0001.jpg, then to <name>0002.jpg, and so on. |
| TGA | Renders each specified frame to a separate .tga file. The file name of the first frame is <name>0000.tga (where <name> is specified in the Output File Name field). The next frame is saved to <name>0001.tga, then to <name>0002.tga, and so on. |
| TIF | |
| TIFF | Renders each specified frame to a separate .tif file. The file name of the first frame is <name>0000.tif (where <name> is specified in the Output File Name field). The next frame is saved to <name>0001.tif, then to <name>0002.tif, and so on. |
| YUV | Renders the take in YUV color format, ideal for television output. |
| SWF (Flash) | Renders the scene as a .swf movie file. When you select SWF (Flash) as the Output Format and click Render Movie, Flash Render Options dialog box appears. See Flash Render Options dialog for more information. |
Use the Output File field to enter the path and name of the output file. Click Browse to navigate your file system, and select where to save the rendered file.
If you type in the path and file name, remember to name your file using the proper extension so the rendered file can be loaded by other software.
Click Browse to open a file browser to let you locate the directory where you can save your rendered file.
Start, Stop, and Step Time fields
The Start, Stop, and Step Times appear in frames per second or timecode format depending on the settings in the Transport Controls window.
Use the Start Time field to set the starting frame or timecode. All animation before the start frame or timecode is not included in the rendered file.
Use the Stop Time field to set the end frame or timecode. All animation after the stop timecode is not included in the rendered file. When you click Render Movie, the scene is rendered from the Start Time until the Stop Time.
Use the Step Time field to set the increment used when rendering between the Start and Stop Times. By default, the increment is set to one frame.
Use the Picture Format menu to select the resolution of the image to be rendered.
Changing the image size also changes the size of the preview window. MotionBuilder supports many resolutions from D1 NTSC (720 x 486) to full screen (1280 x 1024).
You can also set the image format by selecting the From Camera option and configuring the Current Camera’s settings. See Camera settings for more information on configuring camera settings.
Depending on the format you choose in the Format Mode menu, you may also want to select a field rendering mode from the Field Mode menu.
Use the Pixel Format menu to select the color depth of your image. Selecting the color depth may change the Hardware acceleration shown in the Statistics area. MotionBuilder supports standard color depths.
The Channels menu lets you choose whether the render is a stereo or mono file. You have two choices:
| Option | Description |
|---|---|
| 2 (Stereo) | Stereo audio sources contain separate left and right channels and display two waveforms. |
| 1 (Mono) | Mono audio sources contain a single channel and display one waveform. |
The Type menu lets you select the number of bits used by your computer’s audio hardware. You have the choice between 8 and 16-bits.
Click Render Movie to render your scene to the selected Output File, using the selected Output Format.
Depending on what type of Output Format you have selected in the Render Settings pane, additional dialog boxes may appear first to let you define other settings. For example, when you select AVI as the Output Format, the Video Compression dialog box appears.
Refer to the descriptions of each format under Output Format menu for more information on the additional dialog boxes.
The Display Options menu contains options concerning what information you want to appear on the rendered take.
Select the appropriate render type from the Display Options menu. The following options let you choose what is visible in the final render.
| Option | Description |
|---|---|
| Current Viewing Mode | Select Current Viewing Mode to make the final render show whatever is currently shown in the Viewer window, including skeletons, markers, selected items and so on. |
| Normal | Select Normal to make the final render with only the model, without skeletons or markers. |
| Models Only | Activate Models Only to hide all markers, Nulls, skeletons, cameras, and other objects that are related to the MotionBuilder interface. |
| X-Ray | Select X-Ray to have the final render show everything that is shown in the Viewer window’s X-Ray mode. |
This menu allows you to select a Stereo Display mode before you render your scene. You must be looking through the Stereo camera in your scene for your selection to appear in the final render.
Choose from the following Stereo modes:
| Option | Description |
|---|---|
| Center Eye | Look through the center stereo camera. |
| Left Eye | Look through the left stereo camera. |
| Right Eye | Look through the right stereo camera. |
| Active | Use your graphics card for stereo viewing. If you are using the NVidia Quadro line graphics cards, and you have turned on stereo mode, the Active menu item becomes live. The CRT monitor uses the page flipping method of stereo imaging. The settings that you have chosen for your stereo mode in your graphics card are respected; for example, the DIN connector will send signal to your 3D glasses. |
| Horizontal Interlace | This viewing mode interlaces one row of pixels from the left camera with one row of pixels from the right camera and so forth. You obtain half the vertical resolution through this mode. Select this mode for polarized LCD monitors. |
| Checkerboard | This viewing mode alternates between one pixel from the left camera with one pixel from the right camera, forming a checkerboard pattern. You obtain half the vertical resolution and half the horizontal resolution through this mode. Select this mode for Samsung DLP 3D displays. |
| Anaglyph | MotionBuilder supports the red/cyan anaglyph mode. MotionBuilder composites the color output from the left camera with the color output from the right camera. |
| Luminance Anaglyph | The Luminance Anaglyph mode is similar to the Anaglyph mode, but the color output from the left and right cameras are first converted to grayscale before being composited on top of each other. |
| Freeview Parallel | Select this mode to see the left and right camera output side by side in the same window. |
| Freeview Crossed | This mode is similar to Freeview (Parallel), but the left camera output is displayed on the right while the right camera output is displayed on the left. |
| Current Stereo Mode | This mode makes your current selection in the Viewer > Display >Stereo Display menumenu active. |
Activate Show Camera Label to have the Camera label (the white text in the bottom left corner of the Viewer window) display in the rendered take.
Activate Enable Antialiasing to add a slight blur when rendering. See Anti-aliasing and oversampling for more information.
Pixel Format, Antialiasing, Show Time Code and Safe Area are not available when rendering .swf files.
Activate Offscreen Render to hide the Render Preview window while rendering. When Offscreen Render is activated, the render progress bar at the bottom of the Render window indicates the status of the rendering process. Hiding the Render Preview window saves system resources. This option is active by default.


