In the following procedures, you create several full body poses on your character, including the Character Extension, to create
a walk cycle.
Position the character:
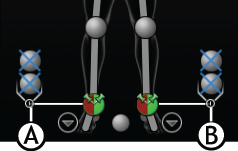
- In the Character Controls window, click the plus sign (+) above each ankle effector to expand both auxiliary pivots. This
way you can see Mia's ankles are pinned in Translation (T) and Rotation (R).
- Ctrl-click to select the wrist and ankle effectors.
- Disable the T and R Effector pinning options.
NoteYou may have to toggle R (Rotation pinning) on and off once more to ensure that rotation is disabled.
Make sure that there are no more T or Rs in any of the effectors on the Character Representation.
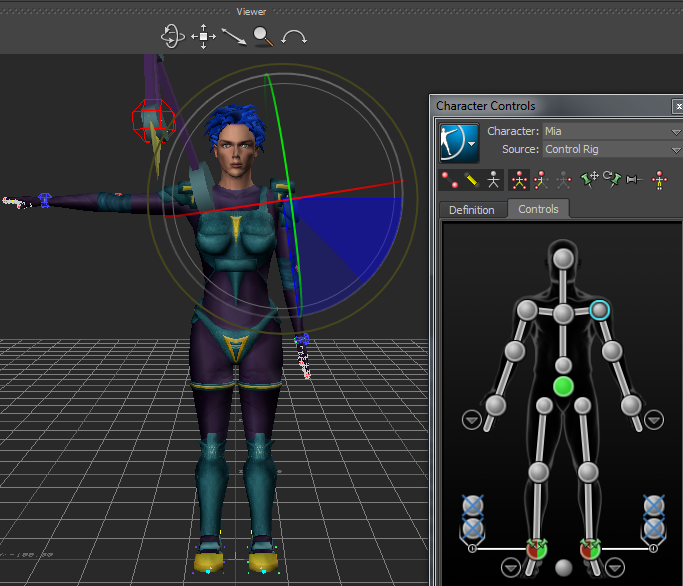
- Ensure the Full Body keying mode (
 ) in the Character Controls toolbar is enabled.
In the Full Body keying mode, pasted poses are placed onto the character’s entire body, and keyframes are placed on all effectors.
- In the Character Controls window, select the Left Shoulder effector.
- Move the cursor over the Viewer window, press R, and rotate the effector until Mia’s left arm is in a more natural position at her side.
- Do the same for the Right Shoulder effector.
- Ctrl+click both wrist effectors and translate them upward on the Y-axis to give the elbows a natural bend.
- Click on an empty area of the Viewer window to deselect the wrist effectors and choose a camera view that lets you see a side
view of the character. For example you can press Ctrl-R to switch to the Producer Right camera view.
NoteYou can switch the camera view at any time during the tutorial to get a better view.
To create the first pose for the walk cycle:
- In the Character controls window, select the right ankle effector and move the foot forward (on the Z-axis) and upward slightly,
so that the knee bends.
- Select the left ankle effector and slide it backward until Mia's feet are apart and both knees are bent as if she is walking.
NoteYou can select the Ankle effector pivots to flex her foot.
- Select the Right Shoulder effector and rotate the right arm slightly backward, then select the Left Shoulder and rotate the
left arm forward as if Mia is naturally swinging her arms.
- Select the Hips effector and translate Mia's body up or down so that she appears to be in mid-stride. If your transformations
cause Mia to float above the floor, select the Hips effector and translate Mia downward at any time. The default floor contact
makes Mia’s feet interact naturally with the default floor.
This pose should have Mia with her right leg beginning the forward motion of a step, as shown in the following figure.
- In the Resources window, click the Pose Controls tab and click Create
 .
.
A pose is added to the Pose browser.
The position of the Character Extension is included with the position of Mia’s body in this pose.
- Expand the Poses folder in the Pose browser to see the pose.
- Right-click the pose created and rename the pose “Walk 01” (B).
Create the second pose for the walk cycle:
- Position Mia’s legs and arms so that she looks similar to the following figure.
- Select the right ankle effector and slide it back and down until her foot is flat on the ground.
- Then select the left ankle effector and slide it back until it is behind her, to provide momentum.
- Adjust the hips effector to bend her knees believably.
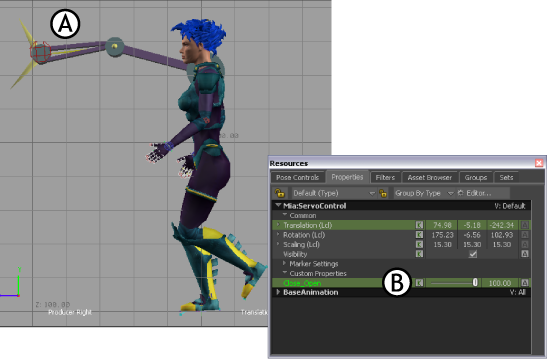
- Select the Mia:ServoControl effector, and translate the Servo arm so it reaches in front of Mia.
- With the Mia:ServoControl effector still selected, click the Asset browser Properties tab and use the Close_Open property
(B) to open the pincers about half-way as shown in the following figure.
- In the Pose Controls, click Create and rename this pose as “Walk 02” (A).
Create the third and final pose for the walk cycle:
- Position Mia’s legs and arms so that her step appears similar to the following figure.
- Select the Mia:ServoControl effector and extend the Servo arm to reach even further in front of Mia.
- With the Mia:ServoControl still selected, open the pincers further using the Close_Open property in the Properties window
(B).
In this pose, the left leg goes back, and the Servo arm goes forward, completing one step for the first half of the walk cycle.
- In the Pose Controls, click Create and then rename this pose “Walk 03”.
You now have three poses in the scene. The three poses are listed in the Pose browser.