The Story controls, arranged along the top of the Story window, let you manipulate tracks, clips, and animation.


Story window controls
The Story controls that display change depending on what is currently selected. For example, the Clips and Edit options are always shown, but the Keys and Ghosts options appear only if a Animation, Camera Animation, or Character track is selected.
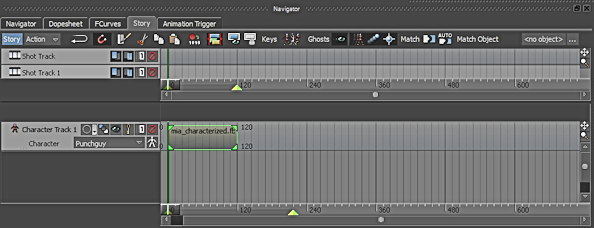
Story window displaying Shot and Character track controls
This section covers the Story controls that appear when any clip is selected. Story controls that are specific to particular types of tracks are covered with the track information.
The Story Mode option lets you activate and disable the Story window. The Story Mode menu lets you select between Action and Edit modes. This option is also in the Transport Controls window.

Story controls A. Story Mode option B. Story Mode menu
Disable Story Mode so that only the take selected in the Transport Controls window plays. If Story Mode is active, the animation in the Story window can override or blend with the take selected in the Transport Controls window.
When Story window animation is active, the Story Mode menu is also active. This menu lets you select between the Story window Action and Edit modes. See Disabling the Story window for more information.
The Manipulation options let you manipulate clips:

Manipulation options A. Loop/Scale B. Snap
| Manipulation option | Behavior |
|---|---|
| Loop/Scale | Lets you loop and trim clips, or scale clips. Looping is the default clip manipulation mode. |
| Snap | Lets you snap the clip to frames, clips, shots, or to the current time, when you drag a clip along a track, depending which option is active in the Snap contextual menu. See Snap menu options for descriptions of the different Snap options. |
Lets you slice, cut, copy and paste clips.

Edit buttons A. Razor B. Cut C. Copy D. Paste
| Button | Function |
|---|---|
| Razor | Lets you slice a selected clip in two.
NoteTo slice selected clips on multiple tracks at the same time, place the Timeline indicator over the clips and use the Razor
option in the contextual menu instead. See Razoring clips.
|
| Cut | Removes selected clips and stores them in memory. You can also use the keyboard short-cut Ctrl-X to cut selected clips. |
| Copy | The Copy button copies selected clips. You can also use the keyboard short-cut Ctrl-C to copy selected clips. |
| Paste | Inserts a copied or cut selection into another location. |

Record to Memory or Disk option
The Record to memory/disk option  lets you record many takes without stopping to free up memory, record in real time session, and so on.
For more information on how to record takes using this option, see Recording Story tracks to memory or disk.
Summary Clips On or Off option
If there are many clips within a folder, then it is time consuming to select and move each clip along the timeline. To avoid this, the Summary Clips On/Off tool in the Story toolbar allows you to display a summary clip, as part of the folder track. By moving the summary clip, you can move all the clips in a folder.
To display the summary clip, click the Summary Clips On/Off icon from the Story toolbar.

A. Summary Clips On/Off icon
Filtering by Selection options
The Filtering by selection ( ) tool displays only the animation tracks that belong to the objects that you select in a scene.
If you want to perform additional tasks on the scene, such as inserting an object, it is important to lock the view in the
Story window. To achieve this, click the Lock filtering by selection ( ) tool.
The Multiple Clips option displays when an Animation, Camera Animation, or Character track is selected.
When the Multiple Clips option is active, clips are automatically created along the track as you move the Timeline indicator and transform selected assets. A clip is created for each keyframe.
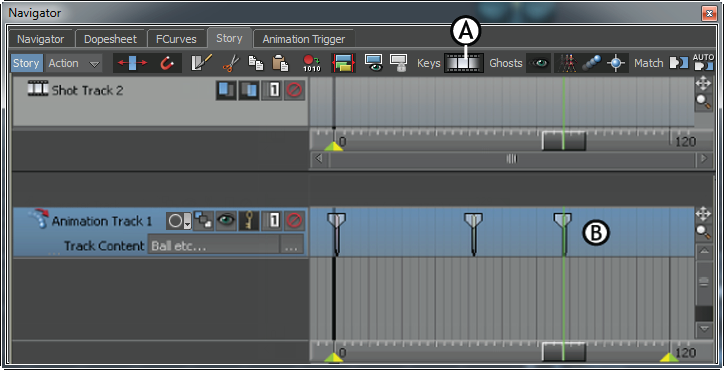
Story window A. Multiple Clips option set to active B. Clips created for keyframes at frame 0, 49, and 81
When the Multiple Clips option is disabled, only one clip is created when you transform selected assets. When the option is disabled, the clip stretches to include the keyframes you set.
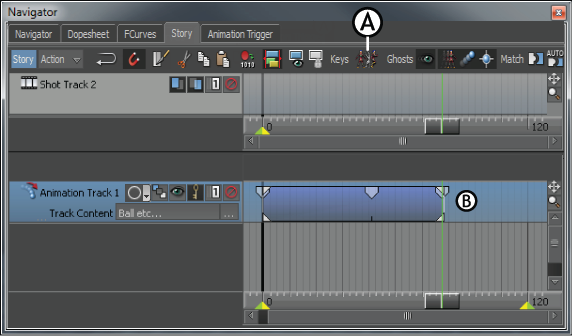
Story window A. Multiple Clips option disabled B. Clip encompassing keyframes at frame 0, 49, and 81
You can change the contents of a keyless clip by placing the Timeline indicator over it and transforming the selected assets again.
The Ghosts options let you hide and show various ghosts. These options display only when Animation, Camera Animation, and Character tracks or clips are selected.
The Ghosts options consist of the following:
| Option | Behavior |
|---|---|
| Ghost option | Hides or shows all ghosts of selected tracks or clips. For more information, see Ghost option. |
| Model option | Hides or shows a model’s ghost. |
| Clip Vector/Travelling Node | Hides or shows either clip vector ghosts or travelling nodes, depending on whether tracks or clips are selected. For more information, see Clip Vector/Travelling Node. |
| Ghost Match Object | Hides or shows the match object ghosts of tracks and clips. Ghosts of match objects look like crosses in the Viewer window. See Matching clips for more information on match objects. |
| Travelling Node(s) | Lets you define a different travelling node for an Animation, Character, or Camera Animation track. For more information, see Travelling node. |
The Match Controls let you blend animation between clips and tracks smoothly. You can match a selected clip to the clip that comes before or after it. You can also match more than one clip at once by selecting all but the first clip.

Story controls A. Match Options button B. Auto Match option C. Match Object field D. Match Object button
The Match Controls are active only when an animation, camera animation, or character clip is selected. See Matching clips for more information.


