The basic process for animating characters involves changing the position and orientation of a character at different points in time, then marking those points with keyframes.
To animate a character, you choose where in time to change the position and orientation of your character, then set a keyframe position on the character at that time. MotionBuilder then interpolates the movement between your keyframes, creating animation.
For example, in the following illustration, six keyframes were set on different positions of a character in a walk cycle. Playing the animation gives the impression of a continuous walking motion because of the interpolation.
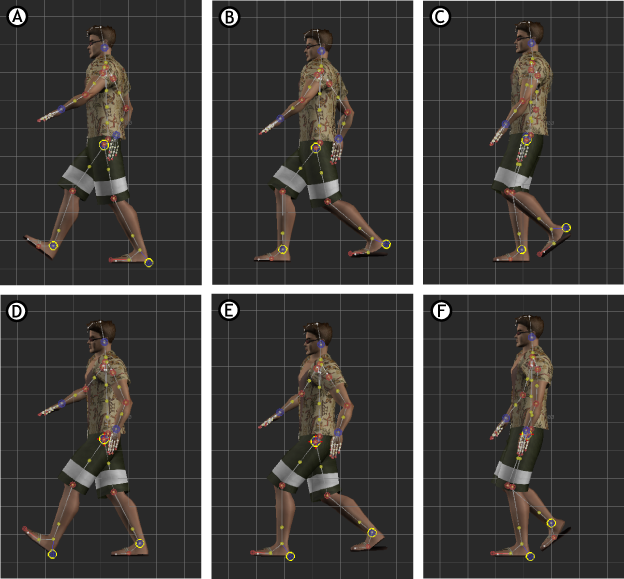
Poses in a keyframe animation cycle A. Frame 0 B. Frame 5 C. Frame 10 D. Frame 15 E. Frame 20 F. Frame 25
Changing the current time involves choosing the frame on which to perform a key transformation. Setting the current time can be done in a number of places that display the current timecode and a timeline. You can change the current time in various places, such as the Transport Controls window, the FCurves window, and the Dopesheet window.
The following illustration, shows the current time at frame 16 in the Current time field and at the location of the Timeline indicator.

Transport Controls A. Timeline indicator B. Timecode field
To mark the transformations, or changes you make to the character over time, you set a keyframe. There are various ways you can set keyframes, including pressing K, or using other keyboard shortcuts. The Key Controls window contains the main keyframing options, but you can also set keyframes in the Blend and Pull area of the Character Controls window.
In the Character Controls window, select one of the Manipulation and Keying mode buttons ( ) to determine the parts of the character that are available for keyframing and transformation. Set a keyframe by choosing
one of the methods described above.
) to determine the parts of the character that are available for keyframing and transformation. Set a keyframe by choosing
one of the methods described above.
When Show Key Hint is active in the Transport Controls, keyframes set in Body Part Keying mode display with a green tip, keyframes set in Full Body mode display with a red tip, and when a Character Extension is keyed, the keyframe displays with a yellow tip. See Keyframing a Control rig for more information.

Transport Controls A. Body Part keyframe B. Character Extension keyframe C. Full Body keyframe
When you set more than one keyframe position of the character over time, you have created character animation. When you play this animation, MotionBuilder interpolates the position of the character between the keyframes you have set, giving the impression of smooth continuous motion.
See Setting keyframes and Basic Keyframe Animation for more information.


