To display the Actor settings in the Navigator window, select an Actor from the Actors folder in the Scene browser.
The Actor representation visually represents the Actor in the Actor settings. The Actor representation is used to add markers or sensors containing motion data to a Marker set and view selected markers in the Marker table (see Marker Table).
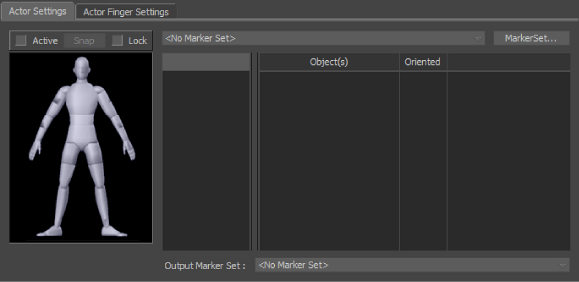
Actor Settings A. Actor representation
When you first create an Actor, the cells in the Actor representation are empty. These cells indicate the number of markers that affect each part of the Actor body. You can assign up to five markers per cell.
To add markers to a Marker set, Alt-drag one or more selected markers or sensors into one of the cells corresponding to the Actor body part. You can drag from the Navigator or the Viewer window.
Dragging connects the marker or sensor to the other markers in the cell, and influences the corresponding part of the Actor body. If the cell already contains markers and sensors, the new markers and sensors are added to the existing list.
This button calculates rotational offsets and slight positioning differences between the Marker set and the markers or sensors used by the Marker set. Snap is best suited for Marker sets that have oriented markers, found in magnetic capture data.
You can also use Snap to compensate for optical capture sessions that use the same Marker set, but were captured during different sessions. Although the Marker set is identical, the sensors might have been in slightly different locations on the performer’s body compared to the previous capture session. Snap works best when these differences are subtle.
Turning on this option locks the current position and rotation of the selected Actor and its Marker set. You must have an active Marker set to use Lock.
This field lets you select the Marker set used by the Actor. You work with the current Marker set when you edit, rename, import, export, and map data to your Actor.
If there are no Marker sets, <No Marker Set> appears in the Current Marker Set field and no cells display in the Actor representation.
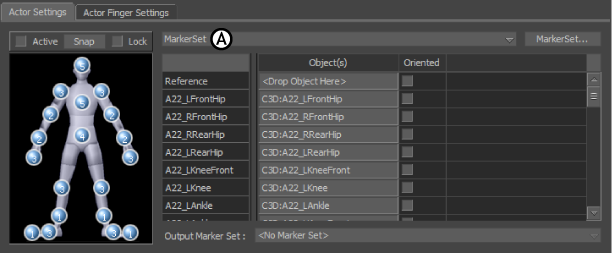
Actor Settings A. Current Marker set field
The Marker Set button to the right of the Current Marker Set field opens the Marker Set menu that lets you create, rename, import, export, and delete Marker sets.
This table lists the markers that drive the Actor joints. If your selected Actor does not have a Marker set, the Marker table is empty.
The Marker table consists of the Marker, Model, and Oriented columns.
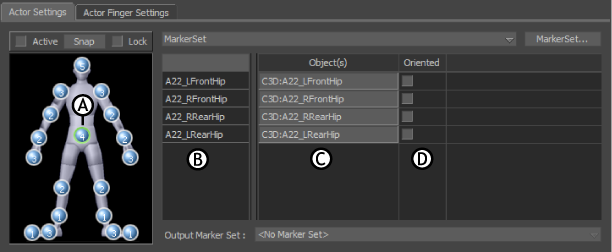
Actor Settings A. Hips cell is selected in the Actor representation B. Marker column B. Model column C. Oriented column
To view only the objects that influence a part of the Actor in the Marker table, click the corresponding cell in the Actor representation. A green outline circles the selected cell in the Actor representation. The list of markers that influence that part of the Actor appears in the Marker table as well.
Selecting a marker in the Marker column selects that marker in the Viewer window and deselects all other markers.
To view all the markers in the Marker table, click the background of the Actor representation to deselect any selected cells. To scroll through the Marker table, Shift-click and drag up or down, or use the scroll bars.
To remove a marker or sensor from the Marker table, select the marker in the Marker column, and press Delete. This removes the marker, which means that it is no longer used by the Marker set. The actual physical sensor or marker is still in the scene.
| Column | Function |
|---|---|
| Marker | Lists the defined markers that indicate the placement of the sensors, markers, or bones that drive the Actor in your scene. You can rename the fields in the Marker table by double-clicking the field, changing the name, and pressing Enter. |
| Model | Specifies the sensors, markers, or bones that drive the white markers. Make sure you Alt-drag the root of your object into the Reference field in the Model column. This is the only field that is not modified in the Actor representation cells. |
| Oriented | Activates rotation and translation data for the corresponding marker. If a marker contains both rotation and translation data, activate the Oriented option for that marker. When Oriented is disabled, only translation data is active. Click the Oriented title at the top of the column to activate all markers for your selected Actor. |
This field outputs the result from one Actor to another Marker set. You can use this technique to transfer motion data that was captured with many different Marker sets to a single format.
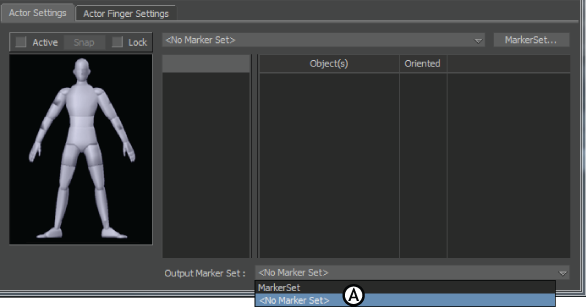
Actor Settings A. Output Marker Set field
For example, you can transfer data from the Marker set of an Actor using magnetic motion data to an Actor using optical data. You can then export the optical data using one of the export file formats.
You can also reverse the direction of Character mapping and have a Character output to a Marker set. Since the Marker set is based on either magnetic sensors or optical markers, you are actually outputting back to these sensors or markers.
This method of mapping lets you reverse the flow of Character mapping and transfer data from a plotted Character to magnetic sensors or optical markers. This is important if you want to export the finished character as a data file (for example, Vicon .c3d). You can also save cleaned data as a different set of optical or magnetic sensors.


