Use the 2D Pan/Zoom feature to pan and zoom in 2D and see the results in your scene view. Using this feature, you can view details in specific areas when doing precise tracking, placement or rotoscoping work without having to physically move your camera.
You can easily toggle in and out of pan/zoom mode. You can even create two panels and display the full camera view in one panel and the pan/zoom view in the other.
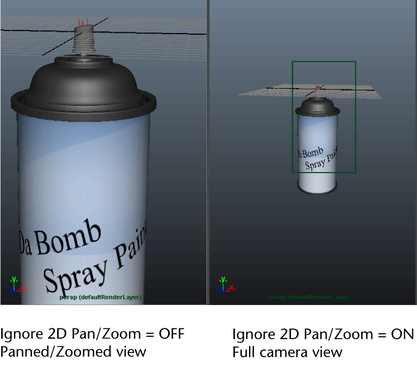
The pan/zoom mode does not render by default and therefore you have the option of rendering the full camera view or the pan/zoom view. In addition, you can also create 2D Pan/Zoom bookmarks.
To enable the 2D Pan/Zoom feature (Method 1)
You can also select Ignore 2D Pan/Zoom by  the
the  icon in the Panel toolbar.
To enable 2D Pan/Zoom (Method 2)
 to pan or zoom interactively.
The Tool Settings window appears. Select between the 2D Pan or 2D Zoom mode.
To disable the 2D Pan/Zoom feature (Method 1)
To disable the 2D Pan/Zoom feature (Method 2)
button in the Panel toolbar to toggle between enabling and disabling the 2D Pan/Zoom.
To create Pan/Zoom bookmarks (Method 1)
Your bookmarks will be listed under View > Bookmarks and also by the icon in the Panel toolbar.
Create Pan/Zoom bookmarks (Method 2)
 the icon in the Panel toolbar and select Create 2D Bookmark.
A bookmark is created with your current Pan and Zoom settings.
The 2D Pan/Zoom feature does not render by default. In order to render the panned/zoomed view, you must enable the Render Pan Zoom attribute under the Camera Attribute Editor, Display Options section, 2D Pan/Zoom subsection.
 Except where otherwise noted, this work is licensed under a Creative Commons Attribution-NonCommercial-ShareAlike 3.0 Unported License


 + dragging a box around the part of the view you want to dolly in on. If you drag the box out from left to right, you dolly
in. If you drag the box out from right to left, you dolly out.
+ dragging a box around the part of the view you want to dolly in on. If you drag the box out from left to right, you dolly
in. If you drag the box out from right to left, you dolly out.