


You can set these attributes to a fixed value, or texture map them over the particles’ lifetime. If mapped, the V values of the map are mapped onto the particles’ lifetime. You can also control them with per-particle attributes using the Particle Sampler Info node.
Controls how much you can see through the particle cloud. It is a color, so that you can control the transparency of the red, green, and blue channels separately. To make the cloud more opaque, set transparency to be darker. To make the cloud more transparent, set transparency to be brighter (transparency = 1-opacity).
Determines the color at a particular time in the life of the particle. You can use the Particle Sampler Info node to animate this parameter over a particle’s lifetime (see Particle Sampler Info node).
Determines the transparency at a particular time in the life of the particle. You can use the Particle Sampler Info node to animate this parameter over a particle’s lifetime (see Particle Sampler Info node).
Determines the incandescence at a particular time in the life of the particle. You can use the Particle Sampler Info node to animate this parameter over a particle’s lifetime (see Particle Sampler Info node).
Controls the noise’s irregularity. The smaller the value, the less rounded the shape.
Click the image below to play an animation that shows the Roundness attribute changing from 1 to 0.
roundness.mov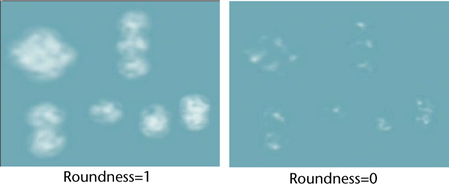
Specifies a scaling factor for density that is used to compute shadows only. The larger the translucence value, the more light penetrates. The formula is:
Click the image below to play an animation that shows the Translucence attribute changing from 0.4 to 0.6.
TranslucenceAtWork.movControls how much of the light in the scene is reflected from the particles. Most materials absorb some of the light falling on them, and scatter the rest.
The default value is 0.0. If you set this to 1.0, all the light falling on the material is reflected. Use a high value when you are creating dense clouds. If you set this to 0.0 (the minimum), no light is reflected and no surface shading occurs.
The surface color is modulated by the transparency. This value can be greater than 1.0, so the surface property can still appear even when the material is transparent.
Makes the surface appear rough or bumpy by altering surface normals (during rendering) according to the intensity of the pixels in the bump map texture. Diffuse Coeff must be set to a value greater than 0 to enable this option.
A bump map does not actually alter the surface. A silhouette of the surface will appear smooth.
Simulates the way light diffusely penetrates through translucent objects. This means that when light shines on one side of the object, the other side is partially illuminated. You can use this to create effects such as clouds, fur, hair, marble, jade, wax, paper, leaves, etc. If you set Translucence Coeff to 0 (the default), no light shows through the object. If you set Translucence Coeff to 1, all the light shows through. Diffuse Coeff must be set to a value greater than 0 to enable this option.
Determines if the surface shading is combined with the pre-illumination, which contains shadows, if enabled (see the Filter Radius attribute). Diffuse Coeff must be set to a value greater than 0 to enable this option.
Click the image below to play an animation that shows Surface Shading Shadow.
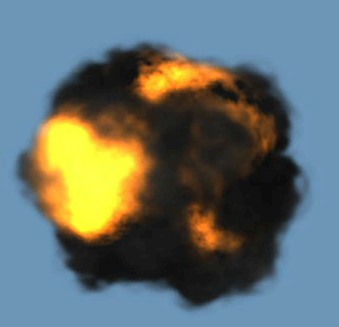
This cloud shader uses Surface color and Surface Shading Shadow to create an explosion.
Volumetric particles use pre-illumination, which evaluates the lighting at each particle’s center by default. This can sometimes cause popping if the illumination changes too fast in an animation, and is especially noticeable if Surface Shading Shadow is on.
Filter radius lets you filter the pre-illumination results so the value at each particle’s center will be the average of all the pre-illumination results within the filter radius. Higher values increase render time but produce smoother images.
 Except where otherwise noted, this work is licensed under a Creative Commons Attribution-NonCommercial-ShareAlike 3.0 Unported License