Settings
-
-
Specifies which of the joint’s local axes the joint can rotate about during inverse kinematics posing. Click , , or . The default setting allows the joint to rotate about all three of its local axes during IK posing.
-
-

Lets you enable or disable symmetry on joint creation. The following options let you specify which axis the symmetry connection
has when it's created:
-
-
By default, symmetry is disabled and the is in normal joint creation mode.
-
-
Mirrors the joint across the X-axis.
-
-
Mirrors the joint across the Y-axis.
-
-
Mirrors the joint across the Z-axis.
-
-
When this option is on, the joints you create are not scaled automatically when you scale joints above them in the skeleton’s
hierarchy. Default is on.
can prevent undesirable shearing effects that can occur after you’ve skinned a character and then decide to scale a joint
along one or two of its axes. Also, it can make it easier for you to change the length of individual bones.
-
-
When this option is on, Maya automatically limits the extent a joint can rotate about its axes according to the angles at
which you build the skeleton’s joints. Also, the smaller inner angle of a joint rounded off to 180 degrees is set as the allowable
range of rotation.
For example, when you create a knee joint, if you create the joint slightly bent back, the joint will not be able to swing
the lower leg bone forward of the upper leg bone, nor will it be able to wobble from side to side. The joint will not be able
to rotate in any other way except through the inner angle rounded off to 180 degrees.
Note
- does not change the joint’s setting. See Degrees of Freedom.
- This setting does not apply to a joint chain’s start and end joints.
-
-
When this option is on, an IK handle is automatically created for any joint chain you draw and the section of the settings is available.
The IK handle that is automatically created will run from the joint chain’s start joint to its end joint.
Note
It is a more common practice to create a complete skeleton, and then add IK handles to the skeleton where needed.
-
-
When this option is on, the section of the settings is available.
-
-
When this option is on, Maya automatically snaps joints to the center of the selected mesh. See Snap to Projected Center.
Orientation Settings
-
-
When on, all joints you create with the are set to align with the world frame. Each joint’s local axes have the orientation of the world axis, and the other settings are disabled. When off, you can specify the joint alignment using the other settings described below.
-
-
Lets you specify the primary local axis for the joint. This is the axis that points down the bone that extends from this joint.
Tip
If you want a joint to rotate about a particular axis, that axis must not be the . For example, a joint cannot rotate about its local X-axis if its orientation is set to X.
-
-
Lets you specify which local axis to use as the secondary orientation for the joint. Select one of the two remaining axes.
To have Maya determine the automatically, set to .
Note
You cannot set the same axis for both the and orientation. If you set either option to use an axis already specified, Maya automatically switches the other option to use
a different axis.
-
-
Lets you set the direction (positive or negative) in which the secondary axis points.
Specifies the creation options for the IK handle that is automatically created when is on. These options are available only when is on. For more information on these options, see IK Handle Tool.
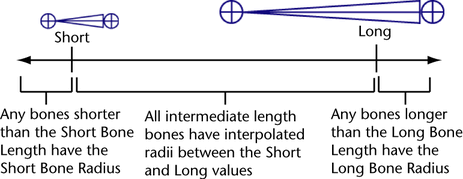
When you create joints, the radii of the joints are determined by the length of their bones. This means that when you draw
a joint chain, the radius of all the joints in the chain automatically adjust to the length of their bones. For example, short
bones like those in the human hand generate small joints and long bones like those in the human leg generate much larger joints
than those in the hand.
-
-
Sets the bone length at which a bone is short.
-
-
Sets the bone radius of short bones. This is the minimum bone radius.
-
-
Sets the bone length at which a bone is long.
-
-
Sets the bone radius of long bones. This is the maximum bone radius.
 Except where otherwise noted, this work is licensed under a Creative Commons Attribution-NonCommercial-ShareAlike 3.0 Unported License