Display preferences


You can set the following preferences in the Display category of the Preferences window.

Performance

Fast interaction

Turns Fast Interaction on to improve performance by displaying fewer geometric entities (such as polygons). The default is off.

Max. texture display res

If you find a large slowdown in performance when editing images larger than 1K by 1K, this can be due to insufficient video card memory to display textures at that resolution. This option allows you to set the maximum size of textures used for display.

It is recommended that you restart Maya for these settings to take effect.

Baked viewport textures

You can set the slider to display scene view textures in a trade-off between fast and high quality.

Note
  • If the scene has only hardware textures, this slider has no effect.
  • The scene’s textures are not automatically updated with any changes; you'll need to force an update; for example, by reloading the scene.
  • The only textures affected are the ones set to use the default texture quality but whose 2d texture placement options are not handled in hardware (for example, use stagger or some other option the card/drivers don't support in hardware).
Render swatches (startup)

Disable this option to disable swatch rendering in the Hypershade, Attribute Editor, and Node Editor upon Maya startup to improve performance. You can override this option in the Node Editor menu.

TipThis option may help improve performance slowdowns caused by swatch refresh. You can override this option and re-enable swatch rendering for your current Maya session by enabling the Options > Render Swatches option from the Node Editor Options menu.
Max res. for swatches

You can now set a maximum resolution for your Material Sample swatches. If your file texture size exceeds the specified resolution, a swatch will not be created until explicitly requested: in the Hypershade, -click the swatch and select Refresh Swatch from the marking menu; or, in the Material Sample swatch in the Attribute Editor, click on the swatch to refresh the display.

This reduces memory consumption and improves conversion time, increasing performance especially when dealing with many large textures. This is most useful for initial load of scenes with many large file textures. Once a swatch is created, it will always be displayed.

Select the maximum resolution from the drop-down list. You can also select the Custom option and enter the resolution that you like. File textures of a resolution above this value are not displayed in the Material Sample swatch in the Attribute Editor or in the Hypershade. The default is 2Kx2K.

Custom Resolution

Select Custom from the drop-down list under Max res. for swatches and enter the resolution for your file textures in this field.

View

Axes

Displays one or both of the XYZ coordinates (view and origin axes). If you disable both choices, no XYZ coordinates appear.

View Axis

Displays the XYZ coordinates in the bottom left corner of the view. The default is on.

Origin Axis

Displays the XYZ coordinates at coordinates 0, 0, 0. The default is off.

Grid plane

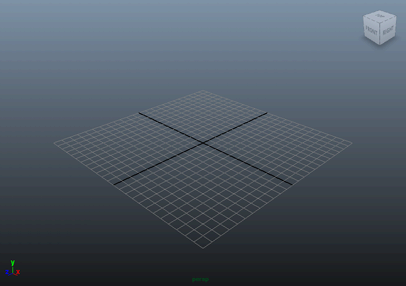
Displays or hides the grid plane. The grid is a 2D plane that represents 3D dimensions in the view. It is useful when you want to animate motion relative to a solid surface. Select Hide to hide the grid. The default is Show.

This setting overrides the Display > Grid setting.

Active object pivots

Specify whether to display pivot points. The default is off.

Affected highlighting

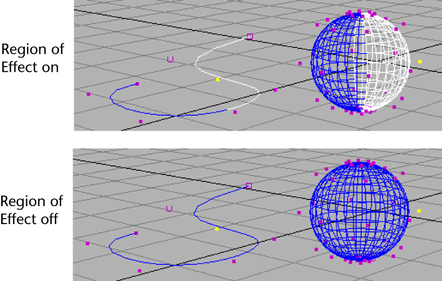
Turns highlighting display on or off. An object associated with or affected by a selected object is highlighted in a different color. The default is on.

Note

You can edit this highlight color by selecting Window > Settings/Preferences > Color Settings, clicking the Active tab, expanding General, and modifying Active Affected.

Wireframe on shaded

Select how you want to display the wireframe on shaded objects.

Full

Displays normal resolution wireframes on shaded objects. This is the default.

Reduced

Displays fewer wires on shaded objects.

None

Displays no wires on shaded objects. Performance is enhanced if you select None.

Region of effect

This option lets you turn on or off the region of effect display. Region of effect is the part of an object that potentially changes as a result of moving selected CVs. Note that curves show the region of effect as well as surfaces. The default is on.

Shade templates

If on, template objects appear shaded in shaded view. If off, the templated objects appear as wireframes while all other objects appear shaded. The default is off.

Background gradient

When on, the main viewport displays with a gradient background color. The default is on. See also Change the scene view background color.

Line Width

Adjust the line width of solid and dashed lines in the scene. Use this attribute to create thicker lines.

NoteThis setting is respected in the Viewport 2.0 workspace, as well as batch renders, playblast, and render view rendering that use the Maya Hardware 2.0 renderer. You must first enable Object Type Filter > UI in the Maya Hardware 2.0 Render Settings.

Viewport 2.0

Rendering engine
Select between using the OpenGL or DirectX 11 rendering engine to run Viewport 2.0. For more information about DirectX 11, see Using DirectX 11 with Viewport 2.0 and DirectX 11 Shader.

Creative Commons License Except where otherwise noted, this work is licensed under a Creative Commons Attribution-NonCommercial-ShareAlike 3.0 Unported License