


Mapping methods determine the relationship between the texture and the surface. For information on how to use different mapping methods, see Transfer Maps.
When you map a 2D texture, you can choose the mapping technique Maya uses to apply the texture to the object: normal, projection, or stencil. Mapping techniques determine the relationship between the texture and the surface. By default, textures are mapped as a normal map.

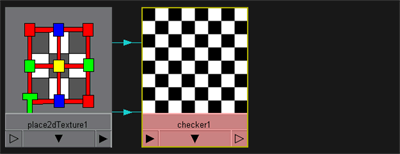
The texture is mapped to the UV space of the surface and is sized and positioned depending on the UV parameterization of each surface.
The shading network for a Normal 2D texture map is made up of the file texture node and the place2DTexture node that defines the texture’s placement.
This mapping technique projects the texture through 3D space like a slide projector.
When you create a projected 2D texture, it behaves like a 3d texture (it has height, width, and depth).
The shading network for a Projection 2D texture map is made up of the file texture node and a Projection node that defines the texture’s placement.
This technique lets you use either a mask file or a color key to remove part of the texture. If your label is not square, project the texture as a stencil to knock out the label using either a mask file or by color keying the texture. Then use the texture's Color Balance > Default Color to set or map the color behind the label.
The shading network for a Stencil 2D texture map is made up of the texture and a Stencil node that defines the masking, and two place2DTexture nodes: one for the texture, and one for the stencil.
 Except where otherwise noted, this work is licensed under a Creative Commons Attribution-NonCommercial-ShareAlike 3.0 Unported License