Select a rig part. > Layer Manager > Create or highlight an animation layer. > Animation mode > CAT menu > Pose Mixer
CAT menu > Pose Mixer > Click CATRig. > Select a bone on the rig to work with. > Layer Manager > Create or highlight an animation layer. > Animation mode
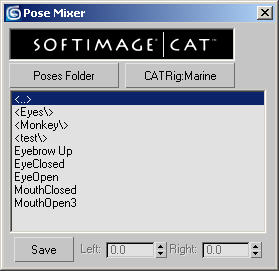
The Pose Mixer enables you to save poses and then reload them back onto your CATRig. You can blend poses Poses can be blended while being loaded.
While you can use use Pose Mixer on any part of a CATRig, it is designed specifically for facial animation, allowing you to save, mix, and and reuse poses the same way you work with facial shape morphing.
When you copy a bone and then use Paste Mirrored on another bone (see, for example, Copy/Paste/Paste Mirrored), 3ds Max CAT remembers the symmetrical relationship between these bones. In this way, you build the “symmetry map” necessary for using Pose Mixer.
For every bone on the left side, use Copy and then Paste Mirrored onto the equivalent bone on the right side, thereby ensuring that the rig contains a complete map of left and right bones and how to perform mirroring operations.
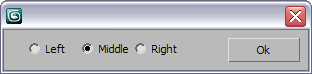
When you save a pose file, you specify whether this pose is for the left side of the body or face, the right side, or the middle. This information is used when loading the file back in. So if you save a Left pose and then reload it using the Right spinner, then the pose is mirrored onto the right side of the body when loading.
For example, you might edit the bones around the left eye to close the eye. Then select all the left eye bones and click Save. After you specify the file name, a small dialog opens offering you the choice of Left, Middle, or Right. Choose Left. Now you can load this pose onto the left or the right eye bones by adjusting the Left or Right spinner. For any given pose, you need only one file for both sides of the body.
To create a pose, select bones and click the Save button. Select only the bones that are used in this pose.
After you click Save, you’re prompted for a file name, and then for whether to save the pose for the left, middle, or right side (see preceding).
To load a pose, highlight it in the Pose Mixer list and then adjust one of the spinners. You needn’t select any bones to load the pose.
If a pose was saved as a Left or Right pose, then when you drag the Left or Right spinner the pose is loaded onto the left or right side of the body automatically. If the pose was saved as Middle, then it doesn't matter which spinner you use: It is loaded back onto the original bones it was saved from.
Normally, you load a pose in an additive sense by dragging the spinner upward, to produce a positive value. However, you can also drag downward to produce a negative value, thus “subtracting” the pose. So, for example, if the character’s mouth is open and you wish to close the mouth, you can highlight the Mouth Open pose and set the spinner value to ‑100%.
By default the Left and Right spinners always load poses using relative loading (see following).
You can load a pose in either absolute or relative mode.
Relative mode is the default method; you load the pose by highlighting it in the list and then adjusting the appropriate spinner. This means, for example, that if you have a pose of the mouth called Mouth Open and the character mouth is already open, then loading the pose again by the same amount will cause the mouth to be opened twice as much.
In some cases you wish to load a pose “absolutely,” so the bones go to the exact positions stored in the pose file.
Relative loading can introduce errors over time. For example, if you open and close the eyes on your character many times using relative loading, you might seethe eyelid bones start to accumulate positioning errors. To reset a pose to the correct values, load the pose in absolute mode by holding down the Alt key while loading.
You can also double-click a pose in the mixer to load it at exactly 100%.
Animating Using the Pose Mixer
Always ensure that the right layer is active in 3ds Max CAT's Layer Manager, and that Animation mode (not Setup mode) is active.
All pose loading is undoable with standard 3ds Max methods. For example, if, while loading a pose, you change your mind, you can restore the previous pose by right-clicking.
Adjust these settings to load the highlighted pose onto the respective side. You can use the keyboard, but the feature is designed to be used from the spinners. Dragging upward (positive value) applies the pose in the direction in which the bones were originally moved from the default positions, and dragging downward (negative value) applies the pose in the opposite direction.
Because the spinners apply a relative adjustment, the spinner values reset to 0 after use.
For more information, see the sections in the first part of this topic.


