|
|
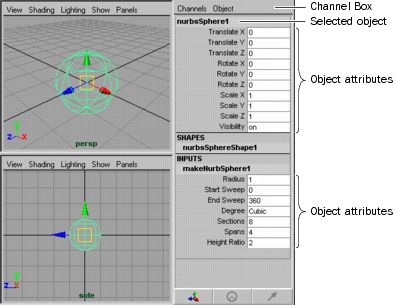
Channel Box |
The Channel Box is the primary, fastest, and most streamlined tool for editing object attributes. It lets you quickly set keys, and lock, unlock, or create expressions on attributes.
Like the Attribute Editor, you use the Channel Box to modify an object’s attribute values. The Channel Box is different from the Attribute Editor in the following ways:
- It displays only the keyable and nonkeyable displayed attributes for the selected object. This lets you easily access nonkeyable channels from the Channel Box without running the risk of accidentally keying them. You can make a channel keyable or nonkeyable from the Channel Box.
You can also make a channel keyable, nonkeyable displayed, or nonkeyable hidden from the Channel Control Editor. See Channel Control Editor in the Keyframe Animation chapter of the Animation guide.
- You can change multiple attribute values of multiple objects (see View and edit multiple attributes on multiple nodes)
- It takes up much less space in the window.
- You can control construction history.
The information displayed in the Channel Box varies, depending on what kind of object or component you have selected. If you haven’t selected an object, the Channel Box is blank.
Related topics
|
|
|
|
|
|
|
|
|
|
|
|
|
|
|
|
|
|
|
|
|
|
|
Showing the Channel Box
The Channel Box appears in the sidebar when you select Display > UI Elements > Channel Box/Layer Editor, or click the Channel Box/Layer Editor icon ![]() in the Status Line (toolbar).
in the Status Line (toolbar).
You can display either the Channel Box or the Attribute Editor in the sidebar, but not both.
Use the Channel Box toolbar to control the display of the Channel Box and Layer Editor.

You can resize the Channel Box using the arrow buttons at the bottom of the Channel Box / Layer Editor.
Click ![]() to widen the Channel Box. Click
to widen the Channel Box. Click ![]() to narrow the Channel Box.
to narrow the Channel Box.
Attributes
When you select a geometric object, the Channel Box displays these sections:
If you’ve selected two or more objects, the Channel Box displays the attributes for the last object selected only. To display the attributes in the Channel Box of another selected object, select Object > objectName.
Edits you make in the Channel Box affect all selected objects of the same type as the one displayed.
Component attributes
If you display attributes of an object component, the Channel Box displays only one section for shape attributes that pertain to the component.
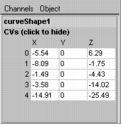
For example, suppose you’ve created a NURBS curve with the following CVs:

If you turn on component selection mode (in the main menu bar) and select the CVs, the Channel Box displays this:
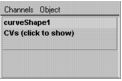
You can display the CV values in the Channel Box and enter new values. To display the values, click CVs (click to show) in the Channel Box.
Channel Box colors
The following colors represent the state of channels in the Channel Box:
|
State
|
Color
|
|---|---|
| Locked |
Gray |
| Nonkeyable |
Light gray |
| Muted |
Brown |
| Blended |
Green |
| Keyed |
Light Orange |
| Expression |
Purple |
| Constrained |
Blue |
| Connected |
Yellow |
How do I work with the Channel Box?
To set a key for one attribute
- Select the object.
- Click the timeline frame number where you want to set the key.

- Click the attribute name to select it.
For example, click Translate X.
- Type the value of the attribute and press Enter.
For example, enter 10 and press Enter.
- In the Channel Box, select Channels > Key Selected.
or
Press  on the attribute name or text box and select Key Selected.
This sets the key for the object attribute value you specified.
Setting a key for all attributes
- Click the timeline frame number where you want to set the key.
- Enter values for the desired attributes in the Channel Box. Press Enter after entering the attributes.
- In the Channel Box, select Channels > Key All.
or
Press on the attribute name or text box and select Key All.
This sets the key for all the object attribute values displayed in the Channel Box.
You can key the same attribute value for two or more objects. Select the objects, click the frame, enter the value in the text box, then select Channels > Key Selected.
You can also key multiple attribute values for multiple objects. Follow the instructions in the previous paragraph, only select several attribute text boxes using Ctrl- or Shift-click before typing the numerical entry.
To make a channel keyable or nonkeyable
- Select the object that has the channel you want to make keyable or nonkeyable.
- In the Channel Box, select the channel you want to make keyable or nonkeyable.
- Do one of the following:
 -click the channel.
The Channel Box’s Channels pop-menu appears.
- Select Channels in the Channel Box’s menu bar.
The Channel Box’s Channels menu appears.
- Do one of the following:
- If you want to make the selected channel keyable, select Make Selected Keyable.
- If you want to make the selected channel nonkeyable, select Make Selected Nonkeyable.
The selected channel now appears light gray in the Channel Box.
To copy keyed attribute values
- Select the object.
- In the Channel Box, select the desired attributes. (You can select either the attribute name, or the attribute text boxes.)
- Select Channels > Copy Selected.
or
Press on the attribute name or text box and select Copy Selected.
- Select the attributes you want to paste the keyframed values to.
- Select Channels > Paste Selected.
or
Press on the attribute name or text box and select Paste Selected.
Breakdowns are a type of key that maintains a proportional relationship with adjacent keys. You can set a breakdown key for an attribute from the Channel Box.
To set a breakdown for selected attributes
- Select the object.
- Click the timeline frame number where you want to set the breakdown.
- Select the attributes you want to set breakdowns for.
- Enter the values of the attributes.
- Select Channels > Breakdown Selected.
or
Press on the attribute name or text box and select Breakdown Selected.
To set breakdowns for all attributes
- Select the object.
- Click the timeline frame number where you want to set the breakdowns.
- Enter the values of the attributes.
- In the Channel Box, select Channels > Breakdown All.
or
Press on the attribute name or text box and select Breakdown All.
INPUTS
Use the INPUTS component of the Channel Box to modify an object’s construction history.