|
|
Work with geometry cache clips |

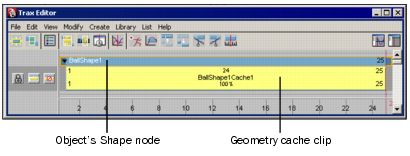
In the Trax Editor, geometry cache nodes are represented by geometry cache clips. With these cache clips, you can clearly view the relationships between your geometry caches and edit your cached deformations in a nonlinear manner. This allows you to visually manage and manipulate all your objects’ geometry caches at the same time.
Note
Geometry cache clips only store the XYZ positions of an object’s vertices, not the translation, rotation, or scale of the object’s Transform node.
|
To view geometry cache clips
- Before you can view your object’s geometry cache clips, you first need to cache your object’s deformations. See Create or import geometry caches
- In the scene view, select the object for which you want to view its geometry cache clips.
- Open the Trax Editor.
- In the Trax Editor menu bar, select List > Load Selected Characters.
All the selected object’s geometry cache nodes are loaded into the Trax Editor as cache clips. Each clip is placed on its own track, and all your object’s cache clips are grouped under your object’s Shape node.
To select your geometry cache clip’s object from Trax
- In the Trax Editor, select the geometry cache clip whose object you want to select in your scene.
- In the track view,
 -click the cache clip and choose Select Geometry from the context-sensitive menu that appears.
The cache clip’s object is now selected in your scene.
To move geometry cache clips
- In the scene view, select the object whose geometry cache clips you want to move.
- In the Trax Editor, do the following:
- To move your geometry cache clip forward or backward in time, drag the cache clip from side to side.
- To move your geometry cache clip to a different track, drag the cache clip upward or downward.

To move multiple geometry cache clips in time
- In the scene view, select the object whose geometry cache clips you want to move.
- In the Trax Editor,
 -
- the geometry cache clips you want to move.
The cache clip manipulator appears.

- Drag the translate handle to the left or right to move all the selected cache clips at the same time.
The selected geometry cache clips move forward or backward in time, changing their Start Frame values.
To move all of an object’s geometry cache clips in time
- In the scene view, select the object whose geometry cache clips you want to move.
- In the Trax Editor, drag the object’s summary cache clip to the left or right.
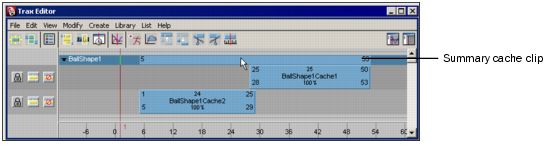
All your object’s geometry cache clips move forward or backward in time, changing the Start Frame of all your object’s cache clips.
To rename geometry cache clips
- In the scene view, select the object whose geometry cache clips you want to rename.
- In the Trax Editor, double- the name of the geometry cache clip you want to change.
- Type the new name for your cache clip and then press
 .
.
The name of the geometry cache clip, and its corresponding cache node, change to the new name you typed.
Enable or disable geometry cache clips
Note
Enabling or disabling geometry cache clips also enables or disables their corresponding cache nodes.
|
To enable or disable individual geometry cache clips
- In the scene view, select the object whose geometry cache clip you want to enable or disable.
- In the Trax Editor, select the geometry cache clip you want to enable or disable.
- Do one of the following:
- In the track view, -click the selected cache clip. In the context-sensitive menu that appears, turn on Enable to make your cache clip active or turn off Enable to make your cache clip inactive.
- In the Trax menu bar, select Modify > Enable/Disable to make the selected cache clip active or inactive, depending on its current state.

To enable or disable all of an object’s geometry cache clips
See To enable or disable all of an object’s geometry caches.
Scale geometry cache clips
You can scale geometry cache clips to speed up or slow down your object’s cached deformations.
Scaling down (<100% of the original cache clip length) a cache clip compresses the deformations in the cache clip so that the resulting deformations appear faster or sped up. Scaling up (>100% original cache clip length) a cache clip stretches the cache clip’s deformations so that the resulting deformations appear to be slower.
To scale geometry cache clips
- In the scene view, select the object whose geometry cache clips you want to scale.
- In the Trax Editor, select the geometry cache clip you want to scale.
- Do one of the following:
- Drag the lower corner clip hotspots to scale your cache clip.

- Double- the scale value on your cache clip, type a new scale value, and then press .
- In the Channel Box, set your cache clip’s Scale channel value.
See Scale.
To scale multiple geometry cache clips at a time
- In the scene view, select the object whose geometry cache clips you want to scale.
- In the Trax Editor, -select the geometry cache clips you want to scale.
The cache clip manipulator appears.
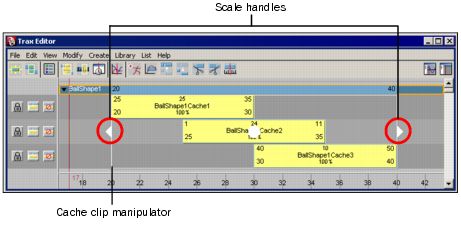
- Drag the scale handles to the left or right to scale all the selected cache clips at the same time.
To scale all of an object’s geometry cache clips
- In the scene view, select the object whose geometry cache clips you want to scale.
- In the Trax Editor, drag the left or right sides of the summary cache clip to scale all the selected object’s geometry cache clips.

Cycle geometry cache clips
You can cycle geometry cache clips to repeat the deformations contained in your cache clips. You can create cycles before or after a cache clip, and they can be whole or partial cycles.

The end of the original cache clip, and the beginning of the first cycle, is marked by a small vertical line. The end of each cycle sequence for a cache clip is marked by a small cycle tick or marker.
Cycles are represented by the letter C and appear a lighter blue than the rest of the cache clip.
To cycle geometry cache clips
- In the scene view, select the object whose geometry cache clips you want to cycle.
- In the Trax Editor, select the geometry cache clip you want to cycle.
- Do one of the following:
- -drag the lower corner clip hotspots of your cache clip to create a cycle before (pre-cycle) or after (post-cycle) your cache clip.

- In the Channel Box, set the Pre Cycle channel value to create a cycle before your cache clip, or set the Post Cycle channel value to create a cycle after your cache clip.
See Pre Cycle/Post Cycle.

To edit the number of cycles for a geometry cache clip
In the Trax Editor, double- the number beside the C on the cycled part of your cache clip, type a new number for how many times the clip is cycled before (Pre Cycle) or after (Post Cycle) the main cache clip, and then press .
For example, if the cycled part of your cache clip appears after the main cache clip and its number of cycles is 2, then the deformations in the main cache clip are repeated twice after the main part of the cache clip.
Hold geometry cache clips
You can hold geometry cache clips to freeze the last deformations in cache clips for a fixed period of time.

A hold is a part or an extension of a cache clip where the last deformation is held for a specified period of time. Holds are represented by the letter H.
To hold geometry cache clips
- In the scene view, select the object whose geometry cache clips you want to hold.
- In the Trax Editor, select the geometry cache clip you want to hold.
- Do one of the following:
- -drag the upper corner clip hotspot to create a hold after your cache clip.

- In the Channel Box, set the Hold channel value for your cache clip.
See Hold.
To edit the number of frames a geometry cache clip is held
Double- the number beside the H on the held part of your cache clip, type a new value for the number of frames you want the last deformation in the cache clip to be held for, and then press .
.
Trim geometry cache clips
You can trim geometry cache clips to omit segments of deformation from the beginnings or ends of your cache clips. This changes a cache clip’s Source In and Source Out times. Trimming your cache clips does not affect their associated cache files on disk. The segments that you omit from a cache clip using Trim are not deleted, and can be reinstated if the cache clip’s original length is restored.
To trim geometry cache clips
- In the Trax Editor, select the geometry cache clip you want to hold.
- Do one of the following:
- Drag the top corner clip hotspots to trim your cache clip.

- Position the Trax current time indicator as desired, and -click the cache clip and select Trim Before or Trim After from the context-sensitive menu that appears, or in the Trax menu bar select Edit > Trim Before or Edit > Trim After.
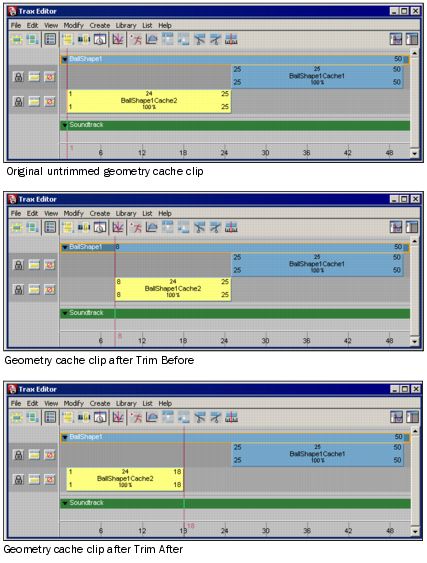
If you selected Trim before, the part of the cache clip that comes before the Trax current time indicator is removed from your cache clip. If you selected Trim After, the part of the cache clip that comes after the Trax current time indicator is removed from your cache clip. See Trim Before and Trim After.
- In the Channel Box, change your cache clip’s Source Start and Source End channel values or double- the Source Start or Source End values on your cache clip, type in new value numbers, and then press .

If you change your cache clip’s Source Start value, then you are trimming frames from the beginning of your cache clip. If you change your cache clip’s Source End value, then you are trimming frames from the end of your cache clip. See Source Start/Source End. The trimmed frames are not deleted from the clip or its associated file on disk. You can reinstate the trimmed frames by restoring the cache clip’s original length.
Split geometry cache clips
You can split your geometry cache clips to divide an object’s cached deformations into multiple, reusable cache clips.
Note
You can not split a cycled geometry cache clip. You need to first merge the cycled cache clip before you can split it. See To merge a single geometry cache clip.
|
To split geometry cache clips
- In the Trax Editor, select the cache clip that you want to split.
- Do one of the following:
- Drag the Trax current time indicator to the position on the cache clip where you want it to be split, -click the cache clip, and select Split Clip from the context-sensitive menu that appears.

The geometry cache clip is split at the current time indicator’s current frame and two cache clips appear replacing the selected cache clip.
- In the Trax menu bar, Select Edit > Split.

The cache clip is split according to the current settings in the Split Clip Options window, and two clips appear replacing the selected clip. See Split.
Tip
Rename the cache clips that result from the Split cache clip operation to help you remember their original order.
|
Merge geometry cache clips
You can merge your geometry cache clips into a single new cache clip. The cache clips you want to merge can be positioned sequentially in a track or can be located on different tracks.
You can only merge geometry cache clips if each of the cache clips that are located in the merge time range are selected or disabled. For example, if you have cache clip 1 (frames 20-30), cache clip 2 (frames 25-35), and cache clip 3 (frames 40-50), and you want to merge cache clips 2 and 3, then cache clip 1 must be disabled or selected for the merge.

To merge all of an object’s geometry cache clips
You can merge all your object’s geometry cache clips at the same time by selecting the object, rather than its geometry cache clips, for the merge operation. On merge, all your object’s enabled cache clips are then baked to a single cache clip.
However, if any of your cache clips overlap, or if there are gaps between any of your clips, see To merge multiple non-overlapping geometry cache clips and To merge multiple overlapping geometry cache clips.
- Select the object whose geometry cache clips you want to merge.
- In the Trax Editor, make sure that all your object’s cache clips are enabled.
- Select Animate > Geometry Caching > Merge Caches.

All your object’s enabled caches merge according to the current settings in the Merge Geometry Cache Options window, creating a new geometry cache clip, cache file, and description file. See Animate > Geometry Caching > Merge Caches.
The geometry cache clips you merged are disabled and their corresponding cache files on disk are not overridden or deleted.
To merge a single geometry cache clip
You can merge individual scaled, cycled, or held geometry cache clips.
- Select the object whose geometry cache clip you want to merge.
- In the Trax Editor, enable the geometry cache clip you want to merge and disable all other cache clips.
- Select Animate > Geometry Caching > Merge Caches.

The single cache clip you selected merges according to the settings in the Merge Geometry Cache Options window, creating a new geometry cache clip, cache file, and description file. See Animate > Geometry Caching > Merge Caches.
The geometry cache clip you merged is disabled and its associated cache file on disk is not overridden or deleted.
To merge multiple non-overlapping geometry cache clips
You can merge non-overlapping geometry cache clips.
However, if there are gaps between the non-overlapping geometry cache clips you want to merge, then the gaps are linearly interpolated and no cache data for those gaps is saved to the merged cache clip.
For example, you have three cache clips that you want to merge: cache clip 1 (frames 15-25), cache clip 2 (frames 25-35), and cache clip 3 (frames 40-50). When you merge these cache clips, the length of the resulting merged cache clip will be frames 15-50, but frames 36-39 will contain no cache data.

- Select the object whose geometry cache clips you want to merge.
- In the Trax Editor, enable the non-overlapping geometry cache clips you want to merge and disable all other cache clips.
- Select Animate > Geometry Caching > Merge Cache.
All selected non-overlapping geometry caches merge according to the settings in the Merge Geometry Cache Options window, creating a new geometry cache clip, cache file, and description file. See Animate > Geometry Caching > Merge Caches.
The geometry cache clips you merged are disabled and their associated cache files on disk are not overridden or deleted.
To merge multiple overlapping geometry cache clips
You can merge multiple overlapping geometry cache clips. The regions of the cache clips that overlap are blended according to their current Input Weight settings and any of their weight maps.
See Blend and set the weighting of geometry caches and Input Weights.
- Select the object whose geometry cache clips you want to merge.
- In the Trax Editor, enable the overlapping geometry cache clips you want to merge and disable all other cache clips.
- Select Animate > Geometry Caching > Merge Cache.

All the selected overlapping cache clips merge according to the settings in the Merge Geometry Cache Options window, creating a new geometry cache clip, cache file, and description file. See Animate > Geometry Caching > Merge Caches.
The geometry caches you merged are disabled and their associated cache files on disk are not overridden or deleted.
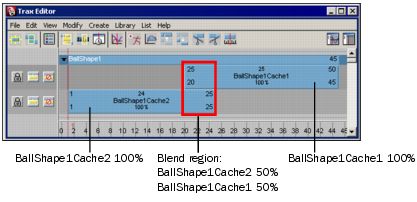
Blend geometry cache clips
You can blend geometry cache clips to create smooth, seamless transitions between your object’s overlapping cache clips.
To blend geometry cache clips
Geometry cache clips are blended automatically. By default, all the overlapping regions of your enabled geometry cache clips are automatically blended together using their cache clip’s current weight settings. See Input Weights.
Cache weights are normalized between overlapping cache clips. So if two overlapping cache clips have the same weight values (i.e. 1.0 and 1.0, 0.5 and 0.5 and so on), then they will both equally contribute to the deformations in their cache blend regions on playback.
You can adjust the smoothness of your cache clips’ blends by adjusting their weight settings, or by manipulating their weight curves. For example, if you have two overlapping cache clips, one from frames 1-25 and the other from frames 20-45, and both their Input Weights are set to 0.5 (50%), then both cache clips equally contribute to their object’s deformations from frames 20-25 during playback.
Sequential cache clips are not blended. When there are gaps between your geometry cache clips, they are filled with the live playback of your object’s original (source) deformations—not interpolated cache data.

To create and adjust geometry cache clip weight curves
You can create weight curves for your geometry cache clips. These weight curves let you adjust how your geometry cache clip’s deformations ease in and out of their blend regions.
- In the Trax Editor, select the geometry cache clip whose weight curve you want to create and adjust.
- -click the cache clip and select Create Weight Curve from the context-sensitive menu that appears.
A weight curve is created for the selected cache clip.
- Do one of the following:
- In the Trax toolbar, click the Graph Weight Curves button (
 ).
). - -click the selected cache clip and select Graph Weight from the context-sensitive menu that appears.
The Graph Editor opens with the selected cache clip’s weight curve framed in its graph view.

- Adjust the shape of your cache clip’s weight curve by doing the following:
- Move the weight curve’s keys or key tangents.
Select the Move Tool from the Maya toolbox, and  -drag the keys or their tangent handles to change the shape of the weight curve.

- (Optional) Add new keys to the weight curve.
Select the Insert Keys Tool (![]() ) or Add Keys Tool (
) or Add Keys Tool (![]() ) from the Graph Editor’s toolbar, and -click the weight curve to add additional keys to the weight curve.
) from the Graph Editor’s toolbar, and -click the weight curve to add additional keys to the weight curve.

You can then use these new keys and their tangent handles to further manipulate the shape of the weight curve.

The modified weight curve now appears on the selected cache clip in the track view area.

Tip
In the Attribute Editor, you can also key the Input Weight attributes on your geometry caches’ cacheBlend nodes to create geometry cache weight curves for your objects.
|
Delete geometry cache clips
To delete geometry cache clips
In the Trax Editor, select the geometry cache clips you want to delete and press the  key on your keyboard.
The selected clips are unloaded from the Trax Editor, their corresponding cache nodes are deleted, and their source cache files on disk are detached from their object.