This section shows how to create a .mi file that uses a custom shader that is linked at runtime. This example uses a texture shader, but the same procedure is used to create and link any other type of shader.
Step 1: Writing the Shader Source
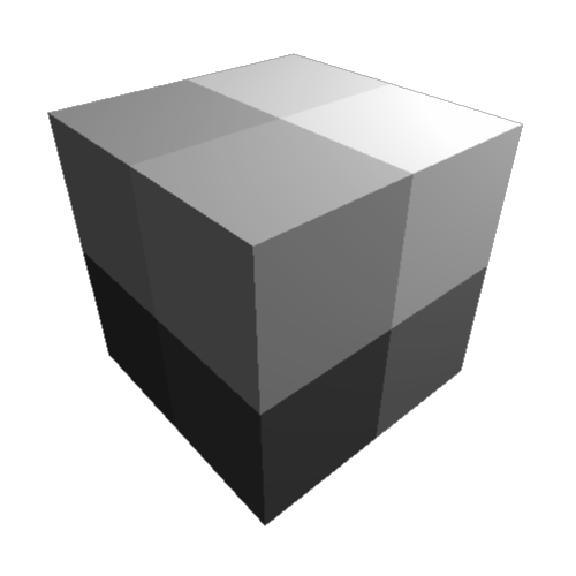
This texture shader operates in object space and colors the object into eight cubes that meet at the object coordinate origin. A cube mapped with this texture looks like a Rubik's cube for beginners that consists of eight subcubes, each with a different color. The brightness of the colors is determined by the shader parameters min and max.
#include <stdio.h>
#include "shader.h"
struct mytexture { miScalar min, max; };
int mytexture_version(void) {return(1);}
miBoolean mytexture(
miColor *result,
miState *state,
struct mytexture *paras)
{
miVector vec;
miScalar min, max;
mi_point_to_object(state, &vec, &state->point);
min = *mi_eval_scalar(¶s->min);
max = *mi_eval_scalar(¶s->max);
result->r = vec.x < 0 ? min : max;
result->g = vec.y < 0 ? min : max;
result->b = vec.z < 0 ? min : max;
result->a = 1;
return(miTRUE);
}
This code should be written to a file mytexture.c.
Step 2: Compiling and Linking
There are several ways to integrate this shader into a scene file: placing the source code directly into the .mi file with $code and $end code statements, referencing the source file with a code statement, or compiling the source and referencing the object code with a link statement. The recommended method, and also the fastest method, is to create a DSO (Dynamic Shared Object) file on Unix systems, or a DLL on Windows NT systems. To do this, the shader must be compiled and linked manually:
% cc -O2 -shared -o mytexture.so mytexture.c
This example uses SGI syntax; other compilers require different command lines. See page linkcommands for the commands required for different types of systems. You may also want to specify the -g option for debugging, -O2 for optimization, or -Idirectory to tell the compiler where the directory containing the shader.h file can be found (refer to the compiler documentation for details). After this command, there is a mytexture.so DSO in the current directory; move it to a place accessible to all hosts, for example with
% mv mytexture.so /usr/share/local
Assuming a directory /usr/share/local exists and is accessible to you. You may also choose a directory such as /usr/tmp, but since this directory is not normally accessible from other hosts that you want to use as slaves (at least not under this name), you will have to copy mytexture.so to /usr/tmp on the other hosts too.
Step 3: Linking and Declaring the Shader
Now the shader needs to be linked and declared in the .mi scene file that contains the object or objects to be mapped with the new texture. Linking means that the DSO (or DLL) becomes callable by mental ray, and the declaration informs mental ray about the shader parameters:
    link "/usr/share/local/mytexture.so"
    declare shader
        color "mytexture" (scalar "min", scalar "max")
        version 1
    end declare
It is important that the declaration matches the type and order of the C declaration in the source file, struct mytexture. These lines should be added near the beginning of the .mi file, before the first use and before the frame statement if there is one. For complicated DSOs, it is recommended to put all declarations for the library into a separate file mytexture.mi, and use a $include statement:
    link "/usr/share/local/mytexture.so"
    $include "/usr/share/local/mytexture.mi"
Either way, the library must be linked before the declaration is given because mental ray makes sure that a declared shader exists.
Step 4: Using the Shader
Now the shader can be used in a real .mi file. The following example puts the texture on a cube. Note that the cube is defined in object space, with the origin at the center of the cube; this is the space that the mytexture shader picks up with mi_point_to_object.
    verbose on
    $include <base.mi>
    link "base.so"
    link "/usr/share/local/mytexture.so"

    declare shader
        color "mytexture" (scalar "min", scalar "max")
        version 1
    end declare

    options "opt"
        samples         -2 0
        contrast        0.1  0.1  0.1
        jitter          0
        object space
    end options

    camera "cam"
        frame           1
        output          "rgb" "x.rgb"
        focal           50
        aperture        44
        aspect          1.18
        resolution      500 424
    end camera

    instance "cam_inst" "cam"
        transform       0.7719  0.3042 -0.5582 0.0
                        0.0000  0.8781  0.4785 0.0
                        0.6357 -0.3693  0.6778 0.0
                        0.0000  0.0000 -2.5000 1.0
    end instance

    light "light"
        "mib_light_point" (
            "color"     1 1 1
        )
        origin          0 0 0
    end light

    instance "light_inst" "light"
        transform        1  0  0  0
                         0  1  0  0
                         0  0  1  0
                        -2 -3 -2  1
    end instance

    color texture "tex"
        "mytexture" (
            "min"       0.3,
            "max"       1.0
        )

    material "mtl" opaque
        "mib_illum_phong" (
            "ambience"  .3 .3 .3,
            "ambient"   = "tex",
            "diffuse"   = "tex",
            "specular"  1 1 1,
            "exponent"  50,
            "lights"    [ "light_inst" ]
        )
    end material

    object "cube"
        visible
        tag 1
        group
                -0.5 -0.5 -0.5
                -0.5 -0.5  0.5
                -0.5  0.5 -0.5
                -0.5  0.5  0.5
                 0.5 -0.5 -0.5
                 0.5 -0.5  0.5
                 0.5  0.5 -0.5
                 0.5  0.5  0.5

                v 0   v 1   v 2   v 3
                v 4   v 5   v 6   v 7

                p "mtl" 0  1  3  2
                p       1  5  7  3
                p       5  4  6  7
                p       4  0  2  6
                p       4  5  1  0
                p       2  3  7  6
        end group
    end object

    instance "cube_inst" "cube"
        transform       1  0  0  0
                        0  1  0  0
                        0  0  1  0
                        0  0  0  1
    end instance

    instgroup "rootgrp"
        "cam_inst" "light_inst" "cube_inst"
    end instgroup

    render "rootgrp" "cam_inst" "opt"
The following image shows the result of rendering this scene with the command line ray example.mi (assuming that the above scene example was written to a file example.mi):

Copyright © 1986-2010 by mental images GmbH