
This guide describes Cached Playback, which was introduced in Maya 2019 as a way to boost animation performance to the next level. It describes basic concepts, ways to configure the cache as well as limitations and debugging techniques.
This guide will be of interest to riggers, TDs, and plug-in authors wishing to understand the Cached Playback architecture in order to take advantage of performance enhancements in Maya.
Even if successful Parallel Evaluation is a prerequisite for Cached Playback, this guide will not go into details on how to make a scene work with Parallel Evaluation. Please refer to the Using Parallel Maya whitepaper for more details on Parallel Evaluation.
From Maya 2016, which introduced Parallel Evaluation, to Maya 2019, which introduced Cached Playback, a lot of changes were made to the core evaluation engine. As a result, some rigs and plug-ins needed to be updated in order to adapt to the new paradigm to take advantage of the new features and performance benefits.
Moving directly from a pre-Parallel Evaluation version of Maya to the latest might make it difficult to understand what needs to be updated in a given rig or set of plug-ins. This section describes a series of steps to incrementally move from the old DG-based evaluation model to the latest parallel and cache-enabled model.
Follow these steps when upgrading a scene from DG-based evaluation to Parallel Evaluation. These steps are not specific to Cached Playback and may have already been done if your scene runs efficiently in recent Maya versions that use Parallel Evaluation. Still, since Parallel Evaluation is a prerequisite for Cached Playback, this section is a brief reminder.
The “Evaluation” Heads Up Display (HUD) provides information about the state of the Evaluation Manager and is a useful source of feedback as you debug a rig for Parallel Evaluation.
Enable the HUD by checking the “Evaluation” checkbox in the Display → Heads Up Display menu.
The “Cache” HUD is also useful when working with Cached Playback. Finally, The “Frame Rate” HUD helps comparing performance between each step.
To progress incrementally through the steps, your initial state should have all performance features turned off:
Before continuing with the next steps, be sure that your scene plays without errors in the current configuration. The scene should have representative animation triggering relevant parts of the rig(s) to be tested.
The first step in detecting potential problems with the new evaluation model is to run a test in Serial Evaluation mode. This mode uses the new architecture, that is, forward evaluation, no dirty propagation at each frame, and so on, but it performs evaluation serially, in a single thread.
To enable Serial Evaluation mode, go to Windows → Settings/Preferences → Preferences to open the Preferences window. Then choose the Settings → Animation category and change the Evaluation mode to Serial.
This test detects problems caused by switching to the Parallel Evaluation model without involving concurrency issues such as race conditions.
When you run this test, that is, playback the scene in this mode, look out for:
print cmds.evaluationManager(query=True, disableInfo=True). If anything disables the Evaluation Manager, Maya reverts to the old, DG-based, evaluation model.After this step, your scene should run the same in Serial Evaluation mode as it does in DG. No significant performance gain is expected at this point, since evaluation still happens serially. In some cases, this mode may even be slower than DG, since it is primarily a debugging mode.
Once the scene runs correctly using the new evaluation model, the next step is to use this new model to enable Parallel Evaluation.
To enable Parallel Evaluation, go to Windows → Settings/Preferences → Preferences to open the Preferences window. Then, choose the Settings → Animation category and change the Evaluation mode to Parallel.
When running this test, that is, playing the scene back using this mode, look for:
At this point, the scene should playback well in Parallel using multiple cores, although the actual concurrency level, and expected performance gains, are highly dependent on scene content.
Depending on the structure of deformer stacks being used, GPU deformation can provide tremendous performance gains. While GPU deformation is not a requirement for Cached Playback, it can still provide a valuable performance boost during interactive manipulation, as well as when playing back without caching.
To enable GPU deformation, go to Windows → Settings/Preferences → Preferences to open the Preferences window. Then, choose the Settings → Animation category and check the GPU Override checkbox.
The Evaluation Toolkit GPU Override section provides tools to inspect which parts of the scene are handled by GPU deformation. You can also query why some meshes were not grabbed by the GPU deformer.
Note: It may require some rig re-engineering to use GPU deformation (see the GPU Override section of the Using Parallel Maya whitepaper).
A final test is to make sure that the scene still evaluates as expected during interactive manipulation, either through Viewport manipulators, the Graph Editor, the Attribute Editor or the Channel Box.
While this test is listed as a last step, if you find problems, it might be useful to debug them by going back through the previous steps and identifying which one introduces the manipulation problems.
One the rig properly works in Parallel Evaluation, you can experiment with Cached Playback.
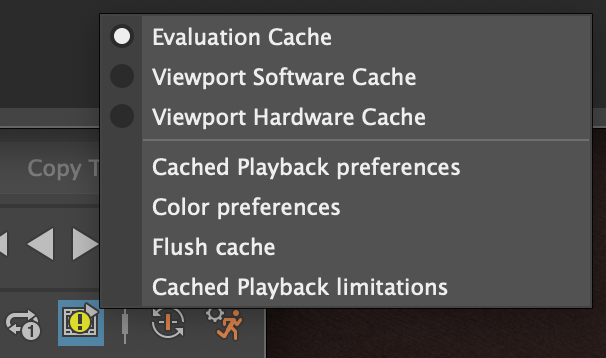
Evaluation Cache is the default Cached Playback mode. Activate it by clicking the Cached Playback Toggle icon in the Playback Controls at the bottom right of the Time Slider. Right-click the icon for more options, such as setting the Caching Modes. Ensure it is set to Evaluation Cache.
If everything works properly, the cache starts filling in the background and a blue bar fills the Time Slider. The scene then plays back faster from the cache.
When you run this test, that is, play back the scene in this mode, look for:
print cmds.cacheEvaluator(query=True, safeModeMessages=True). If anything disables Cached Playback, evaluation continues to be done using the Evaluation Manager and Parallel Evaluation, but the results are recomputed every time. The limitations are listed in Cached Playback limitations and Cached Playback unsupported nodes.Flush cache menu item to clear them out. See the Preferences and UI section for details about the Cached Playback Toggle menu. If you repeatedly experience the same artifacts let us know so that we can address this issue in future versions.As described in Caching Modes, Viewport modes provide better playback performance.
To enable Viewport Software Cache, right-click the Cached Playback Toggle icon at the bottom right of the Time Slider and choose Viewport Software Cache.
The expected behavior is like Evaluation Cache, that is, the cache should start filling in the background.
When you run this test, that is, play back the scene in this mode, look for the same things as Evaluation Cache: stability and correctness issues, shapes not moving, and so on. Also, your playback performance should be better with this than with Evaluation Cache. If this is not the case, use the Profiler to understand why the performance is not as expected. The Caching Modes section provides more details about the differences between Caching Modes.
Once the scene is working properly in Viewport Software Cache, you can test it in Hardware mode.
To enable Viewport Hardware Cache, right-click the Cached Playback Toggle icon in the Playback Controls at the bottom right of the Time Slider and choose Viewport Hardware Cache.
With this mode, performance gains are expected to be the greatest of all the built-in Caching Modes, but results vary based on hardware configuration, especially in relation to your graphics card.
Cached Playback introduced a few new concepts in the underlying architecture. While animators do not usually concern themselves about these, TDs and riggers will benefit from understanding this foundational information so they can get the most from the Cached Playback technology.
A key feature of Cached Playback is the ability to fill the cache in the background while the animator is working in Maya. This Background Evaluation happens in a specific evaluation context so that it is isolated from the rest of what is going on in Maya.
Evaluation contexts represent the world in which Maya performs its evaluation. Node data is kept in Data Blocks; each node has one data block per evaluation context. This keeps the evaluation contexts isolated so that multiple evaluations can occur without impacting each other. Think of a context as an evaluation system parameter for where and how evaluation should happen. It holds important information such as the time at which the scene should be evaluated.
The main types of Maya evaluation contexts are:
Several nodes, both built-in and custom plug-in, were written such that they did not always respect the Evaluation Context. While this previously often went unnoticed because timed context use was limited, it is no longer the case as now Background Evaluation is omnipresent. Because of this, contexts other than the normal context are constantly used.
When nodes use data blocks to read and store data, they usually respect context implicitly, since the data they use is the data associated with the current Evaluation Context. However, it is easy to stop respecting the current Evaluation Context. For example, if you store data directly on the node as a class member. Doing this causes problems because there would be one instance of this member per node, instead of per-context. See Plug-in Authoring for more details.
The current Evaluation Context is passed as an implicit parameter to all evaluation functions. See MDGContext::current() and other methods in MDGContext for how to work with Evaluation Contexts.
The Maya Cached Playback system does not need to cache every node in the scene. In most cases, only a few nodes of interest, such as geometries and transforms, need to be cached for the scene to play back from the cache without triggering evaluation. The nodes for which the caching system stores data in the cache and from which data is restored when playing back are known as Caching Points.
Control over what constitutes a Caching Point is done through Caching Rules. Nodes have different behaviors during Background Filling vs Playback depending on whether they are Caching Points or not.
To visualize Caching Points, go to Evaluation Toolkit → Debugging → Evaluation Graph Inspection → Grapical Output → Visual Graph
For example:

Cache configuration, that is, control over Caching Points, is done through a set of rules. An ordered set of Caching Rules is called a Caching Mode.
A Caching Rule is an expression evaluated for each node in the graph and having an effect on the cache configuration.
The most common type of rule is filter/action rules. The rule is composed of a filter that is a test performed on a given node. If the test passes, the associated action is applied. An example filter could be “is the node of the correct type” and an example action would be “enable evaluation cache”. The built-in rules, filters, and actions are described in the cacheEvaluator command help.
The default built-in caching modes are described in the Caching Modes section, but they are simply a set of rules applied sequentially to set Caching Points.
For example, the following set of rules constitutes a mode:
cmds.cacheEvaluator(resetRules=True)
cmds.cacheEvaluator(
    newFilter="evaluationCacheNodes",
    newAction="enableEvaluationCache"
    )
cmds.cacheEvaluator(newRule="customEvaluators")
The first command simply clears the set of rules. The second command adds a rule enabling Evaluation cache on all nodes of the correct types. The third command applies a safety mechanism around nodes grabbed by custom evaluators.
Viewport caching modes are slightly more complex, but the same principle applies. They start by enabling Evaluation cache, and then enable Viewport cache on the subset of supported nodes.
The Caching Rules are evaluated when partitioning the graph. This means that operations that cause Evaluation Graph invalidation, such as adding new animated nodes, will trigger a re-evaluation of the Caching Rules. For example, if you open a new scene, the current Caching Rules set is kept, but the rules are re-evaluated. Note that built-in Caching Modes are saved in the Preferences and persist between Maya sessions. On the other hand, custom Caching Modes (see Custom Caching Modes) rules are temporary and are active only for the current Maya session.
The default built-in modes (see Caching Modes) are meant to be generic enough to apply to a wide variety of scenes. However, you can use specific rig knowledge for greater performance.
For example, built-in modes will cache all transforms. But, a different approach would be to cache only visible transforms, or transforms that are the output of the locomotion rig. Caching fewer transforms results in a smaller memory footprint and usually provides higher playback performance, since there is less to do when restoring data from the cache.
You can use built-in filters and actions to customize caching modes by adding new rules to an existing mode or creating a custom mode from scratch. There is also an OpenMaya API that allows for the creation of custom filters. Implementing MPxCacheConfigRuleFilter gives a lot of flexibility: nodes can be selected based on a naming pattern, a namespace, the presence and/or value of a dynamic attribute, and so on.
You can use custom caching modes to tailor cache configuration for specific needs. For instance, plug-in shapes that are not enabled by default will require a custom mode to activate caching on the plug-in shape. The following command adds a rule to the current mode to activate Evaluation Cache on a custom shape:
cmds.cacheEvaluator(
    newFilter='nodeTypes',
    newFilterParam='types=+myCustomShapeType',
    newAction='enableEvaluationCache'
    )
Another example is to have all low-fidelity background characters cached in Viewport Hardware Cache, so that they fit in video memory, while the foreground character being edited is cached in Evaluation Cache. Any combination is possible.
However, custom caching modes are unsupported. They can provide a performance boost, but you may create configurations with undefined behavior. Use at your own risk.
Tip. Maya provides traces that you can use as a debugging tool to see the result of of caching rules evaluation.
To activate this trace, use the
dbtrace -k cacheConfig;MEL command.By default, a _Trace_CacheConfig.txt file is created with the result of rules evaluation for each animated node in the graph. Locate this file in the filesystem with
dbtrace -k cacheConfig -q -o;.To disable this trace, type:
dbtrace -k cacheConfig -off;
Cached Playback workflows usually involve two main phases. In the first phase, the cache is filled by a background evaluation process that pre-computes values for the entire timeline, storing them in the cache. Then, playback occurs by restoring pre-computed values from the cache instead of re-evaluating them every time.
When the cache is being filled in the background, both Caching Points and non-Caching Points are evaluated in a background context. However, Caching Points require an extra step, which is copying of the evaluated values to the cache.
When playing back from the cache, Maya tries to do the minimum amount of work. Caching Points are not re-computed: data is simply copied from the cache to the node. Non-Caching Points are “skipped”, that is, nothing is done to them except to leave them in a correct state so they can be re-evaluated if needed.
Cached Playback gives you greater playback performance by restoring pre-computed data instead of re-evaluating it every frame. However, while animators work, pre-computed data becomes no longer valid because the underlying animation curves are changed. In this situation, the cache is invalidated and data must be recomputed.
Invalidation propagation starts from the node being edited and only happens when animation data is changed. Therefore:
When cache invalidation is triggered by a node being edited, it propagates to everything downstream of that node, that is, every node that depends on the edited node. All nodes reached by this propagation are marked so that they are recomputed with the next filling of the cache.
After cache invalidation, background evaluation is triggered to re-compute invalid frames. In typical animator workflows, only a small portion of the timeline needs re-evaluation. Also, only a subset of the nodes usually need to re-compute. For instance, when you animate the pinky finger of a right hand, it is likely that the face rig does not require re-evaluation, nor do other characters in the scene.
Background evaluation considers this information to evaluate the minimum number of nodes. Nodes marked as invalid are recomputed, but to do so, the nodes they depend on also must be evaluated, up to the nearest Caching Points. If the Caching Point has not been invalidated, its data is still valid and there is no need to evaluate it or anything upstream: the data can be restored and used to recompute invalid nodes downstream.
Some edits, such as adding a first key to an attribute or adding a new node, invalidates the Evaluation Graph which in turn, invalidates the entire cache. However, this does not mean that the cached values are no longer valid. The Cached Playback system tracks the topology of everything a node depends on. Once the Evaluation Graph rebuilds after being invalidated, nodes for which dependencies did not change (for instance for a character that was not affected by the edit) can have their cached values restored without needing recomputation. So, while such edits give the impression that the whole cache needs to be refilled, this happens much faster if the edit allows for re-use of the cached data.
Maya uses Invalidation Range Transformation to support cache invalidation in cases where time range handling is complex. For example, the Time Editor can duplicate or retime animation curves.

In the example above, an animation curve was duplicated 3 times with 0,30,50 frames delay. When the source animation is edited in time range [5,10], all the clips mirroring the source also change; therefore the time range [5,10]U[35,40]U[55,60] must be invalidated.
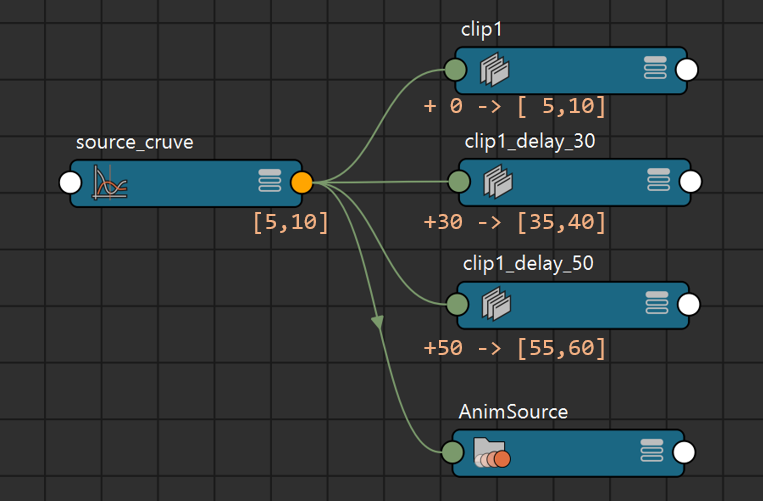
The source animation curve sends out the dirty notification to its downstream nodes with affected time range [5,10]. Once an IRT Kernel (e.g. Time Editor clip) is reached during the propagation, it transforms the affected time range data, only invalidating its downstream with the new time range. The result of this propagation is:
[5,10], Caching Points downstream of clip1 and AnimSource were invalidated[35,40], Caching Points downstream of clip1_delay_30 were invalidated[55,60], Caching Points downstream of clip1_delay_50 were invalidatedNote, Time Editor is not currently supported by Cached Playback.
Another typical usage of IRT is to support dynamics simulation. In typical simulations, an invalidation range [A,B] must be transformed into (at least) [A,+infinity]. The invalidation might even have to be extended to frames before A if the simulation cannot be restarted from any point in time and therefore must start with the first simulated frame. In this case, the invalidation range would be [S,+infinity], where S is the start of the simulation.
To register a node as an IRT Kernel, override the method MPxNode::transformInvalidationRange. Check the documentation there for more details.
For Maya to stay responsive while the cache is filling in the background, background evaluation can be stopped in the middle of a frame. This way, all available resources (CPU, GPU, etc.) can be dedicated to foreground work. This minimizes the impact of background evaluation on animator workflows by keeping the UI responsive and interactive manipulation fast. The partially evaluated frame is discarded so when background evaluation resumes, the frame needs to be recomputed.
Tip. While the cache is filling in the background, artifacts or instabilities can be caused by interactive manipulation. You can try to work around this by disabling the background evaluation fast-interrupt feature using the
maya.cmds.backgroundEvaluationManager( interrupt=False )command.
Maya ships with three default Caching Modes. This section describes what to expect from each mode and the differences between them.
The following image is a profile of the scene used to illustrates the modes when played back using Parallel Evaluation without GPU deformation:
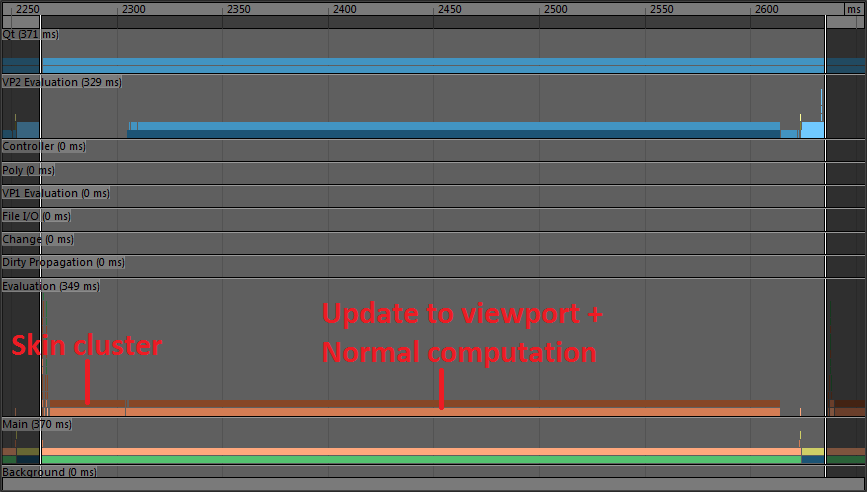
Frame time mostly consists of deformation computation and updating the Viewport representation of the geometry. Part of the translation from the data block format to the Viewport format involves recomputing normals (which are lazily computed on demand), which takes a sizeable portion of the translation time.
Let’s see how Cached Playback can help performance with this scene.
The default mode is Evaluation Cache. In this mode, computation results are cached directly in the node format, that is, the same representation as the one used in the data block. This makes this caching mode generic. It is independent of the renderer and speeds up a variety of workflows, for example, baking (since the data is already computed).
The following image is a profile of the same scene with Evaluation Cache:
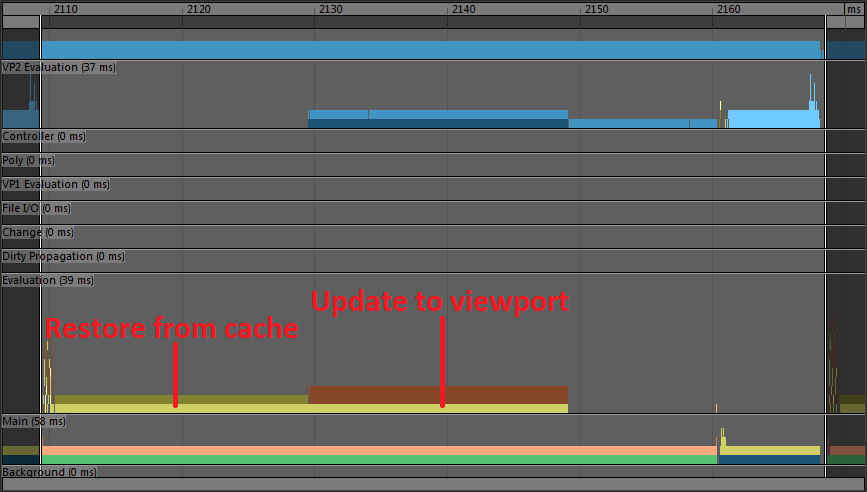
The skin cluster computation is gone and replaced by a shorter section (“Restore from cache”) where data is simply copied back from the cache instead of being fully computed.
This data still needs to be converted to the Viewport representation of the mesh, so the translation phase is still present. However, this time it is much smaller. Without caching, normals were recomputed at every frame. However, using Evaluation Cache mode, normals are only computed when filling the cache and stored in data block format. This means that while the translation will be much faster, it must still occur.
Let’s see if we can improve the situation.
The idea behind Viewport caches is to store cached data in a format that is ready to be consumed by the renderer, avoiding costly translation after restoring already-computed data. Instead of storing geometry the way it is represented in the data block, it waits until after translation to the renderer buffers and stores those in RAM instead. This Caching Mode is specific to Viewport 2.0, but usually results in greater playback performance.
Here is a profile of the same scene with Viewport Software Cache:
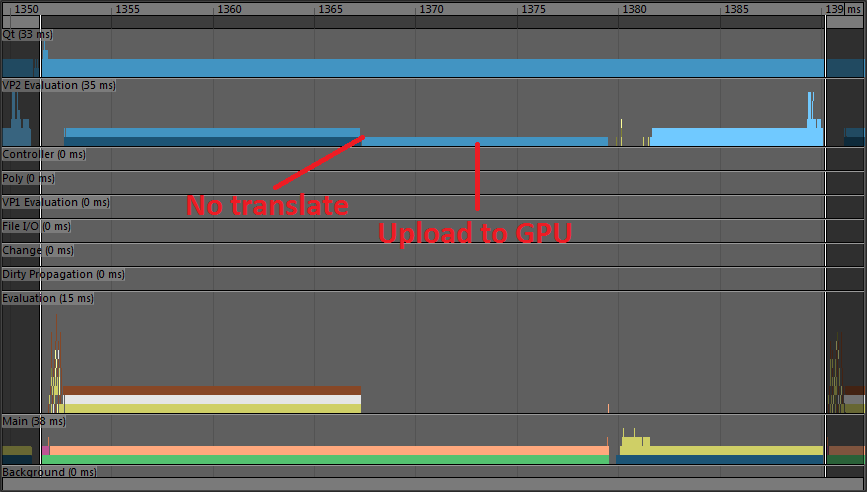
We can now see that the “Restore from cache” section is gone, because it is no longer necessary to copy data block cached data from the cache to the node. We can directly use the ready-to-render buffers. This explains why the “translate” section of the update to viewport is also gone.
However, the restored buffers are not completely ready to be rendered. The renderer still must send those software buffers to hardware video memory.
Let’s see if we can further improve this approach.
Viewport Hardware Cache also stores buffers in the format used by the renderer, but in GPU memory instead of RAM. This is as close as we can get to having the cached data ready to be consumed by the renderer.
Here is a profile of the same scene with Viewport Software Cache:

In this mode, there is almost no work to be done for the Viewport. There remains a few checks to ensure the data is available, but quickly enough the renderer recognizes the data is ready to be used and renders it.
Viewport Hardware Cache provides the greatest playback speed, but it can use a lot of video memory. This is why other modes are useful: when resources are limited, compromises must be made to achieve the best possible performance with the available hardware.
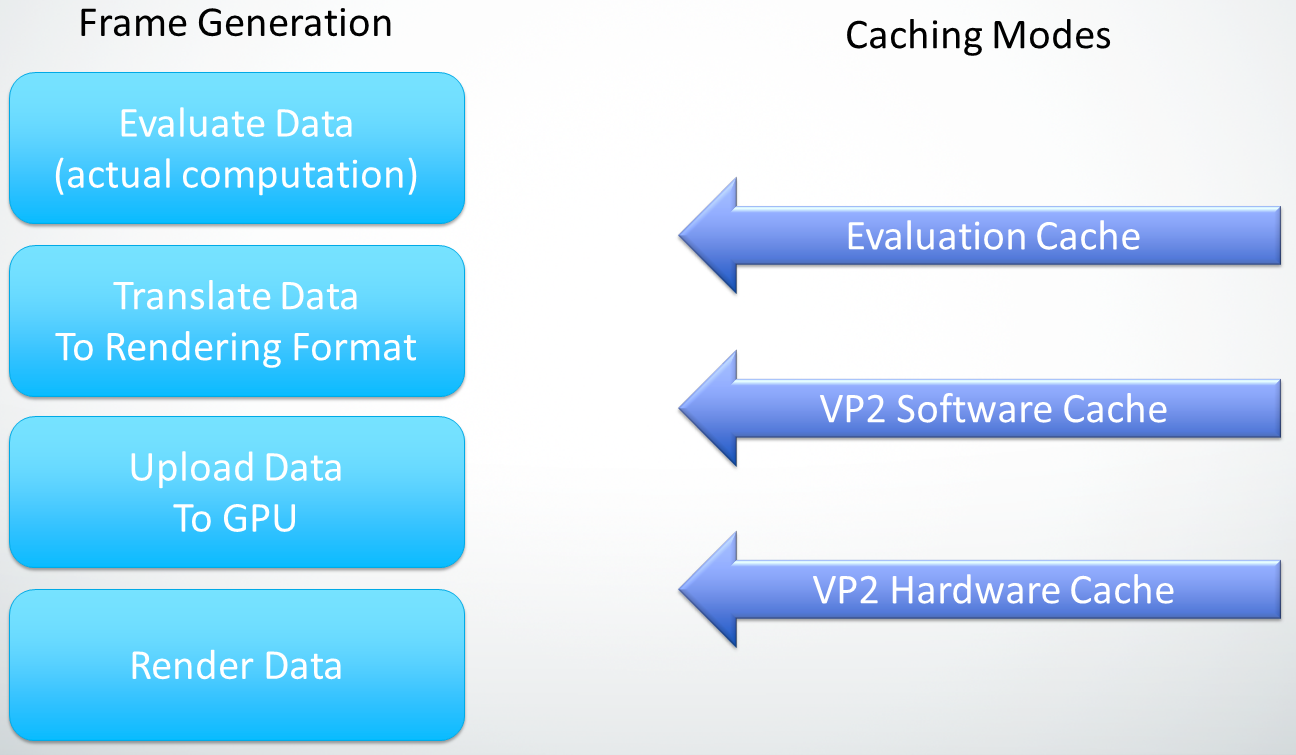
The following image summarizes the steps required to generate a typical frame and where the different Caching Modes fit in the process to provide different levels of performance.
Tip. Even if the current mode is set to Viewport Software Cache or Viewport Hardware Cache, some geometries might fall back to Evaluation Cache. Viewport caches currently have limitations that force the caching strategy to resort to Evaluation Cache to avoid unsupported setups (like animated visiblity or topology), while still providing a reasonable performance gain.
You can use the
cacheConfigtrace described in the Custom Caching Modes section to identify nodes that switch to Evaluation Cache. You can also use thecacheEvaluatorcommand to query what type of cache is enabled on any node.You can deactivate this fallback behavior with a custom caching mode created by simply adding “fallback=0” as a newActionParam for the enableVP2Cache action in the regular Viewport Software Cache or Viewport Hardware Cache configuration rules. See the
cacheEvaluatorcommand help for more details.
Maya caches some nodes by default. Below is the list of nodes that are marked as Caching Points in Maya by default. Some nodes are available in devkit and are linked below. These example nodes may serve as good resource for users.
apiMesh (devkit example)baseLatticebezierCurvecameraclustercMuscleDebugcMuscleDirectioncMuscleDisplacecMuscleDisplaycMuscleFalloffcMuscleKeepOutcMuscleObjectcMuscleSurfAttachcMuscleSmartCollidecMuscleSplinecMuscleSmartCollidedeformFuncdynParticlefolliclefootPrintfootPrintNode_GeometryOverride (devkit example)footPrintNode_GeometryOverride_AnimatedMaterial (devkit example)hikFKJointhwShaderimagePlanelatticelightlocatormeshnParticlenurbsCurvenurbsSurfaceparticlepfxGeometryrawFootPrint (devkit example)transformBesides the nodes mentioned above, there a few nodes which are not Caching Points by default. These nodes are not supported by default due to some limitations which can manifest themselves in form of performance or correctness issues and may disable Cached Playback. A message is displayed when Cached Playback is disabled by a node. Users can however choose to force enable Cached Playback by using environment variables. After using the environment variables, users are advised to test their scene for any undesirable affects.
Warning: Forcing Cached Playback with environment variables is an unsupported workflow and may lead to crashes, correctness, and performance issues.
cacheFile
MAYA_CACHE_IGNORE_UNSAFE_CACHE_FILEclip
MAYA_CACHE_IGNORE_UNSAFE_TRAXclipLibrary
MAYA_CACHE_IGNORE_UNSAFE_TRAXclipGhostShape
MAYA_CACHE_IGNORE_UNSAFE_TRAXclipScheduler
MAYA_CACHE_IGNORE_UNSAFE_TRAXclipToGhostData
MAYA_CACHE_IGNORE_UNSAFE_TRAXcMuscleSystem
MAYA_CACHE_IGNORE_UNSAFE_MUSCLEenableJiggle, enableSliding, enableForce, or enableRelax attribute is set or animated and the environment variable is not set. If environment variable is used, Cached Playback is not disabled, and simulation support is required by this node. If it is not a simulation then the node does not disable Cached Playback.constraint
greasePencilSequence
MAYA_CACHE_IGNORE_UNSAFE_GREASE_PENCILgreasePlane
MAYA_CACHE_IGNORE_UNSAFE_GREASE_PENCILjiggle
MAYA_CACHE_IGNORE_UNSAFE_JIGGLE_DEFORMERenable attribute is set or animated and environment variable is not set.MPxLocatorNode
getCacheSetup . See the section about MPxNode::getCacheSetup() for more details.nHair
MAYA_CACHE_IGNORE_UNSAFE_DYNAMICSsimulationMethod attribute is set or animated and environment variable is not set. If environment variable is used Cached Playback is not disabled and simulation support is required by this node.nRigid
currentState attribute is animated and also requires simulation support.subdiv
MAYA_CACHE_IGNORE_UNSAFE_DEFORMING_SUBDIVnucleus
enable attribute is set or animated, simulation support is required by this nodetextureDeformer
MAYA_CACHE_IGNORE_UNSAFE_TEXTURE_DEFORMERbullet (MASH)
MAYA_CACHE_IGNORE_UNSAFE_MASHenable attribute is set or animated. Setting the environment variable forces Cached Playback to stay “ON” regardless of the attribute status.colour (MASH)
MAYA_CACHE_IGNORE_UNSAFE_MASHenable and enableVelocity attribute is set or animated. Setting the environment variable forces Cached Playback to stay “ON” regardless of the attribute status.fallOff (MASH)
MAYA_CACHE_IGNORE_UNSAFE_MASHenable attribute is set or animated and falloffEventType is not kmNormal. Setting the environment variable forces Cached Playback to stay “ON” regardless of the attribute status.flightLN (MASH)
MAYA_CACHE_IGNORE_UNSAFE_MASHenable attribute is set or animated. Setting the environment variable forces Cached Playback to stay “ON” regardless of the attribute status.orient (MASH)
MAYA_CACHE_IGNORE_UNSAFE_MASHenable attribute is set or animated and orientMode is kVelocity. Setting the environment variable forces Cached Playback to stay “ON” regardless of the attribute status.spring (MASH)
MAYA_CACHE_IGNORE_UNSAFE_MASHenable attribute is set or animated. Setting the environment variable forces Cached Playback to stay “ON” regardless of the attribute status.time (MASH)
MAYA_CACHE_IGNORE_UNSAFE_MASHenable attribute is set or animated, and enableVelocity is set or animated, or simulateTime is set or animated. Setting the environment variable forces Cached Playback to stay “ON” regardless of the attribute status.trails (MASH)
MAYA_CACHE_IGNORE_UNSAFE_MASHtrailsMode is set as kTrails. Setting the environment variable forces Cached Playback to stay “ON” regardless of the attribute status.Starting from Maya 2020, users can cache and playback dynamics simulation, such as nCloth, or Fluid. To activate this feature, in the Cache Preferences, simply check the Cache dynamics checkbox (this option is disabled by default in Maya 2020). This new feature will be activated if simulation nodes are detected in the scene.

Note,
nHairandBifrostdynamics caching is not yet supported.
When dynamics support is active, the following changes will be observable:
To support this asynchronous caching experience for dynamics, Maya partitions the scene’s Evaluation Graph into multiple connected subgraphs. Each of the subgraphs is referred to as a Cache Layer or simply layer in this context. Here is what cache layers look like on a nCloth scene:

Each layer has its own logical cache, indicated by the status line in Time Slider, and can be evaluated independently at different times. Based on the dependency between layers, we number them with a topology order. i.e. Layer [N] may have dependencies on Layer [0] to [N-1]. The layers are currently hard-coded, regular animation at layer[0] and dynamics at layer[1]. The only way to activate Layered Caching for plug-in nodes is to set the SimulationSupport requirement in MPxNode::getCacheSetup() on a simulation kernel node (e.g. Nucleus in the above example). See the section about MPxNode::getCacheSetup() for more details.
During EM partitioning phase, Maya will put all nodes downstream of simulation kernels in the dynamics layer. All the output boundary nodes in regular layer will be configured as Evaluation Caching Point, like the CharacterMesh node in the graph above. This configuration will override any user-provided cache configuration rules on those nodes. This setup is required to make sure all inputs to the next layer are cached and therefore available when running the evaluation of the subsequent layer in the next round of cache filling.
In background cache filling, the lowest cache layer will always be filled first, before filling for higher layers begins. For example, regular animation cache will be filled for all frames before Maya starts to fill dynamics cache. The cache filling for layer [N] starts by restoring all the output boundary nodes in layer [0] to [N-1], and doing regular EM evaluation on layer [N].
When Maya restores the scene from a partially cached frame (for example, when only layer [0] was filled), it restores all the cached data on layer [0], and “freezes” layer [1] and above, by marking all the data as clean on these layers.
Maya allows a user to access a random time from UI or commands. However, most dynamics simulation must be performed in the strict order of subsequent frames, without gaps. Jumping randomly on the timeline usually causes incorrect simulation.
To ensure cache correctness with random time access, by default, Maya only allows the dynamics cache to be filled from the background, where the evaluation time and order can be controlled to fulfill the simulation requirements. This restriction is imposed by the cache layer design, and can be relaxed by calling the MEL command cacheEvalautor -layeredEvaluationEnabled 0 to disable Layered Caching. Note that this command is reserved for debugging and testing purposes, the workflow with Layered Caching disabled is not supported.
Another restriction for dynamics is its invalidation behavior. For example, changing a simulation parameter on frame 3 should cause all the frames after 3 to be recomputed. However, restarting simulation from any time is currently not supported. This means the simulation must restart from its initial state and all the simulation frames must be invalidated. For more information, check the Invalidation Range Transformation section and the simpleSimulationNode devkit example.
Now that we have cached data available we can begin to explore ways of making use of that data to accelerate other tools and workflows.
Ghosting allows the artist to view an animated asset at several points in the animation at the same time.
Before the introduction of Cached Playback, ghosting was only supported for rigid geometries. Because this type of geometry does not change through time and only its location (i.e. parent transform) does, it is possible to render multiple ghosts relatively efficently, since only the transform needs to be evaluated at the different times for which a ghost needs to be rendered.
However, in the case of deforming geometry, rendering ghosts implies re-evaluating full rigs, with full deformation stacks, for each ghost to be rendered. The computation cost was prohibitively high, making this type of workflow unusable on realistic rigs.
With Cached Playback, the fully deformed geometry is already cached for each frame in the timeline, making it much cheaper to render ghosts representing the shape at many different times. Therefore, Maya 2020 introduced the support of Ghosting for Deforming Geometry through Cached Playback. This feature can be enabled through the menu Animation → Visualize → Ghost Selected.
For more information on the ghosting parameters available you can see the full documentation online.
Even though Cached Playback accelerates Ghosting, adding those extra ghosts is not completely free. The following profiles explain the performance implications of ghosting deforming geometry.
Here is what a simple profile looks like for an animated node with Cached Playback:
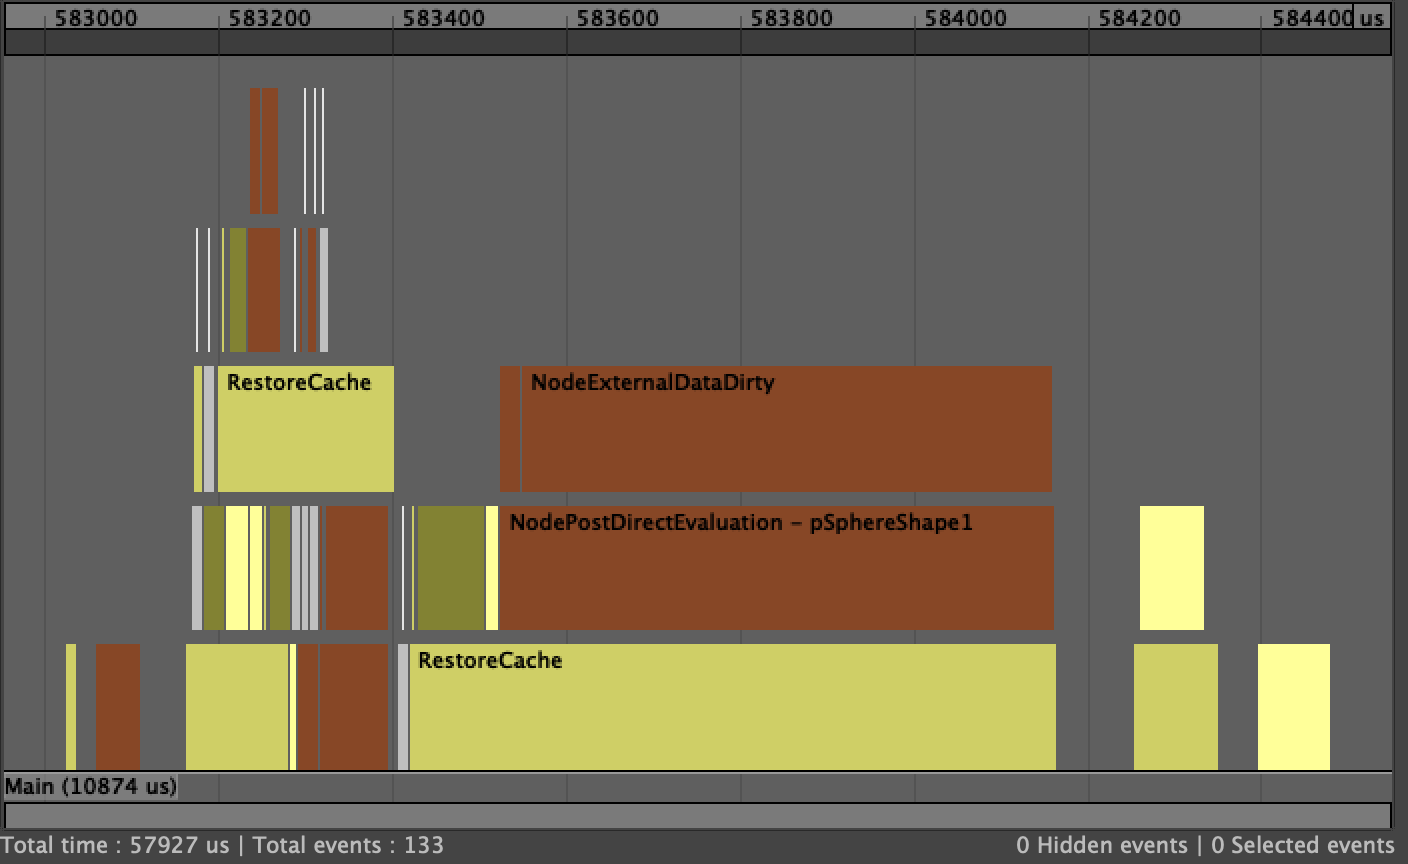
As pSphereShape1 is being restored from the cache, NodeExternalDataDirty is called to notify that any external data dependent on the node being evaluated / restored from cache needs to be updated. In this case, it is mostly the viewport representation of the geometry that needs to be updated, i.e. the VP2 vertex buffers, etc.
With four ghost enabled on the node, the profile looks like this:
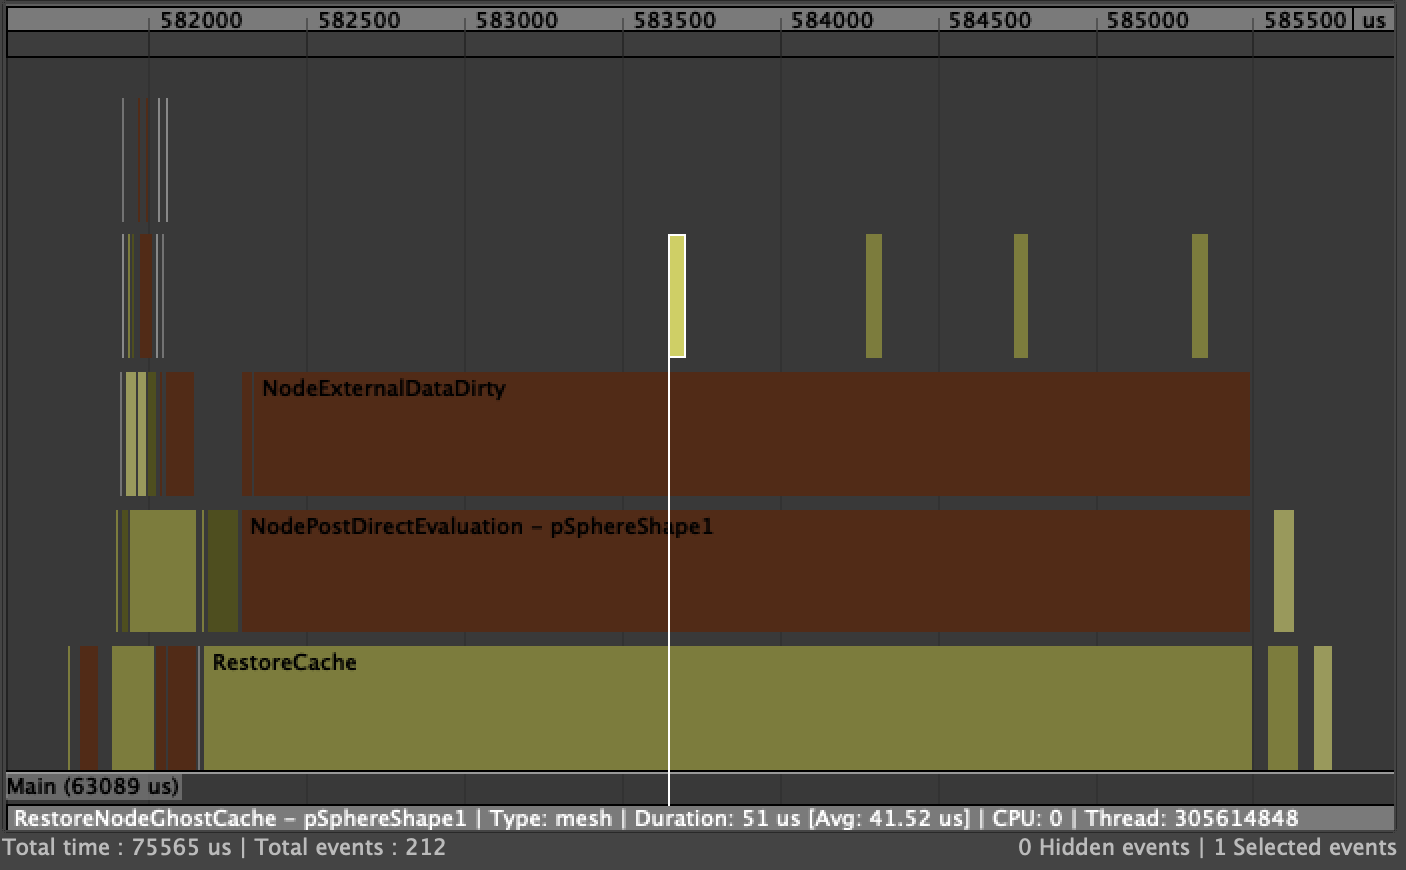
The key event to look for is RestoreNodeGhostCache, which is triggered when the ghost data is retrieved from the cache. These will only show up in Evaluation Cache mode. In this mode, the data extracted from the cache in is an evaluation-friendly, renderer-agnostic format. Therefore, each restored ghost needs to be translated to the viewport-specific representation (see Caching Modes for more information on the different caching formats and the translation phases).
Depending on the complexity of the geometry, these additional conversions between evaluation data and rendering data can take up a significant portion of frame time and therefore have a measurable effect on frame rate, even if the data is cached. That is why it can be much more efficient to use ghosting on deforming geometry with Viewport Software Cache or Viewport Hardware Cache modes.
When in either of the viewport caching modes, the cached data is already in the renderer-friendly format and does not need to be translated. The following profile shows the same scene as above, cached in Viewport Software Cache, without ghosting:
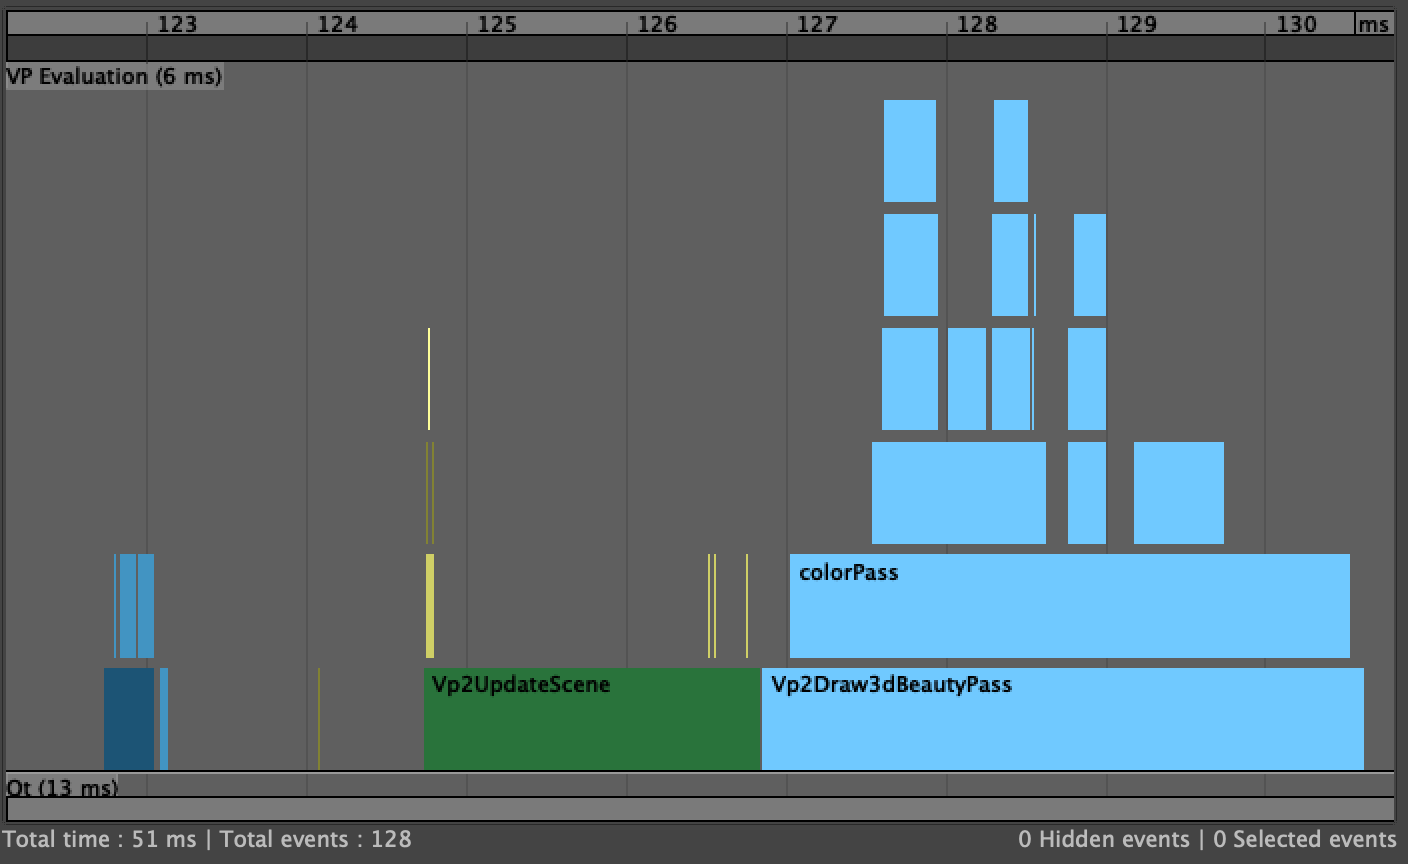
The Vp2UpdateScene section is worth noting, as it is where the additonal ghosting work will show up, as can be seen in the following profile where ghosting is enabled:
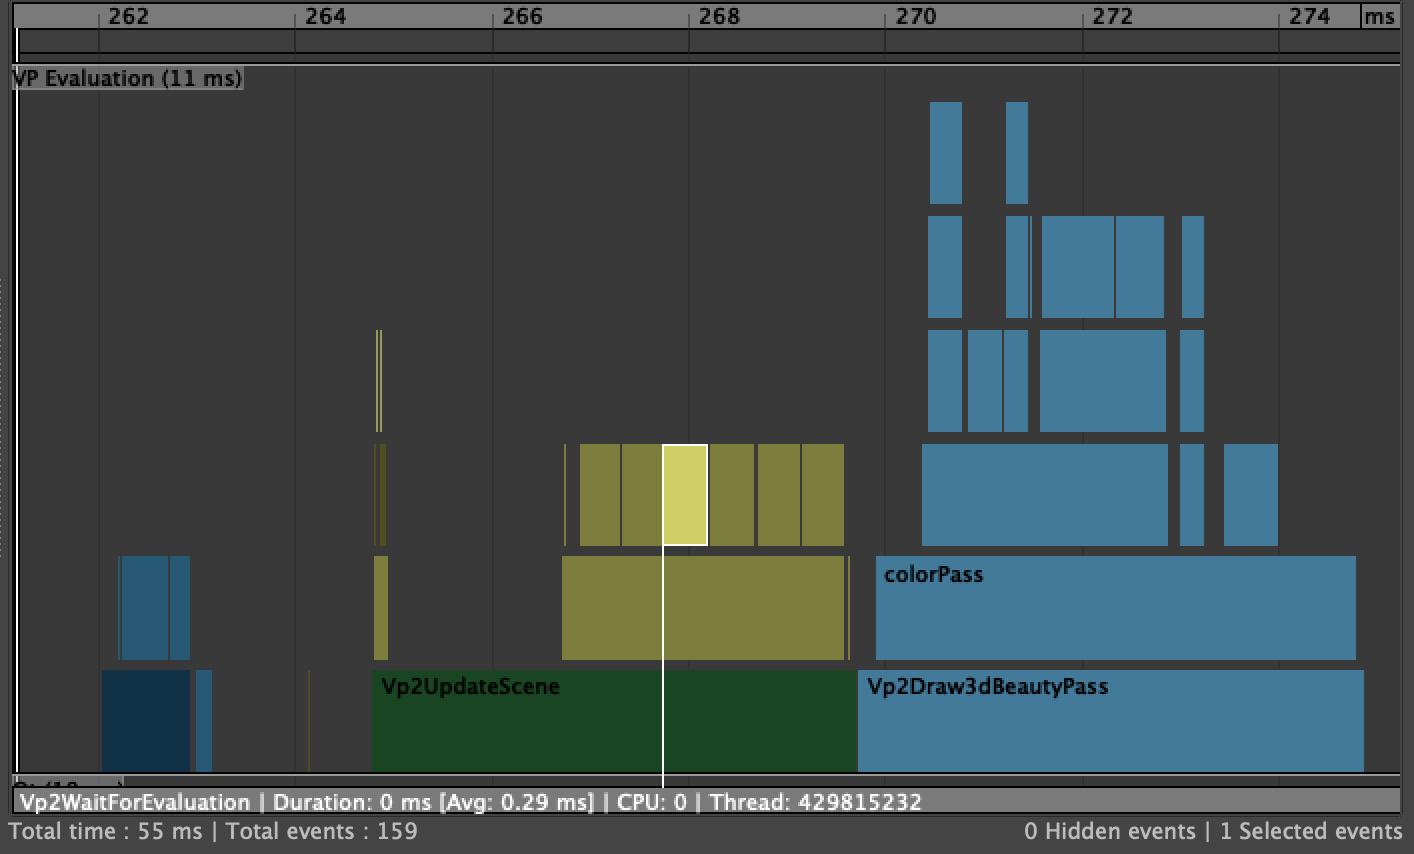
Multiple instances of the Vp2WaitForEvaluation event are being recorded, one for each ghost being drawn. However, in this mode, there is no explicit extraction of evaluation data, only the ready-to-be-rendered buffers a being dealt with by the viewport.
Viewport Software Cache and Viewport Hardware Cache will show similar profiles when rendering. The only difference is that in software mode, the buffers will still need to be uploaded to the GPU before being rendered. In hardware mode, the buffers are already in GPU memory, making it extremely cheap to enable ghosting, since the only additional cost is the actualy GPU work to render those extra ghosts, which usually only represents a very small portion of frame time.
In summary, while Cached Playback now makes it possible to display ghosts for deforming geometry, it is important to understand that there is still extra work involved to render those additional ghosts and the amount of work depends on which Caching Mode is being used.
Scenes and workflows using image sequences on image planes can be accelerated by turning on the Cached Playback. If the scene has a sequence of images applied onto the image plane, instead of loading the images during playback; Maya will now load these images in the background and store them in the Evaluation Cache. During playback, the stored images are restored, allowing for faster playback.
Users should pay attention thad toode>Use Image Sequence option is turned on in the Attribute Editor for the respective image planes. If this option is not selected then the image sequence is not applied to the image plane and will not be cached.
Traditionally in Maya, image planes have always been cached, however the way that caching was done was different from what we offer with Cached Playback. The previous system had images loaded and stored in cache on the first playback, resulting a performance increase on subsequent plays, but causing that first playback to be very slow. Also, no image plane caching system in Maya supported background caching. The new system that is introduced in Maya 2020 provides the ability to cache image plane sequences in background, and have the cache be invalidated and rebuilt in background as required.
It is often preferable to exclude invisible pieces of geometry from the cache. However, not all invisible nodes are treated the same way by Cached Playback.
The invisibility evaluator grabs nodes which do not contribute to a visible object and skips the evaluation of such nodes (for more details, see Using Parallel Maya. This evaluator is of a higher priority than the cache evaluator used to support Cached Playback, so it will own these nodes and they will just never make it to the Cached Playback system. Therefore, as long as the invisibility evaluator is enabled, Cached Playback will not attempt to cache any node that does not contribute a visible object.
However, if an invisible piece of geometry infuences downstream objects which end up being visible, it will not be grabbed by the invisibility evaluator, because skipping the evaluation of such nodes would have a visible effect. Therefore, the invisibility evaluator optimization cannot be applied to those nodes. As a result, Cached Playback will cache those nodes if they are selected as Caching Points.
This is a compromise between caching fewer nodes, which can save memory and improve playback performance, and caching more nodes, which takes more memory but can allow faster manipulation / cache rebuilds since more intermediate data is available. By default, Maya built-in Caching Modes take the simple approach: cache all geometries and transforms. It is possible to use Custom Caching Modes to have finer control over what gets and does not get cached, i.e. in this case to include or not include these intermediate invisible nodes that affect downstream visible parts.
It is also worth noting that nodes with animated visibility are also excluded from the invisibility evaluator. Therefore, Cached Playback will attempt to cache them if they are enabled as Caching Points.
High-density meshes can be challenging for a caching system. The high vertex count results in large amounts of data to be computed, stored and restored. As a result, the number of frames that can be cached is typically small (because of the high memory usage) and the resulting performance disappointing (because of the high cost of moving all this memory around, copying data, etc.). Smooth Mesh Preview significantly increases the complexity of geometries and therefore smoothed meshes are affected by these concerns.
Cached Playback uses a smarter approach to caching smoothed meshes. Instead of naively storing and restoring the fully subdivided geometry, only the base geometry is stored in the cache, resulting in a smaller memory footprint. When the data is restored from the cache, the smoothed geometry has to be computed from the restored base geometry. This is a classic memory vs computation trade-off.
An interesting fact to notice is that while we would expect this kind of trade-off to result in less memory used at the cost of worst runtime performance, it is often not the case. First of all, filling the cache is usually much faster because the subdivided mesh does not need to be computed and a much less dense geometry is stored in the cache. Then, even when restoring from the cache, depending on the setup, performance can be equal or better, especially when using the GPU to do the subdivision as described in the Hybrid Cache section.
In the case where the performance degrades and this trade-off is not desired, it is possible to revert to the naive behavior of storing and restoring the fully smoothed geometry. In the Cache Preferences, simply check the Cache smooth meshes checkbox.
Hybrid Cache is an extension to Caching Modes that allows Cached Playback to be mixed with GPU deformation.
Instead of caching the full geometry after deformation, Hybrid Cache stores and restores the input to the GPU deformation chain. Typically this results in less data being stored, given that the input to the deformer chain (a few matrices, a few animated parameters, etc.) is usually much smaller than the geometry being deformed. This also allows caching the original undeformed static geometry only once for the whole animation and leaving it on the GPU, resulting in smaller transfers between CPU and GPU memory.
Note that deformation chains are not always completely supported on the GPU (see the GPU Override section of the Using Parallel Maya whitepaper). If the first part of the deformer chain is not supported on the GPU, it means that the GPU-deformed part will receive animated geometry. In regular computation, it still makes sense since the geometry data deformed on the CPU will have to be uploaded to the GPU anyways, so Maya might as well performs as much of the remaining deformation on the GPU. However, in the context of Hybrid Cache, caching the geometry data deformed on the GPU before feeding it to the GPU-deformed chain will use the same amount of memory as caching the final output of the chain after all deformation has been applied. So there would be no point in using Hybrid Cache for such chains where the GPU-deformed part receives already-animated geometry. Such chains will be automatically taken out of consideration and Hybrid Cache will not apply in this situation.
For chains fully supported on the GPU, Hybrid Cache manages the input static geometry very efficiently, i.e. by storing a single copy in GPU memory, and leaving that geometry on the GPU for the whole deformation and rendering part. The fact that geometry stays on the GPU can result in great performance gains, especially for large geometries, as well as significant memory usage reduction.
Hybrid Cache can be enabled in the Cache Preferences, by simply choosing one of the options in the Hybrid cache combobox.
For more details on how to use Hybrid Cache as part of a Custom Caching Modes, refer to the hybridCache built-in filter described in the cacheEvaluator command help.
Like most preferences, cache preferences are stored as Maya optionVars. You can identify them by name as they all have the prefix cache. They can be modified in one or more places in the UI, as well as with the optionVar command in MEL or Python.
Here is a complete list of all available optionVars that control caching preferences.
| optionVar Name | Type | Description |
|---|---|---|
| cacheVisibility | bool | When true shows the cache information HUD in the Viewport. |
| cachedPlaybackDiscardFramesOutOfRange | bool | When true proactively flushes any cached data from frames outside the current playback range |
| cachedPlaybackEnable | bool | When true use cached playback |
| cachedPlaybackFillDirection | string | Direction in which the cache loads in the background. Legal values: forward (from the current frame on), backward (from the current frame back), bidirectional (from the current frame alternating forward and backward), and forwardFromBegin (forward from the first frame of animation) |
| cachedPlaybackFillType | string | Choose when the cache is built. Legal values: syncAsync (during playback and in the background), syncOnly (only during playback), asyncOnly (in the background only) |
| cachedPlaybackHeight | integer | Defines the height of the cache status bar within the Time Slider |
| cachedPlaybackMemoryThreshold | float | Amount of system RAM (in percent) being allotted for Cached Playback. |
| cachedPlaybackMode | string | Select how Cached Playback uses system resources to increase performance. Legal values: evaluationCache, viewportSoftware, and viewportHardware) |
| cachedPlaybackPreventFrameSkipping | bool | When true prevents frame skipping while filling the cache in Playback mode |
| cachedPlaybackResourceGuard | bool | When true respects the memory limit and stops caching when it is reached. |
| cachedPlaybackShowWarningMessages | true | When true displays diagnostic messages if caching is disabled |
| optionVar Name | Type | Description |
|---|---|---|
| cachedPlaybackPosition | string | Sets the position of the cache status line relative to the timeline within the Time Slider. Legal values: above and below |
| cachedPlaybackShowCacheStatus | bool | When true displays the Cached Playback status line on the Time Slider |
| cachedPlaybackShowCachedSubframes | true | When true uses the subframe color to indicate the sections of the Time Slider with cached data at subframes |
| cachedPlaybackShowInvalidatedFrames | bool | When true uses the invalidated frame color to indicate sections of the Time Slider with invalidated cached data |
| cachedPlaybackShowWarningFrames | bool | When true uses the warning color in the cache visualization to indicate sections of the timeline where frames are not cached |
These are controlled with the displayRGBColor command. Each frame will have a horizontal bar shown in the Time Slider for various caching states at that frame. (There is only a single caching state per frame.)
| Color Name | Description |
|---|---|
| cachedPlaybackCachedFrames | Color for frames with valid cached data |
| cachedPlaybackUncachedFrames | Color for frames without cached data |
| cachedPlaybackInvalidatedFrames | Color for frames with cached data that may not be valid |
| cachedPlaybackWarningFrames | Color for frames that were not cached due to a warning state (e.g. out of memory) |
| cachedPlaybackCachedSubframes | Color for frames containing valid cached data for subframes |
| cachedPlaybackInvalidatedSubframes | Color for frames containing cached data for subframes that may not be valid |
| cachedPlaybackFramesOPACITY | Opacity for colors displayed in the cache section of the Time Slider |
The online help section on Cached Playback in the Time Slider gives you a detailed visual representation of where are the colors are used. Here is a quick summary:

Tip. The Time Slider’s Cached Playback status line colors entire frames within the cached frame range. When playing back with fractional frames, for example stepping by 0.5 frames, the exact location of those subframes are shown as a single tick in the subframe valid or invalid color.
The Cached Playback system uses various interface elements to control the preferences and show feedback on the current caching state.
Tip. No matter where you update your preference values; the Evaluation Toolkit, the Preferences window, the Cached Playback Toggle, or the
optionVarcommand, all preferences are synchronized. That is, if the Evaluation Toolkit is open and you use the Cached Playback Toggle to enable Cached Playback, the Evaluation Toolkit state is immediately updated.
The Memory Limit options let you allocate a percentage of your memory as an upper boundary for the memory the cache uses, as well as a flag to enable or disable checking that memory. Keep the memory usage of the cache within a reasonable range, such as 60-75%, to prevent cache memory from paging, to ensure optimal playback performance.
The percentage of memory use is calculated by Maya’s current memory use divided by the total memory available. This memory allotment represents more than just memory used by the cache, so adjust your resource limit percentage based on the amount of memory it takes to load your scene.
When the memory resource limit is enabled and reached, caching stops and the remaining uncached frames are shown in the Time Slider in the warning color.
Tip. Set the
cachedPlaybackDiscardFramesOutOfRangeoptionVar to true to ensure you are not using up caching memory to store frames that are not within your current playback range.
The Cached Playback system has some limitations, such as unsupported nodes. When it encounters these limitations, a yellow warning message appears in the Help line to alert you,

along with a detailed explanation in the Script Editor.

The Cached Playback Toggle also changes to the warning icon until the cause of the warning has been addressed.
Efforts have been made to prevent duplicate warning messages as they will impact performance. Warning messages may reappear whenever you make a change to the scene that could affect the cache, such as adjusting memory limits or adding new animated objects, as confirmation that the adverse effect will persist after the change.
You can use Python to control Cached Playback preferences.
The following example shows how you can determine whether Cached Playback is enabled or not, and then enables Cached Playback.
from maya.plugin.evaluator.cache_preferences import CachePreferenceEnabled

# Determine whether caching is enabled or not.
if CachePreferenceEnabled().get_value():
    print "Cache is enabled"
else:
    print "Cache is disabled"

#  Enable caching.
CachePreferenceEnabled().set_value( True )
To choose between the different built-in Caching Modes, use the CachedPreferenceMode object:
from maya.plugin.evaluator.cache_preferences import CachePreferenceMode

# Print the current mode.
print "Cache mode is : {}".format(CachePreferenceMode().get_value())

# To set Evaluation Cache
CachePreferenceMode().set_value( 'evaluationCache' )
# To set Viewport Software Cache
CachePreferenceMode().set_value( 'viewportSoftware' )
# To set Viewport Hardware Cache
CachePreferenceMode().set_value( 'viewportHardware' )
You can find the various configuration objects defined in the maya.plugin.evaluator.cache_preferences and maya.plugin.evaluator.cache_optionvar_states Python packages:
CachePreferenceEnabledCachePreferencePreventFrameSkippingCachePreferenceModeCachePreferenceFillTypeCachePreferenceFillDirectionCachePreferenceHudCachePreferenceResourceGuardCachePreferenceMemoryThresholdCachePreferenceDiscardFramesOutOfRangeCachePreferenceShowCacheStatusCachePreferenceShowInvalidatedFramesCachePreferenceShowSubframesCachePreferenceShowWarningFramesCachePreferenceTimesliderBarHeightCachePreferenceTimesliderBarSpacingCachePreferenceTimesliderBarPositionCachePreferenceShowWarningMessagesSee the optionVars section for a description of these parameters.
This section describes tools that can be used to help with debugging of Cached Playback correctness and performance. Two of the most useful sets of tools can be found in the sections describing the Evaluation Toolkit section and the Profiling Your Scene section of the Using Parallel Maya whitepaper.
In addition to these tools a cache-specific dbpeek operation has been added (see the dbpeek section of the Using Parallel Maya whitepaper for more detail). It allows inspection of the cached frames and data.
Show the contents of the current evaluation cache. The results will be returned in a JSON format for easy parsing. Different arguments result in different values being included. Arguments are specified to the command using the syntax maya.cmds.dbpeek( operation='cache', argument=[X,Y,Z...] )
| Argument | Meaning |
|---|---|
| frame=X | Select frames for including in the output. Once any frame arguments are specified they will define the total number of frames shown. You can combine values in a comma separated string as well, e.g. ‘frame=4,7,10:19’. If not specified then all cached frames are shown. frame=# Add one specific frame frame=#:# Add an inclusive range of frames frame=!# Skip a single frame frame=!#:# Skip a range of frames |
| type=X | Filters output to only include attributes whose data types match the ones specified in the argument. Multiple types can be combined as a comma-separated list, e.g. ‘type=matrix,number’. If not specified then attributes with all data types that can be cached in a node are shown. type=matrix Show matrix-valued attributes, e.g. worldMatrix type=vector Show vector-valued attributes, e.g. translate type=number Show single-valued numeric attributes, e.g. visibility |
| attribute=X | Filters output to only include attributes whose names match those on the comma-separated list, e.g. ‘attribute=matrix,worldMatrix’. If not specified then all cached attributes are shown. |
| invalid | Includes all of the invalid data currently residing in the cache. If not specified then only valid cached data is shown. |
| data | As much as possible, include the detailed values for the cached data that satisfies the above filters. If not specified then only the frame numbers in the cache are shown. |
| state | Include all of the internal state information for the data in the cache. The default is to only show the actual data. |
Warning: Do not use this command to check what cache frames are valid. It may contain invalidated frames.
dbpeek can generate internal status information to debug invalidation issues: with maya.cmds.dbpeek( operation='cache', argument='state' ), one can peek into partial invalidation data from its output.
dbpeek can also visualize cached data. Some data types are not shown in detail. For those that are available the data argument is used. The command maya.cmds.dbpeek( operation='cache', argument=['data', 'frame=3'] ) illustrates how the data is formatted and how the output is filtered based on frame numbers.
"cluster1Handle.translate":{
    "attribute": "translate",
    "value": { "double[3]": [-0.055,0.007,0.0] }
}
Warning:
dbpeek(cache)is only intended be used for diagnostic purposes, its output may change in any future Maya patch or release.
While plug-ins have always been required to handle evaluation in all MDGContexts, with Cached Playback, now it is even more important that this requirement is met. Cached Playback uses background evaluation in time-based contexts to populate the caches so any code that does not respect the current context could potentially cache incorrect data.
Tip. A change was made in Maya 2018 to introduce the concept of a current context.
You should no longer be passing around contexts or using deprecated methods that pass around contexts. If you need to reference the context explicitly, get it from MDGContext::current().
Context-specific data is defined as any information that you use in your plug-in node’s compute() method, or other methods used to compute plug values. Normally, this takes the form of plug values within your datablock, and if possible, use this location as it will reduce the requirement for synchronization in your code.
Sometimes you may need to store data outside the datablock. For example, a complex structure that cannot be represented with attribute types. In these situations you must ensure that a uniquely identifiable copy of your data exists for each evaluation context. A simple way to implement this is to use a hash table whose key is the MDGContext time value, with one extra slot for the normal context, and whose values are the context-specific data in your node.
Tip. When new datablocks are created for different contexts, they are initialized to the same values as the datablock for the normal context, so your context-specific data should do the same.
With caching running in background threads, it is likely that your node will be visited by different threads with different contexts. However, the evaluation engine ensures that no one node will have an evaluation request for more than one context at the same time. There should be no need for mutexes in your evaluation code, which are not recommended due to potential performance issues.
To determine if your plug-in can correctly operate in a caching environment you can use the built-in validation tools. To do this, create a representative scene that uses of your plug-in nodes, enable caching on your plug-in node types, and then run the validation tests.
To enable caching for your particular node type, you must add it to the caching rules. Here is how to enable evaluation caching for your plug-in node MyNodeType.
| L newage | Code to enable Evaluation Cache |
|---|---|
| MEL | cacheEvaluator -newFilter "nodeTypes" -newFilterParam "types=+MyNodeType" -newAction "enableEvaluationCache"; |
| Python | maya.cmds.cacheEvaluator( newFilter='nodeTypes', newFilterParam='types=+MyNodeType', newAction='enableEvaluationCache') |
You can also use the same command with slightly different parameters to enable viewportSoftware caching:
| Language | Code to enable Viewport Software Cache |
|---|---|
| MEL | cacheEvaluator -newFilter "nodeTypes" -newFilterParam "types=+MyNodeType" -newAction "enableVP2Cache" -newActionParam "useHardware=0"; |
| Python | maya.cmds.cacheEvaluator( newFilter='nodeTypes', newFilterParam='types=+MyNodeType', newAction='enableVP2Cache', newActionParam='useHardware=0') |
and also viewportHardware caching:
| Language | Code to enable Viewport Hardware Cache |
|---|---|
| MEL | cacheEvaluator -newFilter "nodeTypes" -newFilterParam "types=+MyNodeType" -newAction "enableVP2Cache" -newActionParam "useHardware=1"; |
| Python | `maya.cmds.cacheEvaluator( newFilter=‘nodeTypes’, newFilterParam=‘types=+MyNodeType’, newAction=‘enableVP2Cache’, newActionParam=‘useHardware=1’) |
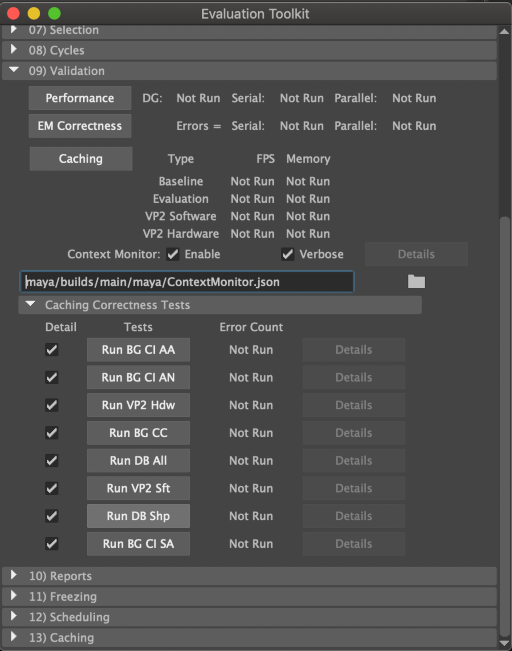
There are built-in tests that let you see if your nodes respect the context and will behave well in a caching environment. You can find these in the Evaluation Toolkit (Windows → General Editors → Evaluation Toolkit)
Create a sample scene that contains some of your plug-in nodes with animation so that you can test their operation. You can use any scene, though it is best if they resemble scenes you typically see in your environment. The only requirement is that there is animation on the plug-in nodes, as otherwise the Evaluation Manager will not cache them using the caching rules you have created.
The first set of tests measure the performance of the supported Caching Modes against an uncached baseline. To run these tests, use the Caching button. The frame rates and memory usage of the cache will populate the table next to the button.
Once you have your performance results, check for areas of the code where evaluation does not respect the current context. Do this by checking both Enable and Verbose options of the Context Monitor and rerunning the performance tests. These checks will impact performance slightly, which is why it is best to run the tests twice.
There are several different evaluation tests in the Caching Correctness Tests section. They ensure that the background evaluation used by caching returns the correct values. Run them in any order; they will populate the Error Count column when complete. Ideally run these tests with the Detail checkbox enabled. This way if any test returns a non-zero error count, you can use the corresponding Details button to show more information on the failure.
In the 13) Caching section of the Evaluation Toolkit are several parameters that modify how caching is performed. Try changing the parameters and re-running your tests to ensure that caching behaves well in every situation. Particularly, you can lower the memory limit % of RAM to force the out of memory condition that halts caching to test playback in a mixed cached/uncached mode.
Maya 2020 introduced Cached-Playback-specific APIs to provide more control and customization to plug-in writers. The following methods were added to MPxNode:
See MPxNode::getCacheSetup() and the apiMeshShape and simpleSimulationNode samples.
This method allows plug-in writers to tell Maya that a node properly supports background evaluation and Cached Playback, and therefore should be cached by the default built-in Caching Modes. Without the use of this API, the only way to make custom plug-in nodes work with Cached Playback was to use the commands in the Enable Caching on Your Plug-in Node Types section. These commands had to be entered by the Maya user, making it very challenging to make custom plug-in nodes work with Cached Playback by default. This new API empowers plug-in writers to provide a better out-of-the-box experience with their custom nodes. The MNodeCacheSetupInfo parameter can be used to ask to be cached by default. Here is an example of how it could be used to do so:
void MyNode::getCacheSetup( const MEvaluationNode& evalNode,
                            MNodeCacheDisablingInfo& disablingInfo,
                            MNodeCacheSetupInfo& cacheSetupInfo,
                            MObjectArray& monitoredAttributes ) const
{
    MPxNode::getCacheSetup(
        evalNode, disablingInfo, cacheSetupInfo, monitoredAttributes
        );
    assert(!disablingInfo.getCacheDisabled());

    cacheSetupInfo.setPreference(
        MNodeCacheSetupInfo::kWantToCacheByDefault, true
        );
}
This method also allows custom nodes to be marked as unsafe for background evaluation and Cached Playback. Such nodes will simply cause Cached Playback to be disabled if they are animated. This provides a safety mechanism for unsafe nodes. See the MNodeCacheDisablingInfo parameter. Here is an example of how it could be used to disable Cached Playback:
void MyNode::getCacheSetup( const MEvaluationNode& evalNode,
                            MNodeCacheDisablingInfo& disablingInfo,
                            MNodeCacheSetupInfo& cacheSetupInfo,
                            MObjectArray& monitoredAttributes ) const
{
    disablingInfo.setCacheDisabled(true);
    disablingInfo.setReason(
        "The presence of an unsupported node has triggered Safe Mode, "
        "and caching is disabled."
        );
    disablingInfo.setMitigation(
        "Remove animation from the unsupported node, "
        "or delete the node entirely, to resume caching."
        );
}
Or using MNodeCacheDisablingInfoHelper for convenience:
void MyNode::getCacheSetup( const MEvaluationNode& evalNode,
                            MNodeCacheDisablingInfo& disablingInfo,
                            MNodeCacheSetupInfo& cacheSetupInfo,
                            MObjectArray& monitoredAttributes ) const
{
    // Before the call to setUnsafeNode(),
    // Cached Playback is not disabled yet.
    assert(!disablingInfo.getCacheDisabled());

    // Disable Cached Playback, set reason and mitigation strings.
    MNodeCacheDisablingInfoHelper::setUnsafeNode(disablingInfo, evalNode);

    // After the call to setUnsafeNode(),
    // Cached Playback is disabled.
    assert(disablingInfo.getCacheDisabled());
}
The method also allows notifying Cached Playback that a given node is using simulation. Simulation has different requirements than most nodes because each frame depends on the previous one. This adds restrictions to the order in which the cache can be filled, as well as on the invalidation mechanism. The MNodeCacheSetupInfo parameter can be used to request to be considered a simulation node. Here is an example of how it could be used to request simulation support:
void MyNode::getCacheSetup( const MEvaluationNode& evalNode,
                            MNodeCacheDisablingInfo& disablingInfo,
                            MNodeCacheSetupInfo& cacheSetupInfo,
                            MObjectArray& monitoredAttributes ) const
{
    MPxNode::getCacheSetup(
        evalNode, disablingInfo, cacheSetupInfo, monitoredAttributes
        );
    assert(!disablingInfo.getCacheDisabled());

    cacheSetupInfo.setRequirement(
        MNodeCacheSetupInfo::kSimulationSupport, true
        );
}
Finally, some of this configuration might depend on the value of certain attributes. Section Nodes Default Behavior lists nodes for which the configuration depends on attribute value. For example, the simulation behavior of a node might be controlled by a given attribute, like the enable attribute on the nucleus node. Depending on whether this attribute is true or false, the behavior may change and might not require simulation support from Cached Playback. When the configuration depends on such attributes, special handling is often required. If the attribute is animated, then the worst-case scenario usually has to be considered. In this example, simulation support needs to be requested. If the attribute is not animated, this setup method needs to be called again when the attribute value changes. The monitoredAttributes parameter is meant to hold this list of attributes. If a node’s cache setup depends on the value of an attribute, it just needs to be added to the monitoredAttributes list and Maya will handle re-configuration when the attribute changes.
This method allows extra configuration when a node participates in Cached Playback.
More specifically, it allows marking additional attributes to be cached. This can be useful to cache input attributes. By default, input attributes are not cached by Cached Playback, because we usually only care about the output. However, a custom plug-in node might require the value of input attributes that are used directly to render the node. In this case, the attributes can be added to the MCacheSchema so they are cached as well.
See MPxNode::transformInvalidationRange() and the simpleSimulationNode sample.
This method can be use to affect the invalidation range for a given edit in the scene.
This can be very useful in case the node behavior has some time dependencies. Simulation nodes are often in this situation. For instance, if frames 10 to 15 are being invalidated by editing a key, it often means that all subsequent frames are also invalid, since the simulation has to run again. It can also mean that frames before frame 10 have to be recomputed if the simulation cannot restart at any point and has to recompute from the beginning. This method allows the implementation of such logic for custom plug-in nodes.
For more details, see Invalidation Range Transformation.
Support for Viewport Software Cache and Viewport Hardware Cache mode can be done through the MPxGeometryOverride class.
The node can then assess that it supports Viewport Cache by returning true from the MPxGeometryOverride::supportsVP2CustomCaching() method. Note that MPxGeometryOverride also has a MPxGeometryOverride::configCache() method, similar to MPxNode::configCache(), to add extra configuration when used in Viewport Cache.
Examples of how to implement support for Viewport Cache can be found in: