
Show Edges and Wireframe
This example includes two related examples:
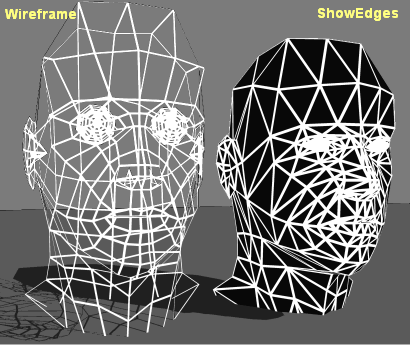
- ShowEdges is a basic mental ray shader that draws a thick border along the edges of a polygon mesh. ShowEdges renders the triangulated version of the mesh that is sent to mental ray.
Wireframe also draws edges, but it shows the true edges (before tesselation). Wireframe uses a UserDataBlob to pass edge information to a shader (which shows how to map Softimage user data into mental ray user data). A custom operator populates the UserDataBlob with the edge information. An operator is used rather than a custom command because whenever the geometry changes, Softimage re-evaluates the operator and re-renders the object. The operater and the shader are contained in the same DLL/SO, and this file is located in the Application\Plugins directory instead of the conventional shader directory (Application\bin\{CPU}) so that Softimage automatically loads it as a self-installed plugin. This approach is convenient for implementing both a shader and an operator together in an single dll, but it means that the normal ability to have multiple platform binaries on a single workgroup would not work. To support that configuration the example would be implemented as two separate dlls.
The difference between Wireframe and ShowEdges is illustrated in the figure below, which shows how the two examples render the same mesh.
Comparison of Wireframe and ShowEdges
Example Files
| Location | |
| ShowEdges |
show_edges.spdl
show_edges.cpp
show_edges.h
show_edges_dll.cpp
show_edges.vcproj
GNUmakefile
|
| WireFrame Files |
WireframeOp.cpp
WireframeShader.cpp
WireframeShader.spdl
Wireframe.vcproj
GNUmakefile
|
Running the Example
 , locate the workgroup folder and then click Select.
 to go to Softimage Net local. In the top navigation bar, click add-ons, and then click the SDK example add-on.
To run the ShowEdges example
In a script editor, run this demo script:
// [ Jscript ] Demo script for ShowEdges NewScene( null, false ); var oSphere = ActiveSceneRoot.AddGeometry( "Sphere", "MeshSurface" ); SelectObj( oSphere ); var oMaterial = oSphere.AddMaterial( "show_edges.Preset",false,"ShowEdges"); InspectObj( oMaterial.Parameters("Surface").Source );- Draw a render region.
To run the Wireframe example
In a script editor, run this demo script:
'[VBScript] Demo program for the Wireframe Softimage shader example NewScene , false ' Create test sphere set object = ActiveSceneRoot.AddGeometry( "Sphere", "MeshSurface" ) SetupObject object 'Shadow effect set oGrid = ActiveSceneRoot.AddGeometry( "Grid", "MeshSurface" ) Translate oGrid, 0, -5, 0, siAbsolute, siParent, siObj, siY oGrid.ulength = 100 oGrid.vlength = 100 SetValue "light.light.soft_light.shadow", True sub SetupObject( in_obj ) ' Add the UserDataBlob property and set it renderable ' The UserDataID must be set to the specific ID that ' the shader is expecting set prop = in_obj.AddProperty( "UserDataBlob" ) prop.RenderData = True prop.UserDataID = 6789 on error resume next prop.AddCustomOp "WireframeOp",in_obj.ActivePrimitive if ( err <> 0 ) then MsgBox "Failed to create WriteframeOp Custom Operator" & vbCrLf & _ "Please make sure the example is fully installed" exit sub end if on error goto 0 ' Add wireframe shader to an empty material set material = in_obj.AddMaterial set oSurfParam = material.Parameters( "surface" ) set oSpriteShader = oSurfParam.connectfrompreset( "Sprite", siMaterialShaderFamily ) material.Parameters("Shadow").Connect( oSpriteShader ) set inputParam = oSpriteShader.Parameters( "input" ) on error resume next set oWireShader = inputParam.connectfrompreset( "WireframeShader", siTextureShaderFamily ) if ( err <> 0 ) then MsgBox "Failed to create WriteframeShader " & vbCrLf & _ "Please make sure the example is fully installed" exit sub end if oWireShader.Parameters("wire_width").value = 0.1 oWireShader.Parameters("base_color").Parameters("red").value = 1 oWireShader.Parameters("base_color").Parameters("green").value = 1 oWireShader.Parameters("base_color").Parameters("blue").value = 1 oWireShader.Parameters("base_color").Parameters("alpha").value = 0 InspectObj oWireShader end sub- Draw a render region.
Building the C++ Example
The Softimage SDK includes a compiled version of ShowEdges. If you want to modify the code, you can rebuild the shader by following these instructions.
To build ShowEdges on Windows
Open an Softimage command prompt, and type devenv to start Visual Studio .NET.
Starting Visual Studio .NET from an Softimage command prompt ensures that environment variables such as XSISDK_ROOT are set (otherwise you'll get build and link errors).
Tip To load the show_edges project from the command line, type:
devenv cppsrc_ShowEdges\show_edges.vcproj- In Visual Studio .NET, open the project file .vcproj.
- Select a configuration (Release or Debug) and build the DLL.
To build Wireframe on Windows
Open an Softimage command prompt, and type devenv to start Visual Studio .NET.
Starting Visual Studio .NET from an Softimage command prompt ensures that environment variables such as XSISDK_ROOT are set (otherwise you'll get build and link errors).
Tip To load the Wireframe project from the command line, type:
devenv cppsrc_Wireframe\Wireframe.vcproj- In Visual Studio .NET, open the project file .vcproj.
- Select a configuration (Release or Debug) and build the DLL.
To build the example on Linux
-
In a shell (tcsh) window, type:
source $XSI_HOME/.xsi_<xsi_version> -
Change directories to
cppsrc_ShowEdges -
To remove all intermediate files before building the example, run this command:
gmake clean
-
To compile the example, run this command:
gmake
Keywords
This example uses the following keywords:
mental ray, shader, tessellated, geometry, edges, polygon, C++ example, operator, Update, InputPort, OutputPort, UserData, UserDataBlob, GetUserData, user data, segments, CSegmentRefArray, GetSegments, CPointRefArray, MATH, CVector3, miQ_FUNC_USERPTR, miQ_INST_DATA, miQ_DATA_LABEL, miQ_DATA_PARAM